Quantcast
Channel: THE CHEF and HER KITCHEN
Viewing all 520 articles
Browse latest View live

Cucumber-Mint Yogurt Dip | Easy Dip Recipes

$
0
0
sour cream dip
Chips and Dips are always a hit in any party. Most of the dips can be prepared ahead and hence makes it easy to serve immediately when you have guests at home.I am sharing a simple dip recipe using hung yogurt which goes well with any kind of crackers,chips and cut vegetables.All the ingredients used in this recipe are easily available,try this dip when you have guests over next time.I am sure you would definitely have a nice time while munching those chips with this dip.

Check out dip recipes in my blog:
Cucumber-Mint Yogurt Dip:
(makes 1 bowl approx)

Ingredients:
1 cup Hung Curd(approx prepared from 1 1/4 cups curd) 
1 tbsp Mayonnaise
1 medium Cucumber,peeled and finely chopped
2 tbsp Mint leaves,chopped
1 tsp Lemon juice
1/4 tsp Black pepper powder,freshly pounded
Salt to taste 
Red chili flakes,to garnish

Method:
to prepare Hung curd:
  • Tie the curd in muslin cloth for 1-2 hrs.Keep a vessel below to collect the water from it.
to prepare Dip:
  • Peel the cucumber and chop it very finely.
  • Add the chopped cucumber and mint leaves along with lemon juice,salt and pepper to hung curd and mix well.
  • Garnish it with red chili flakes and serve it immediately.You can prepare this dip ahead and refrigerate it for better taste.
Serve the dip with tortillas/chips/cut vegetables or also as a side dish for an exotic meal.

Notes:
  1. You can add finely chopped scallions or onions to the dip.
  2. This dip can be prepared ahead and refrigerate it for better taste.
  3. You can even replace hung curd with sour cream.In that case you can avoid mayonnaise.
  4. Adjust the seasoning according to your wish.
cucumber mint dip

Stuffed Bell Peppers with Corn and Cottage Cheese

$
0
0
stuffed bell peppers
It is not necessary that an exotic looking dish should be complicated to prepare. Today's recipe is one such example.These Stuffed Bell peppers look quite exotic but they are relatively simple to prepare.While the options for the stuffing are endless, I chose a classic Corn-Cottage cheese filling which works beautifully as a stuffing for bell peppers.I have previously posted a Stuffed Capsicum recipe with lentil filling,a typical South Indian variety and also Potato stuffed Capsicum in a rich Restaurant style gravy which pairs nicely with Naans,Rotis and Pilaf varieties.
stuffed bell peppers
While the nuts add a nutty crunch,the puffed up raisins add a slight sweetness to the filling and the oozing cheese makes the Bell peppers taste delicious.You can serve these beautiful Stuffed Bell Peppers as an appetizer as a side dish for Pasta,Noodles or flavored Rice varieties with Sauce.It is a nice party dish and goes with anything.
stuffed bell peppers
If you are interested check out few Indian style Stuffed Capsicum recipes here:
stuffed bell peppers

Stuffed Bell Peppers with Corn and Paneer(Cottage cheese):
(Serves 2)

Ingredients:
2 Red Bell peppers(or yellow)
1 tbsp Oil/butter,for basting

for marinade:
1 tbsp Lemon juice
1 tsp Ginger-Garlic paste
1 tbsp Oil
Salt to taste

for filling:
1/2 cup finely chopped fresh Paneer(Cottage Cheese)
1/2 cup fresh/frozen Sweet Corn kernels,boiled
1 small Onion,finely chopped
1 tbsp chopped Cashew nuts
12-15 Raisins
2 tbsp chopped Coriander
1 tsp Mixed Herbs or Herbs de Provence
1/2 tsp Red chili flakes
juice of 1/2 Lemon
2-3 Green chillies,finely chopped
1/2 cup grated Mozzarella Cheese
1 tbsp Olive Oil
Salt to taste

Method:
  • Cut the bell peppers into two equal halves with the stem intact.Scoop out the seeds neatly with the help of a knife.
  • In a bowl mix all the ingredients mentioned under marinade- lemon juice,ginger-garlic paste,oil and salt and rub this marinade liberally on the inside of bell peppers and leave them aside for half an hour.
  • Mean while take a pan and heat olive oil and add onions and fry until they turn slight brown in color.
  • Add chopped green chillies, cashew nuts and raisins and fry for a couple of minutes until the raisins puff up.
  • Add boiled corn and fry for a minute and add chopped fresh paneer(cottage cheese) and mix well. Add salt,red chili flakes and mixed herbs and mix well.
  • Remove from heat and add coriander leaves,lemon juice and 2 tbsp of mozzarella cheese and mix nicely.
  • Remove the extra water from red peppers(which is because of the marinade) and rub oil on the outside of bell peppers.
  • Stuff them with this corn-paneer mixture and top the bell peppers with the remaining grated mozzarella cheese to cover the filling.
  • Preheat the oven at 180 deg C for 10 mins.
  • Line a baking tray with foil and apply some oil on it.
  • Place the stuffed bell peppers on the baking sheet and grill it in preheated oven for 12-15 mins until the cheese melts on top and the bell peppers wilt.Check it in between and bash it with more oil/butter if needed.
Serve them hot with Pasta/Noodles/flavored Rice or as a snack/appetizer.
stuffed bell peppers

Notes:
  1. You can use mixed bell peppers or capsicum in the recipe.
  2. You can add Indian flavors to it by replacing the herbs with Garam masala and Cumin powder.
  3. I have used cheese slices to cover the bell peppers as I did not have mozzarella cheese that time.
  4. You can grill them in tandoor or on the stove top.If you are doing on stove top place wide nonstick  pan and heat a couple of tsp of oil and place the stuffed bell peppers and cover it with lid and keep on low- medium flame.Let them fry until the cheese melts and the bell peppers wilt.
  5. You can use Tofu instead of cottage cheese in the recipe.
stuffed bell peppers

Cilantro Lime Rice Recipe | Easy Mexican Recipes

$
0
0
chipotle style cilantro lime rice
Cilantro lime rice is one of the main components of the famous Chipotle style Mexican Burrito Bowl.It is the most easiest recipe which can be prepared with minimal ingredients available in the kitchen.You do not need to make the complete Burrito bowl to enjoy this Cilantro-Lime rice.It pairs up beautifully with any spicy dish and I like to pair it with a spicy bell pepper sauce and Cucumber-Sour cream dip or Rajma.
 chipotle style cilantro lime rice

Chipotle style Cilantro Lime Rice Recipe:
(Serves 2)

Ingredients:
1 cup Basmati Rice or Long grain Rice
Juice of 1 big Lime
3-4 tbsp chopped fresh Coriander leaves
1 tbsp Olive Oil/Butter
Salt to taste

Method:
  • Wash and Soak Basmati rice for 10-15 mins.Drain the water and keep it aside.
  • Heat olive oil/butter in a thick bottomed kadai and add rice and fry well until it becomes translucent.
  • Add 2 cups of water and add salt and few drops of lime juice and cover it and cook it on low flame for 12-15 mins until it is cooked completely.Once the rice is done keep it covered for 10 mins.
  • Fluff up the rice with a fork carefully,do not over do this.Add the rest of lime juice,chopped coriander and mix well and keep it aside for 10-15 mins until the flavors blend well.
Serve it with any spicy side dish or spicy bell pepper sauce(recipe below) and Cucumber-Sour cream dip like I did.I even served Broccoli stir fry as a side.
You can even use it in your burrito bowl.I like to combine this with Indian Kidney beans -Rajma .
cilantro lime rice
Notes:
  1. Sometimes the rice turn bitter if lime juice is added to rice while cooking,hence I prefer to add it after the rice is cooked.
  2. Adding few drops of lime juice while cooking makes the rice fluffy and would not stick.
  3. You can saute 2-3 finely chopped garlic pods and 1 finely chopped onion in the oil before adding the rice.
  4. If you have vegetable stock in hand,use it instead of water,it makes the rice even more flavorful.
  5. You can use any neutral flavored oil instead of olive oil in the recipe.
  6. You can use this rice to stuff in a burrito with sour cream,salsa and veggies to make a wrap.
cilantro lime rice

spicy bell pepper sauce

Spicy Bell Pepper Sauce Recipe:

Ingredients:
1/2 Red bell pepper,finely chopped
1/2 Yellow bell pepper,finely chopped
1 small Onion,finely chopped
2-3 big Garlic pods,finely chopped
1 tsp Corn flour
few drops of Vinegar(or Soya sauce)
few drops of Tabasco sauce or Hot sauce
1 tsp Mixed Herbs or Herbs de Provence
1/2 tsp Red chili flakes
1/2 tsp Pepper powder
1 tbsp Olive oil
Salt to taste
Method:
  • Heat olive oil and add chopped garlic and onion and saute it nicely.
  • Add finely chopped bell peppers and saute them for a couple of minute.Keep them crunchy and do not let them become soft.
  • Add red chili flakes and herbs to it and saute for a minute.
  • Add 1 cup of water and let it come to a boil.
  • Add salt and pepper powder to it and mix well.
  • Meanwhile mix cornflour in 2-3 tbsp of water nicely and add this to the boiling mixture and mix it nicely so that no lumps would be formed.Let it boil for 3-4 mins until the sauce becomes thick.
  • Add tabasco sauce, soya sauce or vinegar to it and mix well and switch off the flame immediately.
Serve it with Cilantro lime rice.
cilantro lime rice
Notes:
  1. Adjust the seasonings,sauces according to your taste buds.
  2. I like the hint of soya sauce in the sauce,it is optional.You can add just vinegar or soya sauce or both.
spicy bell pepper sauce

Indo-Mexican Fusion Meal | Weekend Lunch Ideas

$
0
0
 indo mexican meal
On a daily basis my usual preference would be for either a simple South Indian or North Indian dish or at times Indo-Chinese or Pasta.I usually love making an elaborate menu for friday dinners or for a weekend lunch.It was one such day a couple of weeks earlier when I wanted to make something elaborate and serve it in the restaurant style and I chose the theme as Mexican,however it turned out as half Indian Mexican and so I can call my meal as Indo-Mexican or a Fusion meal.
indo mexican meal
This meal can be even converted to a Mexican Sizzler by plating it on the sizzler plate.I will try posting some sizzler recipes in my blog sometime.The preparation of the entire meal is a bit time consuming but if you can plan ahead and do slight preparation it would make the job easy when you are planning the meal.Try this Indo Mexican meal and let me know if you like it.
Check out the closer view of the meal below where I have highlighted each dish separately
indo mexican meal
Few recipes make a mark in my mind and I try making them.Chipotle style Burrito Bowl was one such dish.It is a combination of  Cilantro-Lime rice with Pinto or Black beans,Corn or meat,Guacamole,Salsa and Sour cream which makes a complete set meal.But I could not make the entire meal as I could'nt fetch all the ingredients when I planned making it.I have created my own set meal,though not exactly Mexican with the ingredients which were available in my pantry.This meal can be rather called as Indo-Mexican or just a Fusion meal.I have adapted few recipes and modified them conveniently to suit our taste buds.But I intend to prepare that Burrito Bowl sometime and post it.
cilantro lime rice

stuffed bell peppers

As I have posted most of the recipes in this meal,I am just linking all the recipes as follows.The meal consists of:
indo mexican meal

Easy Mango Pickle Recipe | Karnataka style Mango Pickle

$
0
0
easy mango pickle
I have posted several Mango Pickle recipes in my blog and I still have many more versions to share. Most of my Andhra Mango pickles were tried by my readers and they even gave good feedback. Today I am sharing a simple and easy Mango pickle recipe which is prepared at my mom's place. During our childhood, we used to call this pickle as 'Yellow pickle' and it was a favorite among kids because of its fascinating yellow color.This pickle recipe is quite unusual as we use green chilli paste in the pickle instead of red chilli powder. It also requires very less oil.It is not the usual instant Mango pickle as this pickle can be stored upto an year when refrigerated and 3-4 months under normal conditions.Though we use less oil in this pickle the process of marinating the mango pieces in salt and then the tempering increases the shelf life.
easy mango pickle
Though the preparation process of this pickle is simple I never tried it myself.When my mom visited us few weeks back I had asked her to prepare this pickle and also mango thokku which were my child hood favorites,would post mango thokku soon.This yellow mango pickle had become an instant favorite to TH who is tasting it for the first time.The quantity which was supposed to last for 2-3 months has almost got over just in a span of one month.If you are looking for an easy less oil Mango pickle,this recipe is for you.
easy mango pickle

Easy Mango Pickle Recipe -  Karnataka style:
shelf life:2-3 months outside,upto one year when refrigerated

Ingredients:
5 cups chopped Raw mangoes
3/4 cup Salt
1/4 cup Green chili paste(approx 25-30 Green chillies)
1 tbsp roasted Mustard- Fenugreek powder
1 tbsp Turmeric powder
2 tbsp Sesame Oil
2 tsp Mustard seeds
1/4 tsp Asafoetida

Method:
cleaning the mangoes:
  • Wash and wipe the mangoes with a dry cloth.You really need to have sharp thick knife to cut into 1" thick mango pieces.You don't need to keep the inner shell in tact.
  • Spread them over a dry cloth while you are preparing the spices for the pickle.
for making pickle:
  • Keep ready the sterilized and sun dried jars ready before you start pickling.
  • Roast 1 tbsp of mustard seeds and 1 tbsp of fenugreek seeds until you get the aroma and let them cool a bit and grind to a fine powder.Use 1 tbsp of powder for this recipe,store the remaining powder in a ziplock bag,I would share another recipe soon in which you can use it.
  • In a big bowl mix the cut mango pieces with salt,turmeric powder and roasted mustard-fenugreek powder and stuff the jars with this and cover it.
  • You will see the water which oozes from the salted mangoes on the first day itself. Let them marinate for 3 days.
  • On the 3rd day taste it and check for salt,the mango pieces would be slightly salty.If you feel that the salt is less you can add little more salt.
  • Wash and wipe green chillies and dry them for some time and grind them to a coarse paste.
  • Add ground green chili paste to it and mix well.
  • In a small pan heat sesame oil and crackle mustard seeds and asafoetida and let the oil come to room temperature.
  • Add this to the pickle and mix well.
  • You can start using the pickle in a day or two.It tastes best after one week as the salt levels get adjusted.
  • This pickle can be kept outside for 2-3 months.But I prefer to refrigerate it and it stays good upto one year.
Serve it with Curd rice.

Notes:
  • Use pickle variety mangoes which are sour and also cut them in to the pieces with the inner shell in tact.
  • Use Spicy fresh green chillies for the recipe.
  • Always transfer a small portion of pickle into a small jar and use a clean and dry spoon.
  • This pickle stays good for an year when refrigerated and for 2-3 months under normal conditions
  • You can easily double or triple the recipe,the basic rule is to use 5 cups of mango pieces with 3/4  cup salt.
 easy mango pickle 
Check out the various Andhra style Mango pickle recipes here:
 easy mango pickle

Mango Juice | Easy Summer Drinks Recipes

$
0
0
mango juice
I had plans to post Mango recipes this year, but I could not do so because of my laziness.Somehow I managed to prepare a few mango recipes last week and I would post them in the coming weeks.So stay tuned for various Mango Special recipes in my blog and prepare them before the mangoes fade away from the markets.
Mango Juice is an easy recipe which I thoroughly enjoy during the mango season.Given a chance if I am asked to prepare a beverage with mango,I would prepare either Mango Milkshake or Mango Lassias both of them are my absolute favorites.I usually stock the mango fruit pulp in my freezer all the time and if you have the mango pulp at hand you can prepare this juice in no time. 

Check out few ripen Mango recipes in my blog.For complete list of Mango recipes click here.
mango juice

Mango Juice Recipe:
(serves 2)

Ingredients:
1 ripen Alphonso Mango(any variety would do)
2-3 tbsp Sugar
1/4 tsp Cardamom powder(optional)
Ice cubes,to serve

Method:
  • Wash and peel the skin of mangoes and cut into pieces.
  • In a blender add chopped mangoes,sugar and cardamom powder and blend to a fine puree.
  • Add chilled water(approx 1 cup) and blend again to a smooth consistency.Now check the sweetness and add more sugar or water if needed.You can make it thin or thick according to your preference,I prefer to make it slightly thick.
Serve it in a glass with ice cubes on top.

Notes:
  • I like the flavor of cardamom in the drink,you can skip it if you want.
  • Always add chilled water so that you can serve the drink immediately or you can refrigerate the jucie for few hours before serving.
  • Use sweetened mango varieties like alphonso,kesar,badam etc and fibrous variety is not suitable for juice.If you use fibrous variety strain the juice before serving.
  • I usually dip the mangoes in water for few hours.It is believed that this process reduces the heat impact of mangoes on our body.
  • You can add juice of 1 small lemon and few mint leaves while blending to make mango lemonade.This would be a refreshing change to your usual drink.
  • The amount of sugar depends on the sweetness of mangoes,hence add it accordingly by tasting the juice in between while blending it.
mango juice

Mango Salsa Recipe | Easy Mexican Recipes

$
0
0
 mango salsa
Salsas and Dips always go well with a platter of Chips, Tortillas and cut Vegetables.I serve the dips and salsa even with khakras,a slightly healthier version when compared to chips.Tomato salsa is the most common variety in salsa but you can make various salsa varieties like Watermelon Salsa,Mango Salsa during their respective seasons. My most favorite one is Mango Salsa.It is a perfect burst of flavors with the sweetness of mangoes which is balanced with the acidity from lemon and the heat from the chillies.
mango salsa
I prefer to use the mango variety called 'Banginapally' to prepare salsa as I love the peculiar taste of this mango which makes the salsa taste even better.But if you do not find that variety you can use any other sweet mango varieties like alphonso,kesar etc.The fibrous mango varieties might not suit as it is difficult to cut them into pieces.I feel that the salsa tastes best when it is prepared bit mushy and hence I cut them into very fine pieces.You can prepare the salsa bit ahead so that the flavors mix well.If you have not tried Mango Salsa recipe,try it before the mango season gets over.
mango salsa
Check out other Dip recipes in my blog which can be paired with chips:
mango salsa

Mango Salsa Recipe:
(serves a small group of 2-3 ppl)

Ingredients:
1 ripen Mango( I used Banginapally variety)
1 Tomato,seeded and finely chopped
1 Onion,finely chopped
1/2 Green Capsicum,seeded and finely chopped
2 Green Chillies,finely chopped
1 tbsp Coriander leaves,finely chopped
1 tbsp Mint leaves,finely chopped
juice of 1/2 lemon
Salt to taste

Method:
  • Remove the skin of ripen mango and chop it into fine pieces.I like to make my salsa slightly mushy,hence I cut it into fine pieces.You can even cut the mango into big chunks if you want.
  • Remove the eye and seeds of tomato and cut it into fine pieces.
  • In a bowl mix chopped tomatoes,onions,capsicum,green chillies and add salt and lemon juice to it and mix well.
  • Add chopped mangoes,coriander and mint leaves and mix again.
  • Now taste the salsa and add more lemon juice if needed.If your mango is not sweet enough,add a pinch of sugar at this stage.
  • Leave it in refrigerator for half an hour for the flavors to mingle.
Serve it with Chips/Tortillas/Quesedillas/Tacos etc.You can even use it as a filling in Canapes or with Khakra chips like I did.
mango salsa
Notes:
  1. You can use red bell peppers along with green capsicum in the recipe.
  2. I like the taste of Banginapally mango for salsa and I prefer to make mostly with it.It is perfectly sweet and makes the salsa more delicious.If you do not get this variety you can use any other variety too.
  3. If your mango is not sweet enough you can sprinkle some sugar in the salsa. 
  4. Use jalapeno peppers if you can find them instead of green chillies.
mango salsa

mango salsa

Aamras Recipe | Easy Mango Desserts

$
0
0
aamras
Aamras needs no introduction. It is popular in the states of Gujarat, Maharasthra and Rajasthan and is prepared during festivals and occasions.Aamras is nothing but sweetened and flavored thick Mango pulp and usually served along with Puris or Chapati. It can be separately served as a desert too.It is almost mandatory at our place to prepare the combo of Poori - Aamras at least once during the mango season. I though prepare it quite often and enjoy it as a dessert or eat it with chapati instead of poori , as we do not prefer eating oily food quite often. Another best way to serve Aamras is to serve it with Vanilla ice cream or whipped Cream-it makes an easy and light dessert during Summers.
aamras
Aamras is the best way to have mango in its pure form , in my view. Using a good quality mango is a key for making good Aamras. Mango varieties like Alphonso and Kesar suit best for Aamras.One can choose between the two or mix both for a better taste.
In Karnataka, we prepare Seekarane which is a version similar to Aamras but uses more milk in the preparation.I have already posted the recipe of Seekarane,you can check it here.
aamras
Check out few ripen Mango recipes in my blog.For complete list of Mango recipes click here.
aamras

Aamras Recipe:
Serves 2 
Preparation time: 10 mins | Cooking time: nil | Total time:10 mins
Recipe Cuisine: Indian | Recipe Category: Desserts

Ingredients:
2 ripen Alphonso Mangoes(or kesar or a mix of both)
3-4 tbsp Sugar
2-3 tbsp Milk (optional)
1/4 tsp Cardamom powder

Method:
  • Wash and peel the skin of mangoes and cut into pieces.
  • In a blender add chopped mangoes,sugar and cardamom powder and blend to a fine puree.
  • If needed add milk and blend again to a smooth consistency.Now check the sweetness and add more sugar if needed.You can make it slightly thin or thick according to your preference,I prefer to make it very thick.
  • Refrigerate it for 1-2 hrs before serving.
Serve it with hot Puris or Chapati or as a dessert after your meal.Serve Aamras with  vanilla ice cream,it tastes very nice.
aamras
Notes:
  1. I usually prefer to use alphonsos for it,but you can even use kesar or a mix of alphonso and kesar.
  2. The addition of sugar depends on the sweetness of mangoes,so add accordingly.
  3. The addition of milk eases the process of blending into a smooth puree.But make sure you do not add more milk as it will make the consistency thinner like milkshake.
  4. You can even add saffron while blending the mangoes.
  5. If you like dry fruits,you can add roasted cashew nuts,badam and pistachios to it and mix.
  6. You can also mash the mango pulp with hands and avoid the process of blending but the resultant puree would not be smooth.
  7. Sugar can be substituted with Jaggery in the recipe.
  8. Another best way to serve Aamras is to serve it with Vanilla ice cream or whipped Cream,it makes an easy and light dessert during Summers.
 aamras

    Mango Lemonade Recipe | Easy Mango Drinks

    $
    0
    0
    mango lemonade
    Summer has come to an end and the rainy season has just started in Mumbai.I have prepared this drink on one of those hot summer days last week. During summers, I try increasing the quantity of fluids I take in order to keep myself hydrated and hence I try preparing various kinds of juices. I like having Nimboo Sherbet and so I usually keep a bottle of Lemon squash in my refrigerator.As I get bored drinking the same thing every time, I usually play around with various flavors based on the season.You can use the lemon squash as the base and add any fruit pulp like mango, strawberries, watermelon and churn it with chilled water to get a refreshing drink.I even use various fruit crushes like Kiwi or strawberry crush instead of the fresh fruit pulp.

    Check out few other refreshing drinks with mangoes - Mango Milkshake, Mango Lassi , Mango Juice   and if you want to prepare a few more refreshing drinks- check them out here.
    mango lemonade

    Mango Lemonade Recipe:
    Serves 4-5
    Preparation time: 10 mins | Cooking time: 5 mins | Total time: 15 mins + cooling time
    Recipe Cuisine: Indian | Recipe Category: Juices/Beverages

    Ingredients:
    1 ripen Mango(Alphonso or Kesar)
    2 Lemons
    1/3 cup Sugar 
    1/2 cup Water 
    4-5 Cups chilled water
    few Ice cubes,to serve
    mango pieces and mint leaves,to garnish(optional)

    Method:  
    • Combine water(1/2 cup) and sugar and let it come to a boil,reduce the flame and cook until the solution becomes thick and syrupy.Switch off the flame and let it come to room temperature.Refrigerate it until its usage,you can refrigerate it for upto a week and use it in various mocktails.
    • Extract the juice from the lemons and discard the seeds.
    • Cut Mango into pieces(reserve few for garnish) and blend them into a smooth puree.Refrigerate it until its usage.
    • Add 2 tbsp of sugar syrup in each glass and add 2 tsp of lemon juice and 2-3 tbsp of mango puree to it and mix well using a spoon.Top it with chilled water (roughly 1 to 1/4 cups per glass) and mix again.You can taste it and add more sugar syrup or lemon as needed.
    Add few ice cubes,mango pieces and garnish with mint leaves and serve it immediately.
    mango lemonade
    Notes:
    1. I usually store Lemon Sherbet squash in my refrigerator and hence I do not prepare fresh sugar syrup every time,all I need to  do is to mix the blended fruit puree with the lemon squash and water to make respective fruit lemonade.It is easy and refreshing.
    2. I highly recommend to use sugar syrup rather than mixing the plain sugar in the mocktails,it adds nice taste to mocktails.
    3. I even use plain soda water instead of plain water for a fizzy touch.If you are using lemon flavor drinks you need to reduce the quantity of lemon and sugar syrup in the recipe.
    4. You can use any ripen mango variety for this recipe.Adjust the sweetness according to the taste of it.
    mango lemonade


    Totapuri Mango Chutney | Easy Chutney Recipes

    $
    0
    0
    mango chutney
    Totapuri mango is one variety which can be eaten raw as it is slight sweet and sour in taste.It is usually sold in front of parks,schools etc where the vendors would drizzle a liberal amount of masala(salt,chili powder with a hint of sugar) on the mango pieces and I must say that the combination is a bliss!!I am sure many of you would agree.
    In Bangalore, we get really good ones which tastes better than the ones we get in Mumbai.But when ever I find them in market I usually buy them to relish them raw with salt and chili powder or prepare this mango chutney or instant pickle.You can even use totapuri mangoes in salads,bhel puri etc.
    Coming to today's post,this is a very simple and quick chutney made up of totapuri mangoes.Please make a note that you cannot substitute Totapuri mango with any other variety in this recipe.You can prepare this chutney in two ways - you can grind it in whipper mode to retain tiny bits of mango pieces or you can grind it into a smooth paste.It tastes good either ways.I like to prepare coarse chutney with mango pieces which is best suitable with Curd rice and I make it smooth if I want to use it as a dip or serve with any breakfast variety.This chutney is not suitable to mix with rice,if you want to prepare mango pacchadi for rice,check out my Mango-Coconut Pacchadi recipe which tastes best with rice.

    Check out few recipes using totapuri mangoes in my blog.
    mango chutney

    Totapuri Mango Chutney Recipe:
    shelf life: 3-4 days
    Preparation time: 10 mins | Cooking time: nil | Total time: 10 mins
    Recipe Cuisine: Indian | Recipe Category: Chutney|Pacchadi

     
    Ingredients:
    1 Totapuri raw Mango
    4-5 Green chillies
    1 tsp Sugar
    Salt to taste

    to temper:
    1 tsp Oil
    1/2 tsp Mustard seeds
    5-6 Curry leaves
    a pinch of Asafoetida(strong rock variety)

    Method:
    • Wash and peel the skin of mango and chop it into small pieces roughly.
    • Grind the mango pieces with green chillies,salt and sugar in the mixer to a coarse paste.Check the taste and adjust seasoning if required.Here you can grind it in two ways- you can grind it in whipper mode to retain tiny bits of mango pieces or you can grind it into a smooth paste with the addition of little water if needed.It tastes good either ways.
    • Heat oil in a small tempering pan and crackle mustard seeds and add curry leaves and asafoetida and switch off the flame.Add this tempering to the mango chutney.
    Serve it as an accompaniment with khakras/rice/roti/ Curd rice/dosa/paniyaram etc.

    Notes:
    1. Use only totapuri mango variety for this,other varieties would not suit for this chutney.
    2. This chutney is a nice blend of flavors,hence taste the chutney once when you grind and adjust the salt,sugar and spicyness of chutney.
    3. You can prepare the chutney in two ways- you can grind it in whipper mode to retain tiny bits of mango pieces or you can grind it into a smooth paste with the addition of little water if needed.It tastes good either ways.I like to prepare coarse chutney with mango pieces which is best suitable with curd rice and I make it smooth if I want to use it as a dip or serve with any breakfast variety.
    4. This chutney is not suitable to mix with rice,if you want to prepare mango pacchadi for rice,check out my Mango-Coconut Pacchadi recipe which tastes best with rice.
    5. You can store it in an air tight container for 3-4 days in refrigerator.
    mango chutney

    Mango Thokku | Sweet and Spicy Mango Pickle

    $
    0
    0
    mango thokku
    As promised in my Mango Pickle Post last week,I am posting the Mango Thokku recipe which is my favorite pickle from childhood.We call it as 'Noone Uragaya' at our place.This Mango Thokku(pickle) is a nice combo of flavors and tastes best when well balanced with the right amount of seasonings.My mom used to make a big bottle of this mango thokku as it goes well with Paniyaram, Akki roti, Ragi Rotti , Chakli, Murukku ,Thengolu and any roti,chakli and few breakfast varieties.
    mango thokku
    Check out various Mango pickle posts here:

     Sweet and Spicy Mango Thokku Recipe:

     Shelf life: 1 year
     Prep time:15 mins | Cooking time:1.5 hrs | Total time: 2 hrs
     Cuisine: Indian Category: Pickles

     Ingredients:
     2 large Raw Sour Mangoes(weighs 1 kilo)
     150 gms (1 cup approx) Jaggery,grated
     1/3 cup Red chili powder 
     1 tbsp + 2 tsp Mustard seeds
     1 tbsp Fenugreek seeds
     1 tsp Turmeric powder
     1/4 tsp Asafoetida
     1/4 cup Salt,approx
     1 cup Sesame Oil

     Method:
    • Wash and wipe the mangoes with a dry cloth.Peel the skin of mango and cut the mango into very thin slices as shown in the picture.You would get roughly 5-6 cups of mango slices with a kilo of mangoes.

    • Dry roast 1 tbsp mustard seeds and fenugreek seeds separately until they turn fragrant and cool them and grind to a fine powder.
    • Heat oil in a thick large kadai and crackle 2 tsp mustard seeds and asafoetida. 

    • Add the thinly cut mango slices and fry them for 2-3 mins until the oil coats the mango slices.Continue frying them until the mango pieces start becoming soft,once it becomes soft add turmeric powder and grated jaggery to it and mix well.Let it cook on low flame for 15-20 mins until it forms a thick mass,keep stirring in between.

    • Add red chili powder,salt,roasted mustard-fenugreek powder to it and mix well.Taste the pickle a bit now and adjust the seasoning like salt, red chili powder or jaggery if necessary, it should be a good balance of salt, spicy, sour and sweetness.Let it cook for another 10-15 mins until the pickle forms like a big bowl and oil separates from the pickle.It starts leaving the pan with out sticking to it which is an indication that the pickle is done.You would see small mango bits in the pickle,but it is fine.

    • Let the pickle come to room temperature.
    • Store it in air tight sterilized bottles.It can be stored for an year under normal conditions if handled properly or you can even keep it in refrigerator and store it.
     Serve it with Khakras/ Roti/ Chapati/Paniyaram/ Thengolu/ Chakli/ Murukku/ Thalipeeth/ Akki roti/ Ragi Rotti.

    Notes:
    1. Because of the addition of jaggery this pickle turns to dark brown in color.
    2. Always transfer a small portion of pickle into a small jar and use a clean and dry spoon.
    3. The most important part of the recipe is to balance the salt,spicy ness,and sweetness with the sourness of mangoes which makes a tasty pickle.Hence I suggest you to taste it once or twice after you add all the ingredients to the pickle and balance the pickle accordingly.
    4. This pickle would be sweet and spicy at the same time and goes well with Thengolu/ Chakli/ Murukku/ Thalipeeth/ Akki roti/ Ragi Rotti.
    mango thokku

    Mango Shrikand | Amrakhand | Aamkhand Recipe

    $
    0
    0
    mango shrikand
    One can prepare several desserts with mango ranging from a simple Aamras, Kulfi  to Ice-Cream, Cheesecakes, Souffles etc and of course everything tastes nice -how can a dessert go wrong with mangoes right?? This year I enjoyed the mango season thoroughly.Though I prefer to eat the whole fruit most of the time followed by Mango Kulfi,I prepared few recipes using mangoes so that they can make their way to my blog.
    mango shrikand
    Mango Shrikand is another version of Shrikand prepared in mango season.Mango Shrikand is also known as Amarakhand or Aamkhand,is a popular dessert in Maharashtra and is usually served with Poori.Though we get Amrakhand  easily in the market, I usually do not buy it, as I find it too sweet for my taste buds and I prefer a home made version of it where I can reduce the sweetness.I like Amrakhand mildly sweet with lot of chopped nuts. 

    Check out various dessert recipes with mangoes in my blog.
    amrakhand

    Mango Shrikand | Amarakhand Recipe:
    Serves 4-5
    Prep time: 15 mins | Cooking time: nil | Total time:15 mins + straining time
    Recipe Cuisine: Indian | Recipe Category: Desserts

    Ingredients:
    2 ripen Alphonso Mangoes(or kesar)
    1/2 liter fresh Curd(prepared with whole cream milk)
    1/3 cup Sugar
    1/4 tsp Cardamom powder
    2 tbsp chopped nuts(almonds,pistachios)
    few Saffron strands

    Method:
    • Place a thin muslin cloth on a strainer and pour the curd over it and loosely cover it with the edges of the cloth.Fit the strainer into a clean vessel so that it will collect the whey from the curd.Refrigerate this and let the curd sit in the strainer overnight or for a minimum of 4-5 hrs. You can even hang the curd in a muslin cloth outside but I prefer to refrigerate it as I do not like to turn it sour.The resultant hung curd should be really thick and creamy.
    • Wash and peel the skin of mangoes and cut into pieces.
    • In a blender add chopped mangoes,sugar and cardamom powder and blend to a fine puree.
    • Whisk the hung curd using a wire whisk until smooth.
    • Add the blended mango pulp to it and mix well.You can pass this mixture through a fine sieve to yield smooth shrikand,it is optional though.
    • Crush few saffron strands with your finger tips and add it and mix well.
    • Now check the sweetness and add more sugar if needed.
    • Refrigerate it for 1-2 hrs before serving.
    Garnish it with finely chopped nuts and serve it with hot Puris or Chapati or as a dessert after your meal.
    amrakhand
    Notes:
    1. I usually prefer to use alphonsos for it,but you can even use kesar or any other sweet mango variety
    2. The addition of sugar depends on the sweetness of mangoes,so add accordingly.
    3. You can even add saffron while blending the mangoes.
    4. You can make it slightly rich by adding a couple of tbsp of condensed milk to it while mixing.Also reduce the sugar quantity accordingly.
    aamkhand

    Mango Banana Smoothie | Easy Smoothie Recipes

    $
    0
    0
    mango banana smoothie
    I have posted mango recipes non stop from the last 2 weeks and I hope this would be the last recipe for this mango season unless I prepare something new.Hope you liked my mango recipes and did not get bored of them .Check out my complete list of Mango recipes here.
    Smoothies are one of the easiest breakfast option but somehow I am not a person who can live on smoothie for breakfast.But it is a different story all together during the mango season.I do not mind having smoothies for breakfast everyday provided the smoothie has mango in it.Mango can be paired with various fruits like Mango-Banana,Mango-Strawberry,Mango-Papaya etc and my most favorite combination is Mango-Banana which works well for a Smoothie.
    Smoothies are very versatile,you can add cornflakes or oats to the smoothie while blending and convert a simple smoothie to a wholesome breakfast.Some times I even add dry fruits like cashew nuts or almonds or figs or dates as it adds a nice nutty taste to the smoothie.

    Check out few Smoothie recipes in my blog:
    mango banana smoothie

    Mango Banana Smoothie Recipe:
    serves 2
    Prep time:10 mins | Cook time: nil | Total time: 10 mins
    Cuisine: International | Category: Beverages

    Ingredients:
    1 ripen Mango(Alphonso/Kesar or similar variety)
    1 big ripen Banana
    2 tbsp Sugar or honey *
    1/4 cup cold Milk *
    few Ice cubes,to blend and serve

    Method:
    • Remove the skin and cut the mango and banana into pieces.
    • In a mixer/blender add mango and banana pieces,ice cubes,sugar(or honey) and milk and blend into a smooth puree.Check the sweetness and if needed add extra sugar.
    • If you want you can add more milk to make it bit thin and also adjust the sugar accordingly.
    Serve the chilled mango banana smoothie immediately.You can even top them with ice cubes during serving it. 

    mango banana smoothie
    Notes:
    1. Sugar or honey should be adjusted according to the sweetness of mango and to your desired sweetness.
    2. Milk also is to be adjusted according to your desired thickness.
    3. You can choose the mango varieties like alphonso,kesar,badam,raspuri which tastes best for this smoothie.
    4. You can even add oats or corn flakes while blending the smoothie for a wholesome breakfast.
    5. You can also add nuts like cashew nuts or almonds while blending for a rich and nutty smoothie.
    mango banana smoothie

    Niluva Usirikaya Pacchadi | Preserved Gooseberry Chutney Recipe

    $
    0
    0
    usirikaya pacchadi
    During the season of gooseberries we usually buy the gooseberries in large quantity to prepare Usiri Avakaya(Gooseberry pickle) and this niluva Usirikaaya(preserved  Gooseberry chutney).My MIL prepares a special Amla candy which tastes really nice too.This preserved chutney can be stored for almost an year and can be used to prepare Usirikaya pacchadi,Usirikaya Pulihora or raita when ever needed.The process is quite simple to make and if you have this raw gooseberry chutney you can whip the chutney in no time.

    Niluva Usirikaya | Preserved Gooseberry Recipe:
    shelf life:1 year
    Prep time: 20 mins | Cook time: nil | Total time: 20 mins
    Cuisine: South Indian | Category: Accompaniments

    Ingredients:
    1/2 kg big plump Gooseberries
    2 tsp Turmeric powder
    Salt(roughly 2-3 tbsp)

    Method:
    • Wash and wipe gooseberries and spread them on a kitchen napkin to let the extra water dry off. 
    • Cut the gooseberries into pieces by removing the seeds. 
    • Grind chopped gooseberries with salt and turmeric powder to a coarse paste in whipper mode.Make sure all the pieces were ground.
    • Remove the mixture and store it in a clean glass bottle.This can be stored up to an year.
    Prepare Chutney or Rice with it when needed.

    Notes:
    1. This can be stored for an year and can be used to prepare chutney and rice variety with it.
    2. The amount of salt I mentioned is approximate,please feel free to add the salt accordingly.Also do remember that it should be prepared more on the salty side so that it can be stored for long period as salt acts as a preservative.
    3. Use a clean spoon to remove the required portion and also do not store it in steel containers. 
    4. The color changes over a period of time.
    niluva usirikaya pacchadi

    If you are interested check other gooseberry recipes here.

    Sabudana Tikki | Sago Cutlets | Easy Snacks Recipes

    $
    0
    0
    sabudana tikki
    Sabudana plays a key role during fasts in North India as well as in states like Maharashtra. People prefer eating various varieties with Sabudana like, Kuttu ka Atta,Rajgira etc.I sometimes feel that fasting is like feasting as we get to eat different varieties on that day.Though I have not explored much with "Kuttu ki atta", I mostly use Sabudana and Rajgira in many recipes on those fasting days.While the way the fast is practiced in south India is a bit different, I usually try to follow the customs of both South and North India so that I can try new recipes on those days.
    sabudana tikki
    Other Sabudana recipes in my blog which might be interesting for you:
    Sabudana Tikki | Sago Cutlets Recipe:
    makes 12-14 tikkis

    Ingredients:
    1/2 cup Sabudana/Sago
    2 medium Potatoes
    2 tbsp Rajgira flour or 1 Bread slice for binding
    1/4 cup roasted Groundnuts,coarsely ground
    5-6 Green chillies,finely chopped
    2-3 tbsp chopped Coriander leaves
    1" Ginger,grated
    juice of 1/2 Lemon
    Salt to taste
    Chaat masala,to sprinkle (optional)
    Oil,to fry

    Method:
    • Wash sago twice and add enough water until it is just above the level of Sago.Soak it for 4-5 hrs or overnight.
    • Pressure cook potatoes for 3 whistles until they are soft.Peel the skin and mash them nicely while they are still warm.
    • In a bowl add the mashed potatoes,coarsely ground roasted groundnuts,chopped green chillies,grated ginger,chopped coriander leaves,salt,lemon juice and mix it nicely.
    • Add soaked sago pearls and rajgiri flour(or bread slcie)to it and mix it nicely.Check the binding now and try to make one tikki,if you are not able to make it add little more rajgira flour if necessary.If you are using bread slice dip it in water for 10-15 seconds and squeeze the extra water from it and add it to the potato mixture while mixing.
    • Make tikkis out of the mixture.Do not press the tikkis hard while making,try not to apply any pressure.
    • Heat a tawa and add a couple of tbsp of oil and spread it nicely and place the tikkis and fry them on both sides until golden brown.They cook pretty fast and takes around 2-3 mins on each side.You can even deep fry them if you want.
    • Sprinkle some chaat masala on top,this is optional.
    Serve them hot with Green Chutney and Meetha Chutney or Tomato Ketchup.
    sago cutlets
    Notes:
    1. If you are preparing this during fast you use Sendha namak instead of regular salt and also use rajgira flour or arrow root powder(do not use bread slice) in the recipe and avoid chat masala.
    2. I like to add more green chillies and ginger to sabudana based recipes as they are quite bland and tastes nice only when they are nicely spiced.So adjust the quantity of green chillies accordingly.
    3. The addition of groundnut powder adds a nice taste to tikkis.I usually use my mortar and pestle to crush groundnuts and also I keep them slightly coarse.The bits of groundnuts adds a nice crunch and taste while eating tikkis.
    sago cutlets

    Usirikaya Pulihora | Amla Rice Recipe

    $
    0
    0
    usirikaya pulihora
    Amla(known as 'usirikaya' in telugu and 'nellikai' in tamil and kannada) is rich in vitamin C and is very essential to include it in our diet frequently.During amla season I usually buy them in bulk and prepare Niluva Usirikaya Pacchadi and store it upto an year so that I can prepare Amla Pacchadi or Amla rice with it.Usirikaya Pulihora(Amla rice) is one of those easy rice varieties which can be made in jiffy and it tastes delicious too.It is a good lunch box option too.
    nellikai chitranna
    Check out other Pulihora variety recipes in my blog here.
    amla rice

    Amla(Gooseberry) Rice | Usirikaya Pulihora | Nellikai Chitranna:
    Serves 2
    Prep time:5 mins | Cooking time:30 mins | Total time:35 mins+cooling time
    Cuisine: South Indian | Category: Rice varieties - Main Course

    Ingredients:
    1 cup Rice (sona masoori or equivalent)
    15 Gooseberries or 3-4 tbsp Niluva Usirikaya pacchadi
    1/4 tsp Turmeric powder
    10-12 Green Chillies
    8-10 Cashew nuts,broken
    1 tbsp Chana dal
    1 tsp Urad dal
    1/2 tsp Mustard seeds
    10-12 Curry leaves
    2 tbsp Oil
    Salt to taste

    Method:
    • Wash and soak the rice for 10 to 15 minutes with 2 cups of water.Prepare the rice either in pressure cooker or rice cooker.Cool the rice completely.
    • Remove the seeds from amlas and cut them in to fine pieces.
    • Slit the green chillies into 2 pieces and keep them ready.
    • Heat oil in a big thick kadai and crackle mustard seeds.Add chana dal,urad dal and cashew nuts and fry until they turn light golden in color.
    • Add slit green chillies,curry leaves and fry well.
    • Add chopped amla pieces and fry for 2-3 mins.Add turmeric powder and mix.Cover it and cook for 6-8 minutes until it is cooked on low flame.Cool the mixture completely.Mash the cooked amla mixture gently with hands to form a pulpy mix.If you are using niluva usirikaya pacchadi,add it and sprinkle some water and let it cook in steam for a couple of minutes.
    • Add the cooked rice to the mashed amla mixture and add enough salt and mix nicely.Adjust the seasoning according to your taste buds.
    Serve it with chips/fryums or sliced cucumber.

    amla rice
    Notes:
    1. I used niluva usirikaya pacchadi(stored ground amla mixture) which we use for making pacchadi instead of amlas in the recipe.You need to cook the amla for sometime otherwise it will taste slightly bitter.
    2. Adjust the number of green chillies in the recipe accordingly.I prefer to make this rice spicy and tangy.
       gooseberry rice

      Idli Dosa Batter | Idli Recipe using Idli Rice

      $
      0
      0
      soft idli recipe
      Idli is the most common breakfast in many south Indian homes,though I do not make it on a daily basis, I do prepare it at least once in two weeks.I have already posted a version of Idli recipe using Idli rawa which is the usual way in which it is prepared in Andhra.In Karnataka and Tamilnadu,Idlis are usually prepared by using boiled rice or Idli rice.I usually prefer using Idli rice for my Idlis as I like the taste and texture of Idlis better than the Idli rawa ones.Today I am posting the Idli recipe with idli rice and a complete guide to get soft and fluffy idlis
      idli recipe using idli rice
      Idli might sound like a very simple dish to get soft, fluffy and airy idlis one needs to practice a lot.I don't think that even all South Indians manage to make good idlis.There are many factors which dictate the quality of idli, like the quality of urad dal or idli rice used, the climatic conditions and the procedure of grinding the batter, i.e using a grinder or a processor.I have shared a few tips based on my experience and advice from elders to help prepare soft idlis,I hope it would help you.This recipe is meant for beginners and hence I have tried giving more details.Please go through the notes thoroughly before you start preparing it.
      idli recipe
      Check out few Idli varieties and their variations using the basic Idli batter here..
      idli recipe using idli rice
      Idli Recipe using Idli Rice Recipe | Idli Batter :
      makes 30-32 Idlis
      Preparation time: 8 hrs | Cooking time: 15 mins | Total time: 8 hrs + 15 mins
      Recipe Cuisine:South Indian | Recipe Category: Breakfast

      Ingredients:
      4 cups Idli rice(Salem rice)
      1 cup whole white Urad dal
      3/4 cup Poha(atukulu)
      3/4 tsp Fenugreek seeds
      Salt to taste

      Method:
      • Soak idli rice and fenugreek seeds overnight or at least for 5-6 hrs.
      idli batter
      • Soak urad dal and poha in a separate vessel next morning and let them soak for at least 2 hrs.
      idli batter
      • Grind urad dal in the wet grinder until it is smooth,soft and frothy.Add enough water(approx 1.5- 2 cups,it took 2 cups of water for me) at regular intervals while grinding the urad dal.It would take approximately 20-25 mins to grind urad batter.The batter should double in size.To test whether the batter is completely done or not,put a small dollop of batter in a vessel of water,if it floats then the batter is done.Remove it from the grinder and put it in a big vessel.
      • Grind idli rice with poha and fenugreek seeds in the wet grinder by adding enough water(approx 1.5 -2 cups,it took 1 3/4 cups of water for me) at regular intervals to a slight coarse paste.You should feel the slight grainy texture of rice when you touch the batter.
      • Remove the batter and mix the mixture with the ground urad dal and add enough salt to it and mix well with your hand.You can add some water to the wet grinder and add it to the batter to get the desired consistency,the batter should be thicker(not very thick as well) and not thin.Let it ferment for 8-9 hrs.Some times fermentation depends on the weather,so if the weather is cold it might need another an hour or two extra for fermentation.You will get to see the rise in the level of idli batter once it is fermented and it is the indication.
      idli batter
      • Take out the required portion of batter(do not mix the whole batter while scooping out) and refrigerate the rest of batter.
      • Grease the idli plates with oil and pour a ladle of idli batter until each impression is filled 3/4th.You can even line it with a wet muslin cloth and pour the batter on top of it.
      • Steam it in idli steamer or pressure cooker(with out whistle) for 10-12 mins.Let it rest for another 5 mins.
      • With a idli spoon cleanly remove the idlis.Dip the idli spoon in water in between which helps to remove the idlis easily from the plate.If you have used muslin cloth just invert them into the hot box.
      • Keep them in hot box or serve directly on to a plate.Always serve idlis hot.

      idli recipe
      Notes:
      1. Use an air-tight container for storing the batter.I usually remove the batter into my tupperware container and cover it with a normal loose steel plate while it is fermenting and once it is fermented I cover it with a lid and refrigerate the batter,this way the batter will be fresh and does not turn sour.
      2. Fermentation largely depends on the climatic conditions.In places like Mumbai it takes around 8-9 hours for the fermentation.If you are living in cold place you can even place the batter in a preheated oven and turn the oven light ON,this helps in quick fermentation.If you still have problem with it you can add a ladle of idli batter from the previous batch or ready made idli batter which helps the fermentation process to happen without fail.
      3. The idli batter turns sour quickly if you add salt while grinding the batter and that is the reason few add salt while making idlis.It is your wish to follow which way you want.
      4. I prefer to use whole urad dal,if you do not get it use regular ural dal(broken).But always use good quality fresh urad dal for preparing idlis.
      5. Addition of poha is optional but it gives you very soft and fluffy idlis.You can even use a handful of sago instead of poha for the same.You can even add a handful of cooked rice while grinding which ensures to get the softest Idlis.
      6. If you are using mixer you can use 3 cups of idli rice for 1 cup of urad dal for making idlis.Use cold water while grinding the batter in mixer as the batter tends to get heated while grinding in mixer.
      7. If you use muslin cloth for lining idlis,idlis remain soft for a long time and it does not form any layer on top as well.Though there is a drawback of washing that cloth,hence most of the time I just grease my idli plates and prepare idlis.
      8. Once the batter is fermented do no stir it much which makes the batter looses its air bubbles and in return the idlis will not be softer.
      9. After 2-3 days the idlis might not turn soft with the same batter,you can add a fat pinch of cooking soda mixed with 2 tbsp water into the batter and mix it well and make idlis.Your idlis would be definitely soft.
      10. If your idli batter turn soar,try this Masala Idli which is a perfect fix for the sour idli batter.
      11. You can use the same batter for making paper thin crisp dosas.Add enough water to make the batter little thin and then spread the dosa as thin as possible.
      idli
      Try these accompaniments for Idli:
        idli recipe
        You can use the same batter to prepare crisp dosas.You need to add enough water to make the batter bit thin and spread the dosa as thin as possible and roast it with either ghee/butter or oil to get crisp dosa.You can fold it in the shape of a cone like how I did,just have a look at it.
        cone dosa

        Vangibath Powder Recipe | Vangi Bhath Masala Recipe

        $
        0
        0
        vangibath masala powder
        I always stock up home made masalas and powders like Sambar Powder, Rasam Powder, Vangibath Powder and few podi varieties for rice.Its a breeze to prepare a south Indian meal if we have these kind of powders and masalas handy.
        Vangibath is a famous Karnataka rice dish which is prepared with brinjals.The addition of vangibath masala powder makes the rice extra delicious and also gets an unique flavor when combined with brinjals.This vangibath masala powder is quite versatile and you can even use it prepare various bhath varieties and to spice up various south Indian stir fries and curries,see notes for more details.

        Check out few recipes in my blog which are prepared using Vangibath powder.
        vangibhath masala powder

        Vangibath Powder | Vangi Bhath Masala Recipe:
        Shelf life: 1-2 months
        Prep time:20 mins | Total time:20 mins + cooling time
        Cuisine:South Indian | Catgeory:Spices|Masalas - Basic Cooking

        Ingredients:
        1/2 cup Chana dal
        1/2 cup Urad dal
        1 big lemon sized Tamarind
        1 heaped cup grated Dry Coconut
        12-15 Byadige Red chillies(gives nice red color)
        12-15 Guntur Red Chillies
        1/4 cup Coriander seeds
        2" Cinnamon,2 pieces
        8-10 Cloves
        7-8 Marathi Moggu
        3-4 Star Anise
        Salt
        2 tsp Oil 

        Method:
        • Heat oil in a kadai and fry chana dal and urad dal until they turn red in color.Remove them and keep aside.
        • Add red chillies(both the varieties) and fry them and keep them aside.
        • Add cloves, marathi moggu , cinnamon, star anise and fry them and keep them aside.
        • Just warm the coriander seeds and grated dry coconut for few minutes in the same pan.
        • Grind all the roasted ingredients with salt and tamarind to a coarse powder.
        • This can be stored in a air-tight container for about 2-3 months.I generally keep it in fridge and take out enough quantity when required.
        Use it in the recipe as required.

        Notes:
        1. As we use dry coconut in the recipe,it would not stay for long.Hence I suggest you to refrigerate some portion and just keep the required portion in an air tight container outside.
        2. You can even avoid tamarind in the recipe and instead add lemon juice while making Vangibath.
        3. You can use Vangibath powder for the preparation of rice varieties like Vangibath, Vegetable Bhath, Methi Peas Bath and also in Rava Vangibath.
        4. Vangibath powder is quite versatile and it can be used to spice up various south indian stir fries and curries like brinjal, tindora and ladies finger curries.Stir fry brinjals/tindora and sprinkle this spice powder at the end and add extra salt required.
        5. You can even use for vegetable curries like french beans, broad beans, cluster beans, yard long beans , carrots, beetroot, cabbage and cauliflower.
        vangibath powder


        Gobi Paratha Recipe | Paratha Stuffings Ideas

        $
        0
        0
        A stuffed Paratha with North Indian style Aam ka Achar/Mirch ka Achaar, or Mixed vegetable Achar and a bowl of dahi(curd) is a perfect meal for me.I usually prefer preparing parathas when I am not in a mood to cook the usual Roti-Sabzi-Dal fare. Parathas are quick to make if you finish the basic preparation of the filling ahead.Gobi Paratha
        The options for parantha fillings are endless. One can get creative with the fillings and use various combination of vegetables to prepare the fillings.Today I am sharing a simple Gobi Paratha recipe where a spicy cauliflower filling is stuffed in a wheat flour dough and is rolled into a thick bread and roasted on a tawa.
        Gobi Paratha

        Gobi Paratha Recipe :
        yields: 6 parathas
        Prep time:30 mins | Cooking time:30 mins | Total time:1 hour
        Cuisine: North Indian | Category: Flat Bread(Paratha) – Main Course  

        Ingredients:
        for dough:
        1 1/2 cups Wheat flour
        Salt to taste
        2 tsp Oil
        Water,to mix

        for filling:
        2 cups grated Cauliflower
        1 medium Onion,finely chopped(optional)
        3-4 Green chillies,finely chopped
        1 tsp grated Ginger
        2 tbsp chopped Coriander
        1 tsp Amchur(dried mango) powder
        2 tsp roasted Cumin powder
        1/4 tsp Garam masala
        1/4 tsp Turmeric powder
        Salt to taste
        Wheat flour,for rolling
        Ghee and Oil,to roast parathas

        Method:
        to make dough:
        • Mix in the salt with wheat flour and add 1 tsp oil and mix well.
        • Add little water(if needed) and knead it into a smooth and soft dough.The dough should be slightly softer than the regular chapati dough for parathas as it will not only make easy to stuff the filling it will help in easy and even rolling of parathas.
        • Apply oil on top of the dough and cover it and keep it aside for at least half an hour.
        to make filling:
        how to make stuffed paratha
        • Clean and wash the cauliflower florets and soak them in warm water with salt for 10 minutes.
        • Grate the florets and squeeze the extra water from it and put it in a bowl.
        • Add finely chopped onion,green chillies,grated ginger,chopped coriander and mix well.
        • Add amchur powder,garam masala,turmeric powder,salt and cumin powder and mix well and keep it ready.Add salt and other masalas just before you are going to prepare parathas otherwise the mixture will leave water when kept for long time.
        to make paratha:
        • Pinch the dough and take a big size lemon sized dough and place the dough in your left hand palm.
        • Using your right hand fingers in the flour and try to make a cup shape(which can hold 3-4 tbsp filling) out of the dough by moving your fingers pressing with the thumb in the center.Take care that the edges should be slightly thinner and in the center it should be thick.
        how to make stuffed paratha
        • Fill the cup with 3-4 tbsp filling and seal the two sides of the dough(it would look like Karanji now) and gently press the corners to get a big round ball out of it.See the pictures for better idea.
        how to make stuffed paratha
        • If you stuff the filling in the dough in this way you will get evenly filled paratha and it also forms like pocket.If you find all the above process bit difficult,you can easily roll a 3" circle out of the dough and place the filling in the center and pleat the dough and seal it by gathering the dough around the edges.
        how to make stuffed paratha
        • Slightly flatten the dough(stuffed with filling) with hands and dip it in the wheat flour and gently roll it to a 6" disc of 1/2" thickness.You should not apply more pressure while rolling,so roll it gently.
        • Carefully place it on the hot tawa and fry it until you see bubbles on one side and flip the other side.
        • Apply oil/ghee generously and roast on the other side.
        how to make stuffed paratha
        • Fry the parathas on both sides until you get crisp brown patches on both sides.
        Serve them piping hot with Aam ka Achar/Mirch ka Achaar/Mixed Vegetable Achar,curd/masala dahi and sliced onions.
        Gobi Paratha
        Notes:
        1. You can even do a combination of mashed boiled aloo and gobi or gobi and mooli(radish) in the recipe.
        2. Gobi can be replaced with grated paneer or mashed aloo or grated and squeezed radish and follow the same recipe,it tastes nice too.
        Gobi Paratha

        Check out other Stuffed Parathas recipes:
        Gobi Paratha

        Cabbage Pakora | Cabbage Pakoda(Fritters) Recipe

        $
        0
        0
        cabbage pakora
        Monsoons have started and its pouring in Mumbai from the last couple of weeks.What would remind anyone if it is pouring heavily outside?Hot hot pakoras and garam chai right? exactly this is what we craved on one rainy evening and I prepared it immediately.Pakora|Pakoda or Bajji is a most popular road side snack in India and is loved by everyone.There are various kind of pakoras ranging from vegetables, greens to paneer, bread etc and the most popular ones are Mirchi Pakora|Mirchi Bajji,Onion Pakora ,Paneer Pakora and Bread Pakora. cabbage pakora
        My MIL is an expert when comes to pakoras,she can prepare a pakora out of any vegetable,such is her love for pakoras and the same love extended to her son.Though I prepare the pakoras very rarely as I do not like to prepare oil items more often but few times we cannot stick to our rules and during monsoons - I don't think that rule even works!!Today I am sharing a Cabbage Pakora(Cabbage Fritters) recipe which I prepared which few days before. 
        cabbage pakora
        Apart from Pakoras a bowl of hot piping soup and a warm bread is again a comfort food on the rainy days especially.If you are interested check out other Monsoon recipes ranging from tikkis, cutlets, chaats, soups, pakoras  and snacks recipe here.Clicking photographs has become a challenge these days,by the time I do my set up the rain starts and the whole house turns dark.If the weather permits with good lighting,I hope that I could add few more recipes to my monsoon special collection.
        cabbage pakora
        Check out few pakora recipes in my blog:
        cabbage pakora

        Cabbage Pakora | Cabbage Fritters Recipe:
        Serves 2-3
        Prep time:10 mins | Cooking time:20 mins | Total time:30 mins
        Cuisine: Indian | Category: Snacks/Appetizers

        Ingredients:
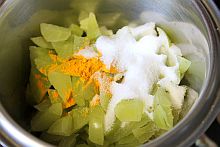
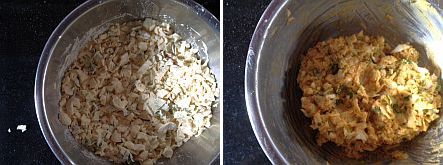
        1 cup finely chopped Cabbage
        1/2 cup Chickpea flour(Besan)
        2 tbsp Rice flour
        10-12 Cashew nuts,split into halves
        2 Green chillies,finely chopped
        2 tbsp chopped Coriander leaves
        1/2 tsp Carom seeds(Ajwain)
        1/4 tsp Turmeric powder
        1/2 tsp Red chili powder
        1 tsp roasted Cumin powder(optional)
        a pinch of cooking Soda
        1 tbsp hot Oil
        Salt to taste
        Oil,to deep fry 

        Method:
        • In a big bowl  take chickpea flour and rice flour.
        • Add finely chopped cabbage,coriander leaves,green chillies to it and mix well.Alternatively you can add salt to the chopped vegetables and leave it for 5 mins to let it release the water and then add chickpea flour and rice flour to it.
        • Add all the masalas,cashew nuts,carom seeds,salt,cooking soda,ajwain and hot oil to it and mix well.
        • Sprinkle some water to let the dough come together.Do not make the batter very thin as the cabbage mixture would leave some water.
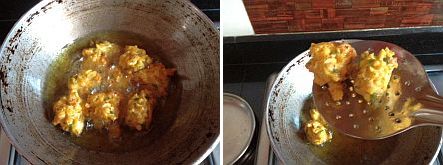
        • Meanwhile heat oil in a kadai for deep frying.
        • Drop small portions of batter like pakora  into the hot oil and let them fry over medium flame until they are crisp.Flip them in between to let them fry evenly.Do no over crowd the kadai with pakoras,add 7-8 pakoras at a time.You can fry them for long if you want crisp pakoras or alternatively you can press the partially deep fried pakoras and deep fry again to get crisp pakoras.
        • Drain the pakodas onto a kitchen tissue and repeat the same process with the remaining batter to make pakoras.
        Serve them hot with Green chutney /Tomato sauce and Masala Chai.Enjoy!!

        cabbage pakora
        Notes:
        1. Along with cabbage you can add finely chopped onion to pakora.
        2. You can replace cabbage with onion or spring onion or greens like spinach, amaranth, fenugreek leaves with a combination of onions.
        3. I love to add cashew nuts to pakoras,it is entirely optional.
        4. You can add chopped curry leaves and grated ginger to the pakora batter.
        5. The addition of hot oil will make sure that the pakors would not consume more oil and also to  make them crisp.
        6. You can avoid cooking soda if you want in the recipe,but it ensures a crisp and fluffy pakora.
        7. Pakoras can be prepared small or big,it is your wish.
        8. For those health freaks,you can make it low calorie version by baking them.Line a baking tray with aluminium foil and grease it slightly and drop small portions of pakora batter leaving some space in between them.Bake them in preheated oven at 160 deg C for 20-25 mins.Turn it once in between.Keep an eye after 15 mins,if you feel the pakoras are dry add few drops of oil before turning them to the other side.
        cabbage pakora

        Check out various deep fried snacks and low calorie snack recipes here.

        If you are interested check out other Monsoon recipes ranging from tikkis, cutlets, chaats, soups, pakoras  and snacks recipe here.

        Viewing all 520 articles
        Browse latest View live