Quantcast
Channel: THE CHEF and HER KITCHEN
Viewing all 520 articles
Browse latest View live

Seven Cups Cake | 7 Cups Burfi | Easy Diwali Sweets

$
0
0

Happy Karwa Chauth to all those who are celebrating the festival.

'Seven cups Burfi' is very similar to the softer variety Mysore Pak how ever the taste,texture and color of both the varieties differs.The amount of ghee used in the burfi is less compared to the later one and also the addition of grated fresh coconut makes it taste different.It is not a hard burfi unlike others but it holds the shape of a burfi and is soft to bite.I was always fascinated by this name '7 cups cake' and also was confused at the same time why it is called 'cake' when it looks like burfi.As the name suggests this burfi is made up of 7 cups of ingredients where all are measured in equal cups apart from sugar.This is a very easy sweet which any one can prepare but make sure you read the recipe carefully before proceeding to make.So what are you waiting for? just put your aprons on and try this delicious burfi for this year Diwali 2012 and give your family and friends a sweet treat.
7 Cups Cake | 7 cups Sweet | Seven Cups Burfi Recipe:
Shelf life:for a week-10 days and up to a month if refrigerated

Ingredients:
1 cup Besan/Chickpea flour
1 cup Ghee
1 cup freshly grated Coconut
1 cup Milk
3 cups Sugar
Method:
  • Take a thick bottomed heavy kadai or a thick non stick pan.
  • Add besan,ghee,grated fresh coconut,milk and sugar and mix well nicely with out any lumps.

  • Grease a square pan/tray with ghee and leave it aside.
  • Switch on the flame and place the kadai on it and mix continuously over low-medium flame for about 8-10 mins.
  • As we keep mixing the mixture you can see it bubbling and gradually becomes more airy and slightly porous and the mixture starts leaving the edges.This is the most important step to get the right consistency.

  • Pour the mixture immediately into the tray for about 3/4" height and very gently try to smoothen the top.Do not apply pressure as the fluffiness inside the burfi will get spoilt.The color of the burfi should be similar to the color of besan(chick pea flour) and the top of the burfi would look slightly uneven but a smooth surface and very shiny with out any bubbles.This is the right texture of the burfi.
  • After few minutes while it is still warm take a sharp knife and make the pieces either in the form of squares or diamonds.Leave it undisturbed until it comes to room temperature.
  • If you miss to mark the pieces and the mixture gets hard,do not worry place the tray over the flame fore few seconds.You can easily mark them again and you can follow the same process if you find it difficult to break into pieces once it is solidified. 

  • Neatly cut them into pieces.Always remove the sides first which makes you get neatly shaped burfis in the centre easily later.
Store them in an air tight container. 
 Notes:
  1. The right texture of 7 cups cake- it should form and hold like a burfi and at the same time it would be soft to bite.The texture,taste and look of 7 cups cake is completely different from its closer cousin Mysore pak.Do not get confused.
  2. You do not need to dry roast the besan/chick pea flour as the flour would be cooked while it is being cooked.
  3. The color of the burfi should be similar to the color of besan(chick pea flour) and the top of the burfi would look slightly uneven but a smooth surface and very shiny.This is the right texture of the burfi.
  4. If you miss to mark the pieces and the mixture gets hard,do not worry place the tray over the flame fore few seconds.You can easily mark them again and you can follow the same process if you find it difficult to break into pieces once it is solidified. 
  5. You can add even dry grated coconut if you do not get access to freshly coconut.But ideally freshly grated coconut is added to the burfi.


Sabudana Kheer | Saggubiyyam Payasam | Sago Kheer | Sabbakki Payasa

$
0
0
A variety of  Kheer/Payasam is usually prepared during any festival or an occasion.'Sabudana' or 'Sago' is called 'Saggubiyyam' in Telugu and 'Sabbakki' in Kannada and 'Javvarisi' in Tamil.I always use the variety called nylon sago when I prepare payasam and also for 'Saggubiyyam(Sago) Upma',which is our community special.The nylon sago really works nicely to give a non sticky upma and kheer which makes each sago pearl looks separate.One can use any other normal variety of sago which is available in the market to make this kheer.Please have a look at the picture below to see how the nylon sago looks.
The preparation of Sabudana(Sago) kheer is quite similar to any other kheer variety just that we need to take care of  the cooking process of sago.Sometimes the milk curdles if sago is cooked in it directly,in order to avoid that I always roast sago in ghee and cook it in enough water before the milk is added.This way it not avoids curdling of milk,it also ensures that sago granules are separate.If you had experienced this problem try my method I am sure you would be happy to make perfect sago payasam.
Sabudana Kheer | Sabbakki Payasa Recipe:
Serves: 3-4

Ingredients:
3/4 cup Sago/Sabudana(Nylon or regular variety)
1 heaped cup Sugar
1 liter full cream Milk
1 cup Water
10-12 Cashew nuts,broken
15-20 Raisins
1/4 tsp Cardamom powder
few Saffron strands
1 tbsp Ghee 
Method:
  • Boil milk and simmer it for 12-15 mins until it becomes 3/4th of the quantity.
  • Take 1 tbsp of milk in a small cup and add saffron strands to it.Rub the saffron strands in between your fingers before you add to the hot milk.
  • Boil a cup of water in another vessel.
  • Meanwhile heat ghee in a kadai and fry cashewnuts and fry them until golden in color and remove them and keep aside.
  • In the same kadai add raisins and fry them until they fluff up and remove and keep them aside too.
  • Now add sago to the remaining ghee and fry for 1-2 mins.
  • Add boiling water and cook till the sago turns transparent and soft to touch.It takes 3-4 mins.
  • Take out from the fire and leave for a minute aside for sago to settle down.Drain off the extra water if any which stands on top.
  • Add the thick boiled milk and reduce the flame and cook until it bubbles.
  • Add sugar and mix gently till it dissolves and let it continue cooking over low flame.Always cook over low flame otherwise the milk might curdle.
  • Add saffron infused milk and cook for another few mins.
  • Add ghee roasted cashew nuts and raisins and cardamom powder to the kheer and mix and switch off the flame.
Serve it hot/warm/cold or at room temperature.
 Notes:
  1. I usually prefer to fry the sago in ghee which makes sure that the sago pearls does not stick to each other in the end product-kheer.
  2. If we cook sago in milk,it might curdle sometimes and hence I always cook in water and then add boiled and thickened milk to it later.
  3. Always make sago kheer in reduced flame to avoid the curdling.
  4. This kheer thickens as it sits for long,you can add a couple of tablespoons boiled milk to the kheer before you serve.
  5. You can even skip saffron strands in the recipe,this will give a white colored kheer.
  6. If you want to make the kheer still richer add 1/4 cup condensed milk and reduce sugar to 2/3 cup.Adjust this by tasting it if necessary.


Sago Murukku | Saggubiyyam Murukulu | Easy Diwali Snack Recipes

$
0
0
Among all the murukkus Sago murukku is the most favorite one at my place.This used to be my mom's signature murukku and as everybody likes it so much my mom used to make it quite often for our evening snacks.The addition of sour curds in this murukku makes it tangy and at the same time it is spicy which definitely tickle your taste buds and makes you to crave more.
Sago murukku makes a perfect tea time snack as well it is good to munch anytime.If you have not tried this murukku before,I suggest you to try this once and I am sure you will definitely like this the way we do.I bet you would finish the whole batch in a day or two and would definitely prepare again.
SAGO MURUKKU | SAGGUBIYYAM MURUKULU Recipe:
shelf life: 15-20 days

Ingredients:
1 cup fine Sago
4 cups Rice flour
1 cup sour thick Curds
thick Sour butter milk,to mix the dough
2-3 tbsp white Sesame seeds
2 tsp Chili powder
Salt to taste( approx 2 heaped tsp)
1 big ladle(1/4 cup) hot Oil
Oil,to deep fry


Method:
  • Wash and soak sago in just enough sour thick curds to cover it for 3-4 hrs.
  • Slightly press it with hands and crumble it nicely to break the sago.
  • Add rice flour,salt,chili powder and sesame seeds to it and mix it nicely.
  • Pour hot oil on top of the flour and carefully mix with the ladle,do not use your hands to mix.Leave it aside for 5 mins.
  • Now mix the flour well with hands until the oil is incorporated in to the flour nicely.If you still find the mix very crumbly with sago pearls run the mix in the mixie for few seconds.
  • Divide the flour equally into five parts.
  • Sprinkle the buttermilk to one portion and prepare a thick dough.
  • Meanwhile heat oil in the kadai. 
  • Use a 5 eyed disc-thick round sev (disc-4 in the above pic) in the murukku maker and fill the dough in it.If your sago pearls are big and are obstructing in the murukku maker you can use star disc(disc no-5 in the above picture) to make the murukku
  • Carefully press the dough in to the hot oil directly in a circular motion.Do this process carefully otherwise the oil might spill.The murukku will break into pieces in oil,it might not form a circular murukku in the oil.
  • If your murukku looks smooth then it is the correct consistency it will give nice hollow and crisp but soft to bite kind of murukku.If the surface is very hard it will yield hard to munch kind of murukku.In that case slightly sprinkle some water to make the dough bit smooth and then proceed.
  • Deep fry over the medium-high flame until the murukku turn golden brown in color and the bubbles subsides in the oil.
  • Drain excess oil on to kitchen napkin.
  • While it is frying add buttermilk to the 2nd portion and repeat the same process of preparing dough and frying and repeat until all the flour is over.It is always better to make dough in small portions than preparing the dough at once.
Let all the murukkus come down to room temperature.Store it in air tight container.
*Rice flour Preparation at home: Wash the rice nicely and spread on a cloth and let it dry in shade completely.Grind it to a fine powder in a mill or at your house in a mixie and sieve the floor.You can use it immediately,if you want to store then spread the floor on the cloth for a day in shade and store it in air tight container.This stays fresh for 2-3 months and can be used for many varieties.For modak/kudumulu especially this kind of rice flour is used.
Notes:
  1. Choose small sized sago for this murukku,if the sago is big it might break into pieces when it is pressed it into oil.You can even use big star disc instead of round dics in the murukku maker if the sago is of big variety.
  2. Always mix the dough in small portions,this way it will not make the dough very soft and in turn reduces the oil consumption.
  3. If your murukku looks smooth then it is the correct consistency it will give nice hollow and crisp but soft to bite kind of murukku.If the surface is very hard it will yield hard to munch kind of murukku.In that case slightly sprinkle some water to make the dough bit smooth and then proceed. 
  4. If the murukku turns very hard to bite,it means the amount of hot oil you added to the dough is not enough.Add 1-2 tbsp more and make the next batch. 


    Thenkuzhal Murukku | Thengolu | Thenkolalu | Diwali Savory Recipes

    $
    0
    0
    I hope you remember my earlier Manugupoolu post where I have talked about various kind of south Indian murukkus and their importance and my ramblings regarding them.Hence I do not want to repeat the same stories here again with this recipe.I can see quite a bit of relief on many of your faces hahh...!!
    I love these kind of white murukkus like kai murukku,chakli,manugupoolu and thengolu.But among all thengolu are my favorite,I like the taste and texture of these thenkuzhal more than the other varieties.We call it as 'Thengolu' or 'Thenkolalu' or'Thentodalu'.I love to eat all these white murukkus with a mango thokku or a mixture spice powder mixed in dahi.Now off to the recipe.
    Thenkuzhal Murukku | Thengolu | Thenkolalu Recipe:
    Shelf life:upto 2 weeks

    Ingredients:
    4 cups processed Rice flour
    1/2 cup roasted Urad flour*
    1 tsp Cumin seeds (optional)
    2 ladles(80 ml approx) hot Oil
    Salt(2 tbsp approx) to taste
    Method:
    • In a bowl take rice flour and roasted urad dal flour and add salt and cumin seeds to it and mix well.
    • Mean while heat oil in a kadai for deep frying.
    • Add 2 ladles of hot oil in to the rice flour mixture and leave it for 3-4 mins until you can handle the mix with hands.
    • Mix it nicely and divide the portion into 3-4 equal parts.
    • Sprinkle water to each portion separately and prepare dough just before frying.
    • Using a 5 eyed round holes plain disc(disc no -4 in the above figure) in murukku maker and fill the dough in it.
    • Prepare murukkus in a circular motion on top of a wet cloth or on the back side of slightly greased ladles.
    • Gently drop the murukkus carefully with hand and slip it into hot oil.
    • Deep fry over medium-high flame till crisp and slightly golden in color.
    • Drain them into a colander.
    • Once they come to room temperature store them in a clean dry container.
    Serve it as a tea time snack.You can even eat with sweet,spicy and sour mango pickle.

    *To make roasted urad flour: dry roast urad dal in a deep curved pan and stir it constantly till it turns into light golden color.Cool it and grind to a fine powder and sieve it.
    Notes:
    1. You can add around 2 tsp red chili powder to the same recipe and make spicy thenkuzhal murukku.
    2. We usually add sesame seeds in thenkuzhal,this time I asked my mom to add cumin seeds for a variation.You can avoid cumin and add sesame seeds instead.
    3. The thenkuzhal murukku should be hollow in between like a pipe which indicates that it has come out nice.
    4. If your murukku is hard it means the amount of fat(oil) is not enough in the dough.
    5. If the murukku turns very oily it indicates that the amount of fat(oil) you added in the recipe is more.These are the indicative points which you should remember.as we do it in batched you can always rectify these mistakes in the next batch.


    Kobbari Boorelu | Kobbari Vadalu | Deepavali Recipes

    $
    0
    0
    I am sure many of you might not be familiar with this sweet called 'Kobbari boorelu'  or 'Kobbari Vadalu' which are prepared only in Andhra and few places of Karnataka.Also do not get confused with the name boorelu and do not assume the dal based boorelu,these are different.When ever my mom prepares Ariselu(or Adhirasam) she also prepares Kobbari boorelu along with them.As she does not eat jaggery(yes you read it correct,she does not eat jaggery at all and that's my mom..;) ) she always makes one variety among those to make with sugar and as she loves Kobbari boorelu she always ends up making kobbari boorelu with sugar and Ariselu with jaggery.However we get to eat both the varieties. When you see them looks wise they are very much similar to ariselu(or adhirasam) and infact even the preparation process is similar but the difference comes in the addition of fresh coconut in this recipe.Coconut not only makes the boorelu soft it also gives a nice bite when you eat them and I must say they are very very tasty.
     
    Let me point out all the differences between those two varieties to avoid the confusion.The main difference between the both ariselu and boorelu is coconut which definitely changes the taste and texture of them.The dough consistency for both of them is different which gives a drastic change in texture.Kobbari boorelu are very soft when compared to ariselu.Also the shape of boorelu would be like medu wada and the ariselu would be flat discs.Boorelu are not pressed like ariselu after they are friedand henceboorelu are soft,slighly spongy.Some prepare boorelu like flat discs like ariselu but we always prepare in the shape of vada and hence we usually call it kobbari vadalu but in Andhra it is called Boorelu.I have included few more differencesin their preparation methods so please have a look at my notes.
    When I posted Ariselu last week many mentioned that the addition of sesame seeds over the top is new to them.Yes it is true and the reason why we add them over the top is it not gives a nice look to ariselu but also adds to the taste with the extra bite of sesame seedsand so is the case with kobbari boorelu too.
    Kobbari Burelu(Boorelu) | Kobbari Vadalu Recipe:
    Shelf life:up to 2 weeks

    Ingredients:
    2 1/2 cups(1/2 kg) Rice
    1 3/4 cups grated fresh Coconut
    2 cups(approx 400 gms) grated Jaggery
    1/2 tsp Cardamom powder
    1/3 cup white Sesame seeds
    2 tbsp Ghee
    Oil,for deep frying


    Method:

    to make rice flour: 

    • Soak rice in water overnight.My mom uses a slight red colored variety of rice for this,she says it tastes the best but you can use regular white rice variety too. 
    • option-1:Drain the water through a colander.Dry under the shade by spreading on a clean dry cloth.Once it is three-fourth dried(it should not dry completely),you need to send it to mill to get it powdered.Sieve it well
    • option-2:Drain the water through a colander and leave it for 10-15 minutes.Grind half the portion to a powder in the mixie and do the same with the remaining half.Sieve it well.
    • option-3:Drain the water through a colander.Immediately pound it using the typical stone grinder using the pestle,this is the most traditional method.Sieve it well.
    • I followed the option-2  as it is very convenient to make the quantity for a small family.
    to make Boorelu:
    • Grate jaggery and keep it aside.
    • Take a heavy bottomed thick kadai and add grated jaggery and 1/4 cup of water and let it melt completely.Strain through a fine strainer to remove the mud and dirt from it.
    • Now pour it back to the cleaned kadai and boil the jaggery syrup until it reaches the SOFT BALL consistency.In order to test the consistency of soft ball - put little syrup in cold water,when you roll it with fingers you should be able to make a ball out of the syrup.This means a correct soft ball consistency which is very important to get in this recipe.
    • Once you get the soft ball consistency add grated coconut,cardamom powder to it and mix well.
    • Sprinkle rice flour(prepared above) quickly little by little and keep stirring so that it does not form lumps. Keep adding the flour until the syrup holds.You need to stop adding the flour once all the syrup is absorbed and the dough should be very soft and slightly loose.Because of the addition of coconut this will be a soft dough not like the dough we get for ariselu.So keep it in mind and do not add more rice flour which will make the boorelu hard.
    • Pour the ghee on top of it and keep it covered and keep aside.
    • Let the mixture sit for a while for an hour or you can even make them immediately.
    • When you are about to prepare the boorelu,check the consitency(if you keep the dough aside for long) if you think it has become slightly hard,add a couple of tbsps of milk to the mixture and can be mixed to get a soft dough.
    • Meanwhile heat oil in a kadai to deep fry them.
    • Take a small gooseberry sized ball and pat it on a greased plastic sheet or banana leaf to a 1.5 inch diameter round discs and then make a hole in between like how we do for medu wada.
    • Sprinkle some sesame seeds in top of them and gently press them.
    • Deep fry them over MEDIUM-HIGH flame until they turn brown in color.They turn to dark color very quickly and hence do not need to be fried for long,so you should remove them when they start turning color.Few sesame seeds float up in the oil but it is fine,you can remove them with the slotted spoon later.
    • Remove it with a slotted spoon and drain them in a colander,this will remove the extra oil from them.
    • Repeat the same process with all the dough and drain them.
    • Let them come to room temperature.
    Store them in a dry container.They can be stored up to 2 weeks.


    Notes:
    1. You can even make the same with sugar by replacing the jaggery with equal quantities of sugar in the recipe.Follow the same recipe.
    2. These would be softer than ariselu because of the addition of coconut.
    3. Do not fry them for long,these are supposed to be soft.Also fry them over Medium-High flame.
    4. Few shape the boorelu like ariselu,like 3 inch discs.You can even do that way and please remember we do not need to press them after they are deep fried like how we do it for ariselu.
    5. The consistency of jaggery syrup to reach the soft ball is very important in this recipe.If you mess up with it- you will even mess up your end product.
    6. Sesame seeds can be added into the dough but we always add over them.
    7. My mom uses a slight red colored variety of rice for this,she says it tastes the best but you can use regular white rice variety too.


    Easy Chakli Recipe | Mullu Murukku | Diwali Recipes

    $
    0
    0

    I have already posted two kinds of murukkus- Manugupoolu and Thenkuzhal Murukku recipes for this year Diwali.Today I am posting an easy version of Chakli(Murukku) which we(me and my mom) prepared along with the other goodies which I mentioned in this post.However all the murukku recipe ingredients look similar but a small variation in the method makes them completely different,so always better to check the recipe in detail before proceeding to make it.

    Usually Chaklis are made with urad dal flour while few recipes call for urad dal flour and few use cooked urad dal paste.I would post the traditional Kai murukku(Chakli) recipe some time later.The chaklis that I am posting today would not be in white color like the ones which are made with urad dal,they turn slightly brown because of the addition of chickpea flour and roasted gram powder.this recipe works well with either roasted gram powder or chickpea flour.
     
    I hope you all enjoyed my Diwali recipes like I did.I must mention a special thanks to my mom for making this happen,otherwise I don't think I could have ever imagined to post all these traditional recipes in my blog that soon.I bow to all my fellow bloggers who are able to manage to prepare and post all the festival goodies all alone.Let us get into this simple chakli recipe.
    Easy Chakli | Mullu Murukku  Recipe:
    Shelf life:up to 2 weeks

    Ingredients:
    1/2 cup Bengal gram flour(Besan) or 1/2 cup Roasted gram powder
    1 tbsp Roasted gram powder*
    2 tbsp white butter(I used Amul)
    1 tsp Cumin seeds(or 1 tbsp Sesame seeds)
    1 1/2 tsp Salt
    Oil,for deep frying
    Method:
    • Mix rice flour,bengal gram flour and roasted gram flour together and sieve.
    • Mix salt,cumin seeds,melted butter to the flour and mix well.
    • Divide the flour into 2-3 parts equally.
    • Mean while heat oil in the kadai for deep frying. 
    • Sprinkle water to one part and prepare a thick dough.
    • Use a single star disc(disc no-3 in the above pic) in a greased murukku maker and press the murukku slowly in circular motion to form a nice spiral like a chakli on a greased plastic sheet or on back of ladles.
    • Slide them gently into hot oil and fry them over Medium-High flame until the bubbles vanish in the oil.
    • Drain on to a colander to remove excess oil.
    • Repeat the same process with all the dough.
    • Let the murukkus come to room temperature and store them in air tight container.
    You can serve them along with tea or munch when ever you want..I love to eat this with mango thokku which is a sweet and spicy pickle.
    * Roasted gram powder: Grind Chutney dal(fried gram/roasted chana dal) in a mixie to a fine powder and use it in the recipe.

    Notes:
    1. Always use the processed rice flour for the murukku,ready rice flour is not suggested to make these kind of  murukkus.
    2. If the murukku turns very hard to bite,it means the amount of hot oil you added to the dough is not enough.Add 1-2 tbsp more and make the next batch.
    3. If your murukku is hard it means the amount of fat(oil) is not enough in the dough.
    4. If the murukku turns very oily it indicates that the amount of fat(oil) you added in the recipe is more.These are the indicative points which you should remember.as we do it in batched you can always rectify these mistakes in the next batch.
    5. You can avoid cumin seeds in the recipe and make plain murukku as well.
    6. These murukkus will be slightly in reddish color.
    7. You can add 2 tsp Red chili powder while mixing the dough to make spicy chakli/murukku.


    Shahi Tukra | Shahi Tukda | Easy Indian Desserts

    $
    0
    0
    I wish a very HAPPY&COLORFULDIWALI to all my readers,friends and family!!

    I hope everyone is busy with the Diwali Celebrations and so am I.I hope you all liked my Diwali sweets and snacks posts which I did for the last couple of weeks and to end the Diwali celebrations in my blog I have chosen a finale dessert 'Shahi Tukda' and I hope you like it.This dessert is even apt for your Diwali Dinner party,so make this dessert for your Diwali party and be ready to receive various complements from your guests.
    Few recipes fit for the Kings and this recipe is one among them which belongs to Nawabi Cooking Category. Shahi Tukda is one of the rich desserts which is famous in North India and is a closer cousin to the famous 'Double ka Meetha' of Hyderabad.Many get confused that 'Shahi Tukda' and 'Double ka Meetha' are same,I would say that they are similar as the ingredients that go in both the recipes are almost same but the way they are prepared and served is bit different.I will post my recipe for Double ka Meetha sometime later.
    Here are the few differences between both the desserts.The deep fried bread slices are served with rabdi in Shahi Tukra where as in Double ka Meetha the deep fried bread sliced are cooked in the sugar syrup and mawa(or thickened milk) and is turned to a slightly chunky halwa consistency.Hence the texture and taste of both the sweets definitely vary.How ever this is my perception and understanding of these desserts,if you know more about them I am all ears to hear your thoughts about this.
    I usually do not opt for rich desserts as we both do not prefer much of fatty foods on regular basis.These kind of desserts are usually prepared on some special occasions or for parties.It is not only a calorie loaded dessert,it is bit time consuming with the preparation of rabdi.However I have given few easy options and also low fat alternatives in my notes.It is left to your choice,you can opt the low fat version or the traditional rich and sinful version.
    Shahi Tukra | Shahi Tukda Recipe:
    (Serves 4-5)

    Ingredients:
    5-6 white Bread slices(a day old)
    1 litre full fat Milk
    1/3 cup Sugar
    5-6 Saffron strands
    1/4 tsp Cardamom powder
    Ghee,to fry

    for sugar syrup:
    1/2 cup Sugar
    2-3 tbsp water

    to garnish:
    8-10 Pistachios ,sliced
    6-8 Almonds,sliced
    3-4 tbsp fresh Malai/Cream(optional)
    few Saffron strands
    Method:
    to make rabdi:
    • Boil full fat milk over low flame stirring occasionally to remove the cream layer formed on top and sides and mix in the milk and boil until it reaches 1/3rd of the consistency.This would become thick like rabdi.You can use non-stick or regular kadai for this process.
    • Meanwhile soak few saffron strands in a tbsp of hot milk.Rub the saffron strand in between your fingers before adding to the milk.
    • Add sugar,saffron infused milk and boil until the sugar melts.Check the sweetness and if you feel it is less you can add a couple of tea spoons of sugar at this stage.
    • Add cardamom powder and switch off the flame.
    to make sugar syrup:
    • Heat sugar and water together in a vessel and heat until it comes to syrupy consistency.Keep it ready.While few recipes call for the sugar syrup to dip the bread slices,I will say it is optional.You can dip the fried bread slices in sugar syrup or/and you can serve them with rabdi.
    to make the bread slices:
    • Cut the edges of bread and cut each bread into four triangles.Keep all the bread slices ready.
    • option-1 : Heat ghee in a kadai and once it is hot deep fry the bread slices until they turn light golden in color.Add bread only when the melted ghee is hot,otherwise it will soak up lots of ghee.
    • option-2 : Heat a wide pan add 1-2 tbsp of ghee and place the cut bread slices and roast until brown on one side and add few more tbsp of ghee and roast on the other side until golden in color.
    • Remove the roasted bread slices and drop them in sugar syrup for few seconds and let the syrup coats on both sides of the bread slices and keep them aside.Do not dip for long time.
    to serve shahi tukra:
    • Pour some rabdi in the bottom of the serving plate.
    • Dip the sugar syrup dunked bread slices in the rabdi and place them in a serving plate.
    • Pour some rabdi on top of the slices.
    • Dot it with some malai on top.
    • Garnish with sliced pistachios,almonds and saffron strands.
    Serve it warm or at room temperature.You can even serve warm bread slices with cold rabdi.It is according to your wish.

     Notes:
    1. You can add 2-3 tbsp of mawa/khoya or condensed milk to the boiling rabdi to make it rich.It is optional though and also adjust the sugar quantity accordingly if you are adding condensed milk.
    2. While few recipes call for the sugar syrup to dip the bread slices,I will say it is optional.You can dip the fried bread slices in sugar syrup or/and you can serve them with rabdi.
    3. I always prefer ghee to fry the bread slices-you can either deep fry or shallow fry according to your wish.I do not suggest to fry bread slices in oil as it spoils the taste of the dessert.If you are calorie conscious you can roast the bread slices on tawa using ghee to roast them until golden brown.
    4. Always use a day old bread for the recipe,if we use fresh bread it soaks up lot of fat.
    5. You can use white bread or brown bread in the recipe.
    6. Always cut the edges and you can use any fancy shaped cookie cutter and can cut the bread into various shapes according to your choice.
    7. You can keep the deep fried bread slices in a dry storage container for up to half a day.They stay crisp.
    8. Rabdi can be prepared a day ahead and can be refrigerated for 2 days.
    9. You can even garnish with silver leaf(edible silver foil) on top before serving.

    For low fat and quick version:
    1. Use low fat milk instead of full cream milk in the recipe.
    2. I usually thicken the milk by stirring it continuously and is the most traditional method.If you are pressed for time you can add 1/4 cup of fresh bread crumbs to the milk to make quick rabdi following the same process.Adjust sugar accordingly.
    3. You can roast the bread slices on tawa using ghee to roast them until golden brown instead of deep frying them.

    If you have not decided what to make for Diwali,check out my list of  DIWALI SWEETS RECIPES and DIWALI SNACKS RECIPES for some easy and quick options.
    Have a Happy and Safe Diwali.Would catch you all soon with yummy recipes.


    Tikki Puri | Easy Chaat Varieties

    $
    0
    0
    I hope everyone had a wonderful Diwali. We celebrated with loads of festive food and yes with an overdose of sweets .To comply with the tradition , we burst a few fire crackers- just a few as were cognizant of the pollution.
    Tikki Puri is a very common snack we get in Bangalore.You can see lots of chaat gaadis(carts) and small shops spread across Bangalore which serves these awesome chaats.The various chaats which are quite famous are nippat masala, churmuri, tomato slice, chakli masala, chips masala, bele masala,tikki puri and many more items.You can find these kind of small gaadis especially in front of schools,colleges and parks. They are pretty cheap and also a good time pass snacks for those lengthy chit chats.The crisp flat puris that are topped with carrot-onion mixture and is generously sprinkled with chaat chutneys and masalas and layered with crisp murmur and congress kadalebeeja(spiced up peanuts).This is really a delight to the taste buds with the balance of flavors and textures of the various ingredients in the recipe.
    You can serve this snack as an evening snack or a party appetizer when you have a small party at your place. Me and my friends love to play card games when we stay at my place. This finger food is great to be served during that time and not the usual packed potato chips to keep a healthy diet while having fun.
    Tikki Puri Recipe:
    (Serves 2)

    Ingredients:
    16 Papdis/Bombay Puri/Flat Puris
    1 Onion,finely chopped
    1 Carrot,grated
    1/4 cup fine Sev
    1/4 cup Congress Kadalekayi(spiced Peanuts)
    1 cup Puffed rice/Murmur
    2-3 tbsp finely chopped Coriander
    4-5 tbsp Green Chutney
    4-5 tbsp Sweet Chutney(meetha)
    1 tsp Red chili powder
    1 tsp roasted Cumin powder
    1 tsp Chaat masala
    Salt to taste
    Method:
    • Mix finely chopped onions with grated carrot and chopped coriander and keep it aside.
    • Keep all the items ready before plating them as these are supposed to be make quick and eat immediately.
    • Arrange 7-8 pieces of papdis/flat puris in a plate.
    • Take a handful of onion-carrot-coriander mixture and place 1 tbsp of mixture on each puri.
    • Pour 1/2 tsp green chutney and 1/2 tsp meetha chutney on each puri.This quantity is personally your choice and according to your taste buds.
    • Sprinkle a pinch of salt,cumin powder,red chili powder and chaat masala all over the papdis.Sprinkle them according to your taste buds.
    • Next comes the layer of sev and congress kadalekayi(spicy groundnuts).Be generous with this as it gives a nice taste to the masala.
    • Finally top it with a big handful of murmur.Repeat with another plate or prepare both the plates simultaneously.
    Serve the plate immediately.Lift each papdi with all the masala over it and dump into your mouth and enjoy the taste.
    Notes:
    1. There is no hard rule for the measurements in the recipe.You can play with those ingredients and also can tweak in the recipe according to your taste buds.
    2. You can add chopped tomatoes along with the carrot-onion mixture if you wish.
    3. You can follow the same recipe and replace puri/papdi with small nippat/chakli which makes it 'Nippat masala' and 'Chakli masala'.
    4. You can follow the same recipe and replace papdi with tomato slices which makes it 'Tomato slice masala'.This is a guilt free snack for those who are really calorie conscious.


    Beetroot Curry | Beetrool Stir fry(Poriyal) | Easy Side dishes

    $
    0
    0
    After a heavy dose of oily food and sweets from the past couple of weeks because of Diwali I have been preparing very simple food for the last couple of days.This is a simple stir fry recipe which is prepared in most of the south Indian house holds.It goes well with steamed rice or as a side dish for sambar/rasam and dal rice.
     
    Beetroot Stir fry | Beetroot Palya(Curry) Recipe:
    (Serves 3-4)

    Ingredients:
    2 big Beetroots,peeled and finely chopped
    1/3 cup grated fresh Coconut
    3-4 Green chillies
    2 whole Red chillies
    1 tbsp Chana dal
    1 tsp Urad dal
    1/2 tsp Cumin seeds
    1/2 tsp Mustard seeds
    8-10 Curry leaves
    juice of 1/2 lemon(optional)
    a pinch of Asafoetida
    salt to taste
    2 tsp Oil

    Method:
    • Steam chopped beetroot pieces with few pinches of salt either in pressure cooker(without whistle) or steamer for 8-10 mins.You can even microwave them on HIGH for 4-5 mins.Strain them and keep aside.
    • Heat a spoon of oil in a pan/kadai and crackle mustard seeds and cumin seeds.
    • Add asafoetida,chana dal,urad dal,red chillies and curry leaves and fry for a minute.
    • Grind grated coconut with green chillies and salt to a coarse masala.It should not become a paste,it should be like just roughly coarse ground masala.
    • Add cooked and strained beetroot pieces and stir fry for 2 mins.
    • Now add ground coconut-green chili masala and fry for another minute or two.
    • Switch off the flame and add lemon juice and give a stir.
    Serve it with rice,dal/rasam/sambar and papad.
    Variations:
    1. You can follow the same process for vegetables like carrots,beans-carrot,raw banana,cluster beans,yard long beans,cauliflower etc.
    2. You can skip the steaming part and can make with the vegetables like ladies finger,cabbage etc.You need to saute them well for 7-8 mins before adding ground coconut masala.
    3. You can add red chili powder instead of green chillies,it would slightly change in color.
    4. You can add 1 tbsp kurala podi along with the ground coconut masala to the stir fry,in that case reduce the amount of green chillies to 2 in the recipe.This gives a nice taste to curry.
    5. If you want you can add finely chopped onion to the pan and saute well and then proceed with adding chopped beetroot pieces and ground masala.


    Rajma Chawal Recipe | Punjabi Rajma Chawal

    $
    0
    0
    Rajma chawal is the most popular combinations in Punjab.If you ask any Punjabi or any North Indian Rajma chawal would definitely feature in their top 5 list.I had never cooked or tasted Rajma before my marriage and I tasted it for the first time at my friend's place long back and was really impressed with the taste. As hubby is a proper Delhi-ite I learnt the preparation and included it in our weekly menu.I must say it is a real killer combo Rajma-Chawal-Chaas,a hearty meal.
    I think it is an acquired taste and not everyone would love it at the first instant.It is also important to cook rajma in a right way to actually start appreciating it.If rajma is cooked nicely it would be soft and creamy,underdone rajma does not taste good.Rajma tastes best with minimal spices,even if you avoid all the spices and just add chili powder it tastes wonderful.
    While there are lots of rajma varieties available in the market I always pick up those light pink colored ones which cook very nicely.I had even tried Kashmiri rajma which are deep brown in color and smallish and I love it too.
    I have earlier posted a Rajma recipe which is a creamy version (though no cream in the recipe) and goes nicely with rice and roti while today's version is ideally the dhaba kind which is the most famous Rajma Chawal recipe.
    Punjabi Rajma Chawal Recipe: 
    (serves 2)

    Ingredients:

    1/2 cup Rajma/Red Kidney Beans
    1 big Onion,chopped
    2 big Tomatoes,chopped
    1 tsp Ginger-garlic paste
    1/2 tsp Garam masala
    1 tsp Coriander powder
    1/2 tsp Cumin powder
    3/4 tsp Red chilli powder
    1/2 tsp Amchur powder
    2 tbsp chopped Coriander
    1 tbsp Oil
    Salt to taste

    to temper:
    1/2 " Cinnamon
    1 black Cardamom(optional)
    1 Bay leaf
    1 green chilli,slit
    a pinch of Asafoetida
    Method:
    • Soak Rajma in water with some salt for 8-9 hrs or overnight.
    • In a pressure cooker heat oil and add cinnamon stick,black cardamom,bay leaf,green chilli and fry for a minute.Add a pinch of asafoetida and also a pinch of garam masala powder and fry a bit.
    • Grind Onions and tomatoes into a smooth puree.
    • Add the ground onion-tomato mixture,ginger-garlic paste and fry until the raw smell disappears.I usually grind onions along with the tomatoes,you can even cut onions into fine and fry well and then add tomato puree.Either way it tastes nice.
    • Now add all the dry masalas like red chili powder, coriander powder,cumin powder,garam masala,amchur powder and salt and fry until the oil leaves the edges.
    • Add rajma and fry for another 2 mins.Mix everything and cover it and pressure cook for 1 whistle and reduce the flame and cook for 30 mins on a low flame.
    • Once the pressure is dropped,open the cooker and check the gravy consistency.Add required amount of water and boil for another 5-7 mins.Add chopped coriander leaves and mix.
    Serve it hot with plain steamed basmati rice,onion rings,papad and a glass of chaas/lassi.You can even serve it with roti/chapati or Jeera rice.
    Ideally rajma is served over a bed of rice and which is topped with chopped onions and it is served with a glass of chaas/lassi.
    Notes:
    1. Rajma tastes best when it is made simple and not many masalas are added.You can avoid coriander and cumin powders in the recipe and just proceed with red chili powder and garam masala.
    2. I usually grind onions along with the tomatoes,you can even cut onions into fine and fry well and then add tomato puree.Either way it tastes nice.
    3. I use a pink colored skin rajma as I feel they cook nice and soft unlike the other varieties which are very hard to cook.


      Hyderabadi Mirchi Ka Salan Recipe

      $
      0
      0
      Mirchi Ka Salan is a Hyderabadi special recipe which is usually paired with Hyderbadi Dum Biriyaniand gets featured in most of the weddings and functions in Andhra.The spiciness of green chillies is slightly neutralized with the slight sweet and creamy rich gravy made up of groundnuts,sesame seeds and fried onions.I have mentioned few pointers to reduce the spicyness of chillies in the notes and recipe,please do follow them.
      Bagara Baingan is another recipe which is prepared in a similar manner and is absolutely our family favorite.You can check out my recipe for lip smackingBagara Baingan here,I suggest you to try it once and I am sure you would definitely thank me as you tried it.Trust me it is really delicious and a perfect party recipe.
      Mirchi Ka Salan Recipe :
      (Serves 3-4)

      Ingredients:
      12-15 big light Green peppers(bajji variety/poblano)
      2 big Onions sliced
      1 tbsp Ginger-Garlic paste
      2-3 tbsp Tamarind pulp
      a pinch of Turmeric powder
      a pinch of Sugar
      1 tsp powdered Jaggery(optional)
      1 tbsp chopped fresh Coriander
      5-6 Curry leaves
      1/2 tsp Cumin seeds
      1/2 tsp Mustard seeds
      3 tbsp Oil
      salt

      To roast and grind:
      1/4 cup Groundnuts(roasted and peeled)
      2 tsp white Sesame seeds
      2 tbsp grated dry Coconut
      1 tsp Roasted gram(optional)
      5-6 Red chillies(or red chilli powder)
      1 tbsp coriander seeds
      1/2 tsp Cumin seeds
      3-4 Cloves
      1" Cinnamon
      1-2 green Cardamom pods
      Method:
      • Wash and slit the green chillies(poblano peppers) and remove the veins and seeds of it.
      • Bring water to a boil with some salt and add the green chillies and blanch for a minute and drain them.I really can't judge the spiciness of chillies even though they are light green in variety,some times they turn out very spicy for me.So I do blanch my green chillies to reduce the heat from chillies,if you like spicy food you can avoid this step.This process not only reduces the heat it also helps in consuming less oil while shallow frying.
      • Heat oil,fry half the portion of sliced onions(add a pinch of sugar while frying) and fry until they turn pink.
      • Add ginger-garlic paste to it and fry for a minute and cool the mixture.
      • Dry roast sesame seeds,dry grated coconut and ground nuts separately.Peel the skin of the groundnuts and keep them aside.
      • Dry roast all the spices cloves,cinnamon,cardamom,coriander seeds,cumin seeds and red chillies separately until light brown in color and cool them and then grind it to a fine powder.
      • Add roasted ground nuts,sesame seeds and grated dry coconut and grind again.
      • Add the fried onion mixture, jaggery,tamarind pulp and grind it again to a smooth mixture.Add water if needed while grinding to get a smooth velvety paste.
      • Heat 1tbsp oil in a wide bottomed pan and add the slit poblano peppers and fry for 2 minutes,cover it with a plate and pour water over it and cook for 5-6 minutes until the peppers are slightly soft,remove the peppers and keep them aside.
      • In the same pan add the remaining 2 tbsp oil and crackle mustard seeds and cumin seeds and then add the remaining sliced onions(1 onion) and fry until they turn pink.Add curry leaves to it and fry again.
      • Add the ground spice mixture,turmeric powder and salt and fry until the mixture leaves the oil,add 1 cup of water(adjust the water according to the required consistency) and let it come to a boil.The gravy thickens as it sits for a while so make the gravy slightly thin.
      • Add fried peppers and mix and cover it and cook for 7-8 mins until thick.
      • Garnish with chopped coriander.
      Serve Mirchi ka Salan with Veg Biryani / Jeera Rice/ Steamed Rice or Roti/Naan/Kulcha.
      Notes:
      1. Use light colored chillies which are used for preparing mirch bajjis as they are not spicy.
      2. Remove the seeds from the peppers which will reduce the spicyness of chillies and I also prefer to blanch them which removes any extra spicyness in the chillies.
      3. You can even use wide strips of capsicum or colored bell peppers instead of poblano peppers in the recipe and follow the same recipe.
      4. The gravy thickens a bit when it sits for long.If it becomes very thick add some water and boil it again during serving.
      5. You can add 1 tsp poppy seeds along with the sesame seeds in the recipe.
      6. Another famous Hyderabadi recipe Bagara Baingan is also prepared in a similar way.You can just replace peppers with the small slit brinjals in the recipe.


      Spicy Potato Roast | Crispy Aloo(Alu) Fry

      $
      0
      0
      I have mentioned many times before that I love baby potatoes and never miss a chance to pick them up during my shopping.You can check out various baby potato recipes like Baby potato biriyani, Dum Aloo chutney waale, Pudina Aloo and other recipes here.I try to use baby potatoes in place of various recipes as I prefer them.I usually make this simple Potato roast for weekend lunch as it is very simple and complements sambar or rasam very well.
      Spicy Potato Roast | Crispy Aloo Fry:
      (Serves 2)

      Ingredients:
      18-20 Baby Potatoes or 4 Big Potatoes
      2 tbsp Tamarind pulp
      3/4 tsp Red Chili powder or  Garlic chili powder
      Salt to taste

      to temper:
      1/2 tsp Mustard seeds
      1 tsp Urad dal
      2-3 red chillies,broken
      a sprig of Curry leaves
      2 tbsp Oil
      Method:
      • Dilute the tamarind pulp with enough water and add cleaned and washed potatoes and salt and pressure cook for 1 whistle.Let the pressure drops and drain the potatoes and let them cool.
      • Peel the skins off and keep them aside.If the baby potatoes are big,cut them into 2.If you are using normal potatoes cut each of them into 8 big chunks.
      • Heat the kadai and add oil and heat it.
      • Add mustard seeds and let them crackle and then add urad dal,red chillies and curry leaves to it.
      • Add the boiled and peeled baby potatoes(or the cubes) and fry them in oil on HIGH flame for 2-3 minutes.Keep them stirring in between so that the potatoes are well covered with oil and roast evenly and also take care not to let  them burnt.
      • Once you see the brown patches on the potatoes,if you feel the oil is more you can remove the oil from the sides by gently handling the potatoes or otherwise leave it.I try to remove the extra oil at this stage as we do not need more now to fry them.
      • Now reduce the flame and let them roast over low flame for approx 8-10 mins.Keep stirring them to avoid them burnt and also make sure you roast them evenly.
      • Add salt,red chili powder(or garlic chili powder) and Kurala podi and stir them to coat the potatoes with all the spices.
      • Roast for another 2-3 mins on low flame.
      Serve them immediately with hot rice or as a side dish for sambar/rasam with rice.
      Notes:
      1. These kind of roasts/fry will loose their crispiness after a while,so its better to serve immediately.
      2. In case you want to serve later you can roast them again in the same pan for 4-5 mins on medium flame to get the crispiness back at the time of serving.
      3. You can follow the same process for Arbi and Raw Bananas.
      4. I like the addition of Kurala podi in the recipe,if you do not have you can avoid it.


      CANAPE SEV PURI | Fillings for CANAPES

      $
      0
      0
      I have mentioned in many of my posts that chaats are usually a part of our meal and get featured very frequently in our menu at my place.When ever I go to shopping I would end up buying a pack of golgappas or papdis or canapes as these three are the most common bases for any chaat and I keep experimenting new chaats and apart from the usual ones.This recipe was sitting in my drafts from a very long time and I kept postponing as I was not happy with the picturesand finally I am posting the same.
      These kind of Canapes are easily available in the market these days (I got the brand called DIP) and these are very versatile and are good for finger food for parties.I have earlier posted a recipe where I used an Italian filling for Canapes,today's recipe is more of a simple sev puri filling which is quite suitable for Indian palates.One can get creative with the fillings and experiment various flavors.I usually make American corn sev puri with these canapes which I would post some other time.Now off to the recipe.
      Canape Sev Puri Recipe:
      (Serves 2- you can easily double the recipe)

      Ingredients:
      14-16 Canapes(Ready made)
      1/3 cup Moong sprouts,steamed
      2 Potatoes,boiled,peeled and chopped
      1 Onion,finely chopped
      1/4 cup chopped fresh Coriander
      1/3 cup fine Sev
      1/4 cup Kharjur-Imli chutney
      1/4 cup Green chutney
      1 tbsp roasted Cumin powder
      1 tsp Red chili powder
      1 tsp Chaat masala
      Salt to taste
      Oil,to deep fry canapes

      Method:
      • Pressure cook potatoes for 3 whistles.Add enough salt to potatoes while cooking them.Peel the potatoes and chop them into fine pieces.
      • Steam moong sprouts with a pinch of salt for 5-6 mins.
      • Deep fry canapes in oil for few seconds until they turn crisp,follow the instructions given at the back of the packet.I usually bake them in oven for 2-3 mins at 160 deg C.I keep a close watch to check whether they are done or not,so if you are baking them in oven please have a close look at them.
      • Arrange the canapes in 2 plates,7-8 each.
      • Fill them with 1/2 tsp steamed moong sprouts and then followed by 1 tsp boiled and chopped potatoes.
      • Add 1/2 tsp chopped onion in each puri.
      • Add little bit of kharjur -imli chutney and green chutney.
      • Again top it with a generous drizzle of kharjur-imli chutney and green chutney.
      • Sprinkle a fat pinch of roasted cumin powder,red chili powder,chaat masala and salt.
      • Top it with sev generously and garnish with coriander.
      Serve it immediately.
      Do not keep it for long as it will become soggy,so prepare this just before serving,Keep all the ingredients ready before you serve this.
       
       Notes:
      • There are no specific measurements for this recipe.All the ingredients are adjusted according to your taste buds.
      • You can make more number of plated increasing the quantities accordingly,there are no measurements.
      • You can use cooked  and slightly mashed white chickpeas instead of moong sprouts in the recipe.
      • You can garnish with few pomegranate kernels at the end.


      Chickpeas Salad | Chana Salad | Healthy Salad Recipes

      $
      0
      0
      I usually prefer saladsfor a light weekday dinner along with a small bowl of soup or toasted bread slices.I prefer these kind of protein rich beans salad as they are not only tasty they are even very filling too and hence can be eaten as a meal by itself.One can play with the ingredients that go in the salad and prepare it according to their wish.This is a very versatile salad and can be prepared with various beans.
      Chickpeas Salad Recipe:
      (Serves 2)

      Ingredients:
      1/2 cup Chickpeas/Kabuli Chana
      1 medium Potato
      1 small Onion,finely chopped
      1 small Tomato,seeded and finely chopped
      1/4 cup Pomegranate Kernels
      2 tbsp finely chopped Coriander
      2 tbsp Mint leaves,torn with hands
      1 Green chilli,finely chopped

      for dressing:
      2 tbsp Extra virgin Olive oil
      3/4 tsp Chaat masala
      1/4 tsp Red chili powder
      1/4 tsp black Pepper powder
      1/4 tsp roasted Cumin powder(optional)
      juice of 1/2 Lemon
      Salt to taste
      Method:
      • Soak chickpeas overnight for 8-9hrs and wash them and pressure cook with enough water for 3 whistles,reduce the flame and cook for another 5-8 mins.Chickpeas should cook thoroughly and soft but firm and also should not become mushy.Drain them and keep them aside to cool.
      • Pressure cook potato for 3 whistles along with chickpeas or separately.Let it cool completely and then peel the skin and chop into small cubes.
      • In a small make the dressing mix in olive oil,lemon juice,salt,chaat masala,red chili powder,black pepper powder,roasted cumin powder and give a nice stir using a small wire whisk until you get a uniform paste.
      • Take a big bowl and add boiled chickpeas,boiled and chopped potatoes,finely chopped onion,tomato,green chilli,coriander leaves,pomegranate kernels and give a nice stir.
      • Add the dressing and check the taste of it and add any seasoning like salt or spice to suit your taste buds.
      • Serve them into two individuals bowls.Garnish with chopped coriander.
      Serve the Salad immediately. You can even refrigerate for sometime and eat,it tastes good too.
       Notes:
      • You can follow the same recipe replacing white chickpeas with Black Chickpeas or Rajmain the recipe and follow the same recipe.
      • If you do not have olive oil you can skip it and proceed with the same.
      • I love the bite of pomegranate kernels in the salad,you can even add roughly chopped walnuts or pecans or raisins in the recipe.
      • You can even add finely cubed cucumbers to the recipe along with onions and tomatoes.


      Chinta Chiguru(Chintaku) Podi | Tamarind Leaves Powder

      $
      0
      0
      My pantry is always loaded with various podi mixes and pickles which comes very handy on those days when I am very lazy to cook anything.All I need to do is to prepare some plain rice and can eat these powders and pickles mixed with hot rice and ghee which is actually a delicious meal which I crave at times.

      I get most of my podi(powders) supply from my mom and pickles from my MIL on my every visit.The varieties of podis(powders) which can be eaten with rice are really vast and my mom makes very nice podis.She makes lot of other varieties of podis like Kothimir Podi(coriander leaves podi), Pudina Podi, Curry leaves Podi, Bitter gourd podi, Garlic podi, Kandi podi, Munagaaku Podi(Drumstick leaves powder) to name a few.Her Bitter gourd podi is a big hit among all those who have tasted it and have made them to change their opinion about biter gourds after they tasted her's.
      Chintaku(Tamarind leaves) podi is really tasty with the natural hint of tangyness it gets from tamarind leaves.We usually store a pack of dried tamarind leaves all through the year and make this podi when ever we want.We even use dried tamarind leaves in this Onion-Chintaku palya which is a nice combo with Rice flour poori(Vadappa).
      Chintaku Podi | Tamarind Leaves Podi Recipe:
      shelf life: up to a month

      Ingredients:
      1 heaped cup dried tender Tamarind leaves
      6-8 Red chillies
      1/3 cup Groundnuts
      1 tbsp grated dry Coconut
      1 tbsp white Sesame seeds
      3-4 Garlic pods with skin(optional)
      1 tsp Oil
      Salt to taste
      Method:
      • Use the tender tamarind leaves which are dried in sun until completely dry,might be for 2-3 days consecutively.
      • Dry roast groundnuts until the skin turns brown and once they are cool,remove the skin and keep them aside.
      • Dry roast sesame seeds and keep them aside.
      • Keep the dry coconut in sun for some time or you can even dry roast the grated dry coconut for a minute.
      • Heat oil in a kadai/pan and add red chillies and remove them and keep aside.
      • In the same kadai add tamarind leaves and fry for 3-4 mins on low flame until they are slightly crisp and keep them aside.Let all these fried ingredients come to room temperature.
      • Grind groudnuts,sesame seeds,dry coconut,red chillies and salt to a fine powder.
      • Add fried tamarind leaves and grind again to a fine powder.Check the taste and add more salt if required.
      • Add garlic pods and run in whipper mode to crush the garlic pods little bit.
      • Cool the powder and store it in air tight clean container.
      Serve it with hot rice and ghee.
      Notes:
      1. Adjust red chillies according to your spice level.
      2. You can increase the quantity of ground nuts a bit more if you like the taste.
      3. It can be stored for up to a month under normal conditions and 2-3 months when refrigerated.


      Vankaya Kobbari Karam | Andhra style Stuffed Brinjals

      $
      0
      0
      We are just back from a long holiday to Kerala-God's own country which we were planning since long and it finally happened.It was quite rejuvenating and we had a wonderful time in Kerala and would definitely share more details regarding our trip later.It is very difficult to get back to routine especially after a long holiday and I will slowly visit your blogs in a couple of days.I am posting a recipe today from my archive.
      I have posted lots of stuffed vegetable recipes with Brinjals,Tindora,Poblano Peppers and Bitter gourds.I have a special liking towards the stuffed vegetables as I just love to eat them with rice.If you are like me you must check out my other stuffed vegetable recipes like Vankaya Ullipaya Karam , Andhra style stuffed mirch, Dondakaya Ulli Karam, Stuffed Karela, Kakarakaya Ulli Karam. All these stuffed vegetables makes a nice combo with rice and can be even served as a side dish with sambar or dal or rasam rice.
      Vankaya Kobbari Karam | Stuffed BrinjalRecipe:
      (Serves 3-4)

      Ingredients:
      10-12 baby Brinjals/Eggplants
      1/2 cup grated fresh Coconut (or even coconut pieces of 2/3 cup approx)
      a small bunch of Coriander leaves(approx 1 cup)
      4-5 Green chillies
      1/2 tsp Cumin seeds
      1/2 tsp Tamarind pulp
      Salt to taste

      to temper:
      2 tbsp Oil
      1/2 tsp Mustard seeds
      10-12 Curry leaves
      a pinch of Asafoetida
      Method:
      • Mark a cross and cut through the 3/4th portion of brinjals and take care that you would not cut them into pieces.Drop them in a salted water for 10 mins,this way it will remove the bitterness if any in the brinjals.
      • Grind coconut pieces(or grated coconut),coriander leaves,cumin seeds,green chillies,salt and tamarind pulp to a very coarse mix.Do not grind for long,just grind it enough to get a coarse mixture.
      • Stuff the eggplants with the ground mixture liberally and keep them aside.
      • You can follow any of the two methods which I mention below to make these stuffed eggplants.
      • option-1: Heat oil in a small cooker and crackle mustard seeds and add curry leaves and asafoetida and add stuffed baby eggplants and fry for a minute or two and sprinkle water -roughly 2-3 tbsp and add a generous pinch of salt on the eggplants and give a stir and cover it with lid and pressure cook for 1 whistle on medium-high flame.Let the pressure drops off on its own.Open the cooker and check if any water is residing,if there is any water content switch on the stove and cook for 2 minutes on high flame with the lid open until water evaporates.
      • option-2:Heat oil in a wide kadai and crackle mustard seeds and add curry leaves and asafoetida and add stuffed baby eggplants and fry for 3-4 minutes.Add a generous pinch of salt on the eggplants and give a stir  and cover it with a deep lid and pour water and in the lid and let the eggplants cook with the steam produced in this manner over low flame.It takes roughly 12-15 mins.Keep checking in between and also stir once in a while.If the water evaporates in the lid add some more water to it,otherwise the eggplants will get burnt.
      Serve them hot with hot rice,ghee and papad.You can serve it as a side dish for rasam,sambar and dal rice.
      Notes:
      1. You can add the ingredients according to your requirements.You can even increase the quantity of coriander leaves in the stuffing if you want.Also adjust spicyness according to that.
      2. The same stuffing can be used for Ladies finger,in that case you need to follow the option-2 for cooking.You cannot use the pressure cooker method for ladies finger,it will become sticky and soft.

      Curd Rice | Daddojanam | Mosaranna | Thayir Sadam

      $
      0
      0
       
      My week long vacation has made me a bit lazy - am still in a holiday mood so have not been too eager to cook any new dishes after coming back. So here is a post that finds its way from my picture folders where I had saved a few pics which I had taken last month- a good time to clear my drafts and get to cook something new later!
      Coming to today's recipe, "Curd rice" is a very common south Indian dish prepared in every house hold and is a comfort food for many.One can have curd rice as a meal by itself or as a part of a meal in the end. I find a bowl of curd rice always comforting especially during summers.I usually make curd rice very simple if I make it on usual days and try to make it slightly rich when I prepare it for an occasion or a party.Few additions like butter and cream will make the curd rice really rich and tasty.Do go through the recipe and notes and opt the method which is convenient for you.
      Curd Rice | Daddojanam Recipe:
      (Serves 2)

      Ingredients:
      1 cup normal Raw rice(Sona masuri or equivalent)
      1 1/3 cup whole Milk
      1/2 cup fresh thick Curd
      1 tbsp Butter
      2 tbsp cream
      1/4 cup Pomegranate kernels
      2 tbsp chopped Coriander
      Salt to taste
      to temper:
      1 tbsp Oil
      1/2 tsp Mustard seeds
      1 tsp Urad dal
      1 tbsp Chana dal
      a pinch of Asafoetida(optional)
      6-8 Cashew nuts,cut into halves
      a sprig of Curry leaves
      4-5 Green chillies,slit
      1/2" ginger,grated

      Method:
      • Wash and soak raw rice for 15-20 mins and add 3 cups of water and pressure cook for 3 whistles.Let the pressure drops off automaticlaly.
      • Meanwhile boil the milk and keep it warm.
      • Once the rice comes to luke warm temperature transfer it into a wide bowl and slightly mash it with the back of the ladle.
      • Add warm milk and butter to the rice and mix well.
      • Heat oil in a small pan and crackle mustard seeds and add chana dal,urad dal and cashew nuts and fry until they turn golden in color.
      • Add asafoetida,slit green chillies,grated ginger and curry leaves and fry well.Let the tempering cool down to room temperature.
      • Add curd,salt,pomegranate kernels,chopped coriander to the rice mixture and mix well.
      • Add the tempering to the curd rice and mix well and keep the rice aside for 1/2 hr to 1 hr.This standing time will set the curd rice nicely.If you want to serve it later its better to refrigerate after an hour until the serving time
      Serve it as a part of meal or as a meal by itself.Serve it with curd chillies and lemon or mango pickle.
      Notes:
      1. If you like curd rice little soft,slightly mash the rice while it is still warm.
      2. Add warm milk and butter to the rice while it is still warm.
      3. If you intend to serve curd rice later after few hours add curd just an hour to the milk-rice mixture before serving.Also refrigerate if needed.
      Variations:
      1. You can add grated carrots or chopped cucumber pieces or chopped raw mango pieces to curd rice.
      2. You can replace pomegranate kernels with chopped green grapes or black grapes to the curd rice.
      3. Raisins can be added in the tempering along with cashew nuts to the curd rice.

      Andhra style Pappu Charu | Tomato Dal Rasam

      $
      0
      0
      I had prepared this rasam along with Vankaya Kobbari Karam(Stuffed Brinjals) which I had posted recently for those one of our week end lunches.This is a very common recipe in every south Indian household.I love this rasam very much and also make it quite often.
      Tomato Dal Rasam | Pappu Charu Recipe:
      (Serves 3-4)

      Ingredients:
      1/4 cup Toor dal
      2 small Tomatoes,chopped
      a small lemon sized Tamarind or 3 tbsp Tamarind pulp
      1 light colored Green Chilli,slit
      1 tsp grated Jaggery
      1 tbsp finely chopped Coriander leaves
      2 tsp Sambar/Rasam powder *see notes
      1/4 tsp Turmeric powder
      Salt to taste

      for Tempering:
      2 tsp Ghee
      1/2 tsp Mustard seeds
      2 Red chillies
      a sprig of curry leaves
      a pinch of Asafoetida

      Method:
      • Pressure cook toor dal with chopped tomatoes and turmeric powder for 3 whistles.
      • Once the pressure drops transfer it to a vessel and let it come to a boil.Add more water to  the required consistency.
      • Once it comes to a boil add green chilli,chopped coriander,sambar/rasam powder,tamarind pulp,jaggery and enough salt and mix well.Let it come to a boil.Taste it now and adjust the seasoning according to your taste buds.In case you need to add more water or tamarind or salt or sambar powder,feel free to add it and boil for a couple of minutes more.This would be sweet,spicy and tangy at the same time,a perfect blend of flavors.
      • Mean while heat ghee in a small(tadka) pan and crackle mustard seeds and add red chillies,curry leaves andasafoetida and fry for few seconds and add the tempering to the boiling rasam and boil for 1 minute and switch off the flame and keep it covered.
      Serve it hot with plain hot rice and some vegetable fry and fryums.

      *My mom gives me the sambar powder which can be used as rasam powder.You can easily replace the sambar powder with store bought MTR brand Rasam powder.

      Christmas Fruit Cake | Kerala Plum Cake | Christmas Cake Recipes

      $
      0
      0
      Today is my niece K's birthday and she has turned four today.I would like to wish her a very Happy Birthday through this virtual celebration post.
      My dear lovely princess K,  'May your birthday be filled with sunshine and smiles, laughter, love, and cheer'. - with love,Atta.
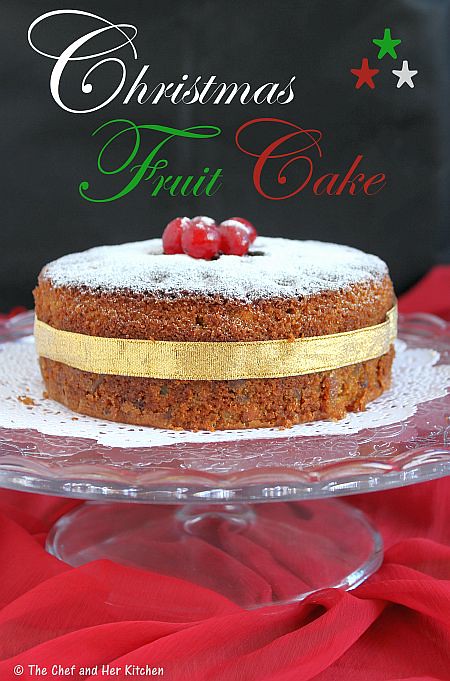
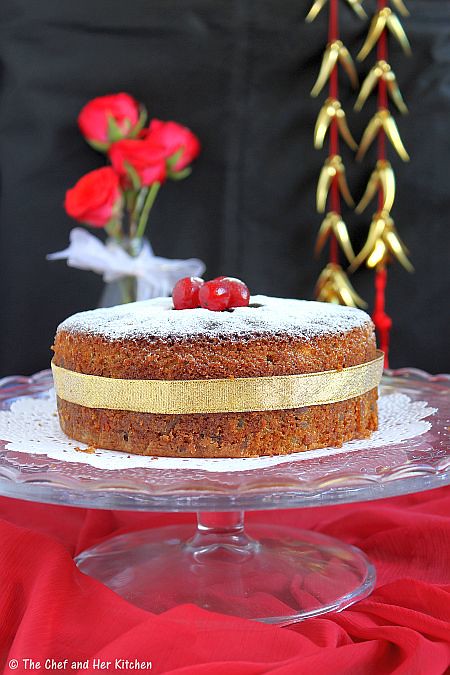
      Christmas is nearing and I am sure many of you would have already soaked your dry fruits for the Christmas cake.As I do not use alcohol in my cooking, I am posting my non-alcoholic version of Christmas fruit cake which is ideal for those who are planning to make it at the last moment.I soaked the dry fruits and nuts in orange juice instead of alcohol(rum) which imparts a nice flavor-may not be similar to that of the alcohol version but it tastes still delicious.
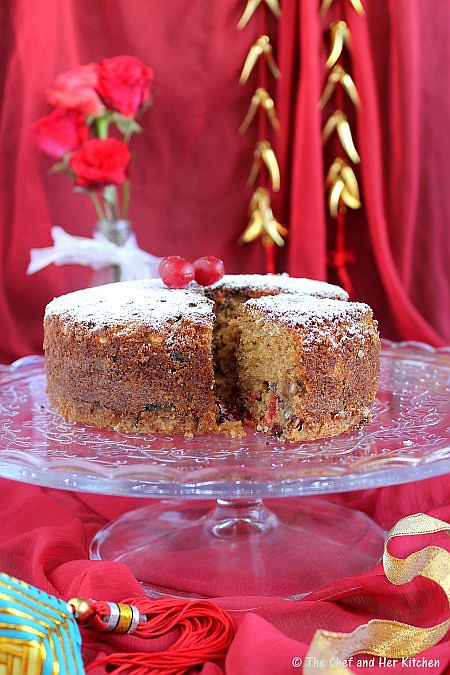
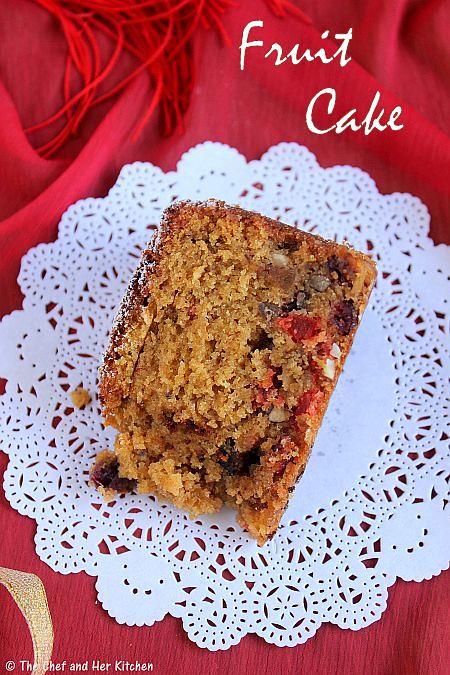
      Plum cake/Fruit cake is one of my favorite cakes apart from the classic butter sponge as I prefer the cakes with out frosting.When I googled the fruit cake recipe I got so many recipes but most versions used alcohol which I did not want. I got impressed with 
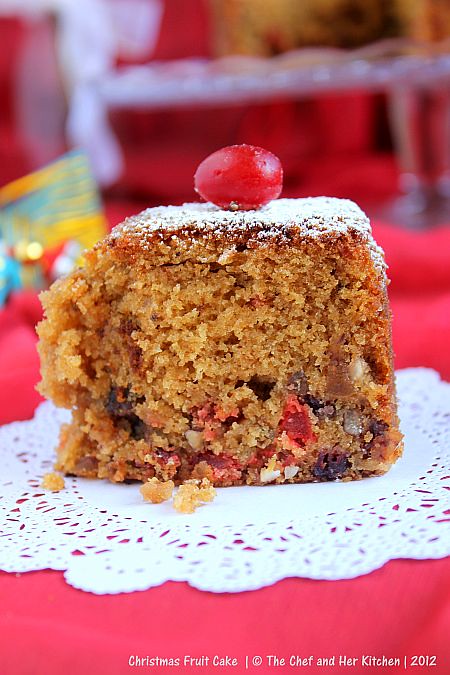
this recipe and I have adapted the process and also my basic Vanilla cake recipe and changed it according to my taste.The cake was very moist with the right amount of sweetness and slightly crumbly just like how the Fruit cake is supposed to be.Few of my dry fruits got settled down,next time I should mix the batter bit careful.But this recipe is definitely a keeper for a non -alcoholic version of Fruit cake.
      The recipe list goes long and also the method looks quite elaborate but believe me it is a very easy recipe if you follow the instructions clearly and plan it bit ahead.Also the shelf life of the cake is more and you can easily store it more than a week when refrigerated.Do not miss preparing this cake during Christmas,it will definitely make your Christmas more merrier.
      KERALA PLUM CAKE | CHRISTMAS FRUIT CAKE RECIPE:
      makes a 6" Cake
      recipe source: adapted from here

      Ingredients:
      100 gms(1 leveled cup) All purpose flour
      100 gms(1 stick or 1/2 cup) unsalted Butter*,at room temperature
      60 gms(1/4 heaped cup) Dark brown Sugar
      2 large Eggs
      1 tsp Baking powder
      1/4 tsp Baking Soda
      1 tsp fresh Orange Zest
      1/2 tsp fresh yellow lemon Zest
      1 tbsp candied Peel(optional)
      1 tbsp candied Ginger(optional)
      3/4 tsp All spice powder( 1/4" Cinnamon + 3 Cloves + a fat pinch of Nutmeg powder)
      1 tsp dried Ginger powder
      a pinch(1/4 tsp) of Salt

      to prepare ahead(atleast a day before):
      3/4 cup fresh/canned Orange juice
      1/4 cup Tutti Fruti
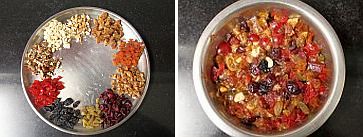
      1 cup dried Fruits(1//4 cup dried Cranberries, 2 tbsp Raisins,2 tbsp Black currants,2 tbsp chopped dry Dates, 2 tbsp chopped dried Figs, 2 tbsp chopped dried Apricots,2 tbsp chopped Glaced Cherries)
      1/2 cup chopped Nuts(8-10 Cashews,8-10 Almonds,8-10 Walnuts,8-10 Pecans,2 tbsp Pistachios)

      to prepare caramel:
      50 gms(1/4 cup) Dark brown Sugar
      1 tbsp Water
      1/4 cup warm Water
      1 tsp Vanilla essence

      to decorate:
      2 tbsp Icing sugar
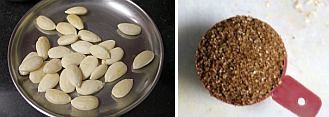
      25 blanched and skinned Almonds

      Method:
      to prepare ahead(atleast 1 day ahead) - soaking up dry fruits:
      • Cut all the dry fruits like apricots,figs,dates and cherries into fine pieces and also the nuts like cashewnuts,almonds,walnuts and pecans into fine pieces and keep it ready.
      • Soak all the chopped dry fruits and nuts with tutti fruti and cranberries,raisins and black currants in orange juice.Let the dry fruits soak in the orange juice at least for a day or at least for a minimun of 6-7hrs.Keep mixing the chopped fruits and nuts in between so that they would soak up all the juices.
      to prepare Caramel:
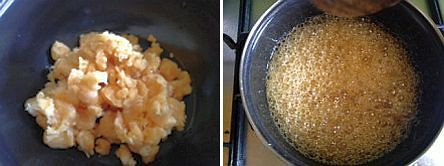
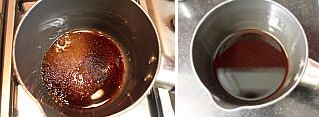
      • In a deep pan add 50gms(1/4 cup) dark brown sugar and 1 tbsp of water and stir it continuously until the sugar caramelizes and melts and starts bubbling and changes it color to the deeper dark shade.It takes roughly 4-5 minutes.Meanwhile warm 1/4 cup of water either in microwave or on stove top.Switch off the flame and add 1/4 cup warm water to it and leave it aside to cool completely.Add vanilla essence to it and mix.
        to prepare Cake:
        • Prepare a 6" round tin by layering it with butter paper at the bottom and grease it with butter.Sprinkle a tsp of all purpose flour and dust it to reach all the edges and sides of the pan.Shake off the extra flour from the tin. 
        • Blanch the almonds and peel off the skin and keep them ready.
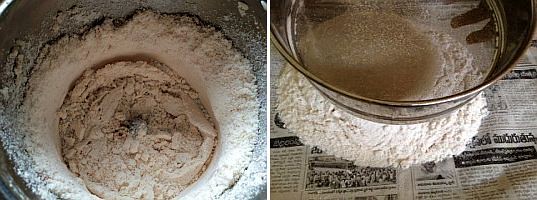
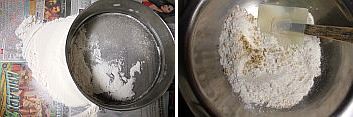
        • Sieve the all purpose flour with baking powder,baking soda,dry ginger powder and all spice powder.Sieve it 4-5 times until all the flour is uniformly mixed.
        • Beat butter with a electric whisk and add dark brown sugar(or powdered form of sugar) and beat well again for 5-6 mins until you get a smooth and fluffy mixture.
        • Add one egg at a time to the mixture and beat again until everything is well incorporated.Add the other egg and follow the same process.
        • Add cooled caramel mixture and beat again to get a smooth uniform mixture.
        • Add orange zest and lemon zest and mix well with a rubber spatula.
        • Meanwhile preheat the oven at 160 degrees for 10-12 mins.
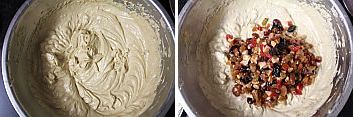
        • Add 1/3 rd quantity of  the flour mixture and beat it with electric whisk or fold it using a rubber spatula and repeat the same process for the remaining portion of flour.
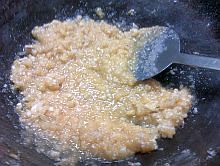
        • Drain the soaked dry fruits and add them to the batter and gently mix with a spatula.I has some 2-3 tbsp of soaked orange juice left which I added to the batter.It is your wish to add it or not to the batter.
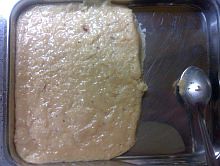
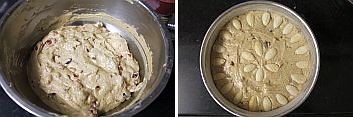
        • Scoop out the mixture to the prepared tin until 2/3rds full .Here if you want you can decorate the cake with blanched and skinned almonds in a required manner.Cover it with aluminum foil.Covering it with Aluminum foil ensures that the top portion will not get burnt.It is an optional step to cover the tin with foil.

        • Bake it in preheated oven at 160 deg(320 F) for  40-50 minutes.Mine got done in 45 minutes.Keep an eye after 30 minutes.When you insert a long tooth pick it in the center,it should come clean which means the cake is perfectly done.
        • Cool the cake in the tin for 10  minutes.Run a sharp knife along the edges and invert it on to the wire rack and peel off the butter paper and let it cool completely for an hour.
        • Cool it completely overnight for at least 5-6 hours before cutting the cake.
        Store it in an air tight container.It stores well for 3 days under room temperature and more than a week when refrigerated.
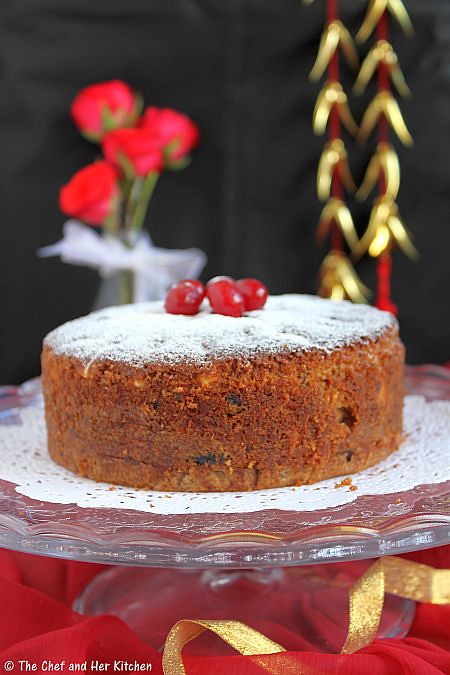
        You can dust it with icing sugar if you want before serving.

        *I used Amul salted butter in the recipe.So I avoided salt in the recipe.If you use unsalted butter add salt otherwise it is not necessary.
        Notes:
        1. You can add dry fruits of your choice to the cake.
        2. You can add 1-2 tsp rum to the batter or you can even soak the fruits in rum 1-2 months before.This depends on your personal choice to use alcohol or not.Mine was a non-alcoholic version and hence I did not add it in the cake.
        3. You can soak the dry fruits for long in the orange juice say for a couple of weeks,it says that you get a better flavor but I soaked it just for a day and it was still tasting nice. 
        4. Few of my dry fruits settled in the bottom.Hence I suggest you to drain the dry fruits completely and wipe off extra moisture in a kitchen towel and sprinkle some flour and mix.Then add them to the cake batter and mix well,I think this would help in not settling the dry fruits down.
        5. Use dark brown sugar for the cake which gives the brownish color to the cake. 
        6. As I did not have candied peels and candied ginger in hand I did not use it in the recipe.If you have them do definitely use them they will definitely enhance the flavor of the cake.
        7. You can even pour the batter into a loaf pan and bake it like a load which is quite convenient to cut into slices.

        KADAI PANEER RECIPE | PANEER RECIPES

        $
        0
        0
        The first time I tasted Kadai Paneer was almost a decade ago when my mom prepared it after watching a cookery show.We instantly fell in love with the curry, as it was lip smacking good with all the freshly pound spices which takes the curry to another level, in my view.This recipe was a keeper and it got transferred to all my hand written cook books (only the trusted recipes find their way in my hand written cook book!) over a period of time and I thought this is the time to get its place in my virtual cook book - my blog.You can see my hand written cook book in this picture which I treasure from more than 5 years.
        I have modified the recipe a little bit over a period of time.The original recipe used fenugreek seeds in the masala which got replaced with fenugreek leaves in the gravy and also few minor changes in the process of roasting vegetables which yields into a delicious curry.
        When I saw the Kadai Paneer recipe in Anu's space, I was very happy to see a version similar to what I prepare at home and of course with a few tweaks, as every one has their own personal touch which makes the recipe special.I liked her idea of frying the vegetables individually and coating each vegetable with the freshly pound spices, which is slightly different in my case as I roast all the vegetables at one go, and coat them with spices in the end.
        I love the Kadai Paneer semi-dry,I do not like it in a gravy form or a stir fry form.The moist paneer pieces and the crisp roasted vegetables are coatedt with a light coat of aromatic spices and a mildly spiced gravy, the taste of which lingers for a long time.If you taste this one, I am sure you would make it again and again.It is really that good,don't trust me? then give it a try and let me know your views. 
        Kadai Paneer Recipe - Restaurant Style:
        (serves 3-4)

        Ingredients:
        250 gms fresh Malai Paneer,cubed
        1 small Red Capsicum,seeded and cubed
        1 small Green Capsicum,seeded and cubed
        1 small Yellow Capsicum,seeded and cubed
        1 medium Onion,peeled and cubed
        1 big Tomato,seeded and cubed
        2-3 tbsp fresh Curd,beaten
        2 tbsp chopped fresh Coriander
        1 tsp Kasuri Methi(dried Fenugreek leaves)
        1 Bay leaf 
        Salt to taste
        2 tbsp Oil

        for the Onion-Tomato masala:
        1 medium Onion,chopped
        1 big Tomato,chopped
        3-4 Garlic pods
        3/4" Ginger,roughly chopped
        1 tsp Red chili powder
        1/3 tsp Turmeric powder
        1/4 tsp Sugar
        Salt to taste
        1 tsp Oil

        for Kadai masala:
        1 1/2 tbsp Coriander seeds
        1 1/2 tsp Cumin seeds
        7-8 black Pepper corns
        2 Red chillies
        1/2" Cinnamon
        2-3 Cloves

        Method:
        to make Kadai Masala:
        • Dry roast coriander seeds,cumin seeds,black peppercorns,red chillies,cinnamon and cloves separately until they turn slightly brown and starts releasing the aroma.
        • Cool them and pound it in a mortar and pestle to a coarse masala.You can even grind it in mixer to a coarse powder but I prefer to pound my spices manually for this recipe.
        to make Tomato-Onion masala:
        • Heat 1 tsp of oil and add garlic,ginger and fry for a couple of minutes.
        • Add chopped onions and fry until they turn pink.
        • Add tomatoes and fry well until the tomatoes turn mushy.
        • Add turmeric powder,little salt,red chili powder,sugar and cover it and cook well for a couple of minutes.
        • Cool the mixture and grind it to a fine paste and keep it ready.
        to roast Vegetables:
        • Heat 1 tbsp oil and add chopped paneer pieces and fry them until you see light golden spots.You should not fry them for long,otherwise the paneer will become hard.So just fry for a minute on either side.Remove and keep it aside.
        • In the same pan add little more oil if required and add the cubed bell peppers and fry for a couple of minutes.Maintain the crispy ness of the bell peppers which is a key taste for the curry.
        • Add cubed onions and fry for a minute along with the bell peppers and add seeded and cubed tomatoes at the end and fry for a minute.Take care that onions should be crispy and also the tomatoes should be slightly cooked and not become mushy and also should not loose their shape.
        • Now add fried paneer pieces to the pan and add the kadai masala and required salt and mix the vegetables and paneer pieces well until the masala coats all the vegetables and paneer.Leave them aside for sometime.
        to assemble the kadai paneer:
        • Heat 1 tbsp oil in a kadai and add bay leaf and ground tomato-onion mixture and fry well.
        • Add kasuri methi(slightly press it in between your fingers before adding) and required salt(remember you added salt to the veggies and also the ground tomato-onion mixture early).Cook the mixture until it is very thick.
        • Reduce the flame or remove the kadai from the flame and add beaten curd to it and cook for another few minutes.The gravy should be thick enough to coat the vegetables,but it should not be of flowing consistency.
        • Add the roasted vegetables and paneer pieces(coated with the masala) to the gravy mixture and mix well.
        • Add coriander at the end or either garnish the kadai paneer with coriander at the end.
        Serve it hot with Naan/Roti/Kulcha/Chapati/Paratha.It tastes very delicious and pair up beautifully with any flat bread or pulao.I served them with laccha paratha.
        Notes:
        1. Use freshly pound masalas (kadai masala) and do not replace them with either ready powders or garam masala.The taste definitely differs.
        2. Maintain the crispyness of bell peppers and onion while roasting,which makes the bite of them more delicious in the curry.
        3. Malai paneer tastes quite good in the recipe.If you do not get hold of malai(soft) paneer,you can keep your paneer pieces soaked in warm water after they are roasted.This will make the paneer pieces very moist.
        Viewing all 520 articles
        Browse latest View live