Quantcast
Channel: THE CHEF and HER KITCHEN
Viewing all 520 articles
Browse latest View live

Nalleru Pacchadi | Adamant Creeper Chutney | Pacchadi Recipes

$
0
0
                  nalleru pacchadi
'Nalleru' is also known as 'Adamant creeper' in English and 'Pirandai' in Tamil and it has a Botonical name – Cissus quandrangularis.This creeper is usually grown on fence or in between plantations in the fields.It has good medicinal properties and is used as a healer for bone fractures and also is good for digestive troubles.
I don't find these creepers in Mumbai ,but my mom prepares this chutney for me whenever I visit her as she has these creepers in her little garden in Bangalore.I got the opportunity to click the pics of this chutney when she prepared for me sometime back.This chutney is very tasty and makes a nice combination with hot rice and ghee.
                 nalleru

Check out other Pacchadi varieties in my blog:
                 nalleru pacchadi 

Nalleru Pacchadi:
Yields 1 cup
Prep time:10 mins | Cooking time:20 mins | Total time: 30 mins
Cuisine: South Indian | Category: Chutney/Pacchadi

Ingredients:
5-6 long stems of Nalleru
2 tbsp Urad dal
1/3 cup dry Coconut pieces
6-7 Red Chillies
1 tsp Tamarind pulp
Salt to taste
2 tbsp Oil

to temper:
1 tbsp Oil
1 tsp Mustard seeds
1 tsp Urad dal
6-8 Garlic cloves,slightly crushed
8-10 Curry leaves

Method:
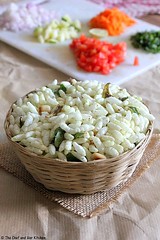
  • Remove the leaves from the nalleru stems and cut them at each nodes and scrape the sharp thin edges using a knife.Smear oil on your palms and tear the nalleru stems into small pieces by removing the fibre from the sides.If the stems are tender you would not need to remove the fibre part.
               
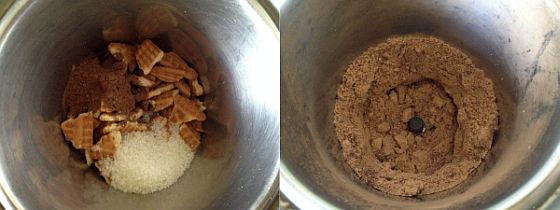
  • Heat 1 tsp oil in a kadai/pan and add urad dal and red chillies and fry until they turn slight red in color.Add dry coconut pieces and fry for a minute.Add tamarind to it and remove it to a plate.
  • In the same pan add remaining oil and add chopped stem pieces and fry the pieces until they turn slightly crisp.You should fry it really well with almost no moisture content left in the pieces.
               
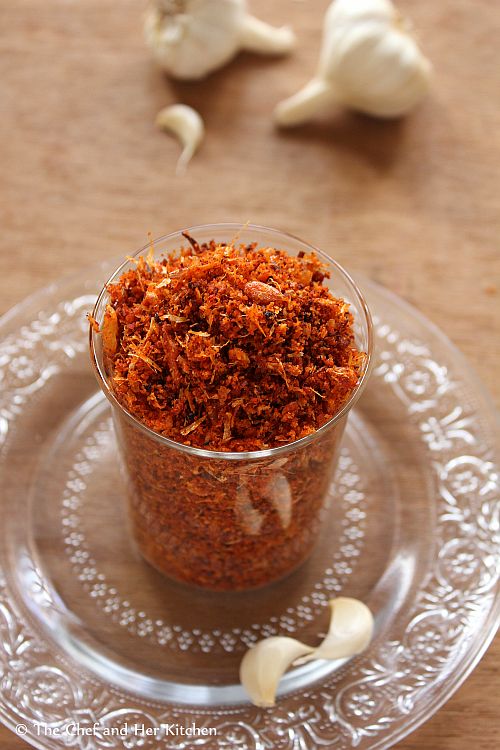
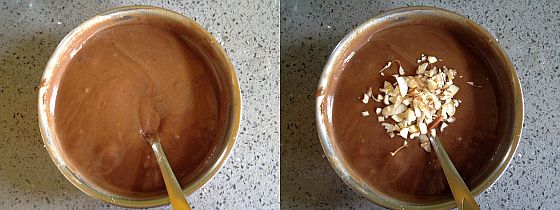
  • Grind the roasted dal-red chilli mixture into a powder and then add fried nalleru pieces and salt and add enough water and grind to a slightly coarse chutney,remove it to a bowl.You can alternatively fry all together and grind them together to a coarse paste.
               
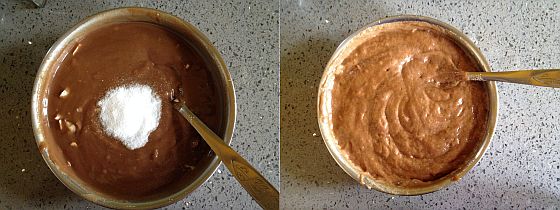
  • In a small tempering pan heat oil and crackle the mustard seeds and add urad dal,curry leaves and crushed garlic cloves and fry until they turn slightly red in color,add the tempering to the chutney.
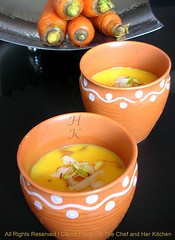
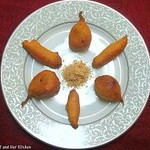
Serve it with hot steamed rice,ghee and fryums.

                    nalleru pacchadi

Kothimeera Podi | Coriander Leaves Spicy Powder | Podi Recipes

$
0
0
coriander leaves spicy podi
A typical south Indian meal is incomplete without a Podi(spicy powder).We prepare various podi varieties,while few are paired with breakfast others with rice.Mom makes various podi varieties and she always packs a few varieties for me when I visit her.Her Kakarakaya(Bittergourd) podi is quite tasty and is the most favorite one at our home.
Coriander leaves podi is quite flavorful and delicious when mixed with hot steamed rice.Try this coriander podi when you have abundant coriander leaves,you will thank me for introducing this aromatic and flavorful coriander podi to you.
kothimeera karam podi
As I usually stock these podi varieties sometimes it is really helpful on those lazy days.I just prepare steamed rice and mix various podi varieties with hot rice and ghee along with fryums and papads- a satisfying meal for me.
Check out other Podi recipes for rice in my blog:
kothimeera podi

Kothimeera Karam Podi Recipe:
shelf life:2-3 months
Prep time:10 mins | Cooking time:40 mins | Total time:50 mins
Cuisine: South Indian | Category: Accompaniments - Podis

Ingredients:
1 large bunch Coriander leaves
1 cup grated Dry Coconut
15-16 Red chillies
1 large gooseberry sized Tamarind
1 1/2 tbsp grated Jaggery,optional
2 tsp Mustard seeds
3-4 tbsp Oil
Salt to taste

Method:
  • Separate the coriander leaves from stems and wash the coriander leaves and wipe with a kitchen towel completely and spread in a thin layer and let them dry for few hours until no moisture is left. They would not get dried completely, they will just loose the moisture content slightly and look little dry.
  • Heat 1 tsp oil in a pan and add red chillies and fry them until they turn brown and remove them and let them cool.
  • Grind red chilies with grated dry coconut  and salt to a coarse powder. Add jaggery and tamarind and grind it again. Remove the mixture and keep it aside.
  • Grind the coriander leaves(slightly dried) to a coarse powder in WHIPPER mode. Do not run it in normal mode as it might turn to a chutney.
  • Heat 3 tbsp oil in a thick kadai/pan and crackle mustard seeds and add coarsely ground coriander leaves to it and fry until the coriander leaves are browned and become slightly crispy. They will turn to brown to slight blackish in color. This will take 15-20 mins.
  • Add ground coconut- chili mixture to it and fry again for another 3-4 mins.
  • Cool the powder completely. Store it in air tight container.
Serve it with hot rice and ghee and raw onion if you prefer.
 
Notes:
  1. As we grind the dried coriander leaves first and then fry it in oil,the color of the coriander leaves is not preserved but it tastes delicious with wonderful flavor and also can be stored for long.
  2. You can replace coriander leaves with curry leaves or mint leaves and follow the same recipe to prepare Karivepaku(Curry leaves) Podi and Pudina(Mint) Podi respectively.
  3. You can add more dry coconut if you wish,it adds more taste to podi.
  4. The addition of jaggery is optional but helps in balancing the flavors.
    kothimeera podi

Nellikai Chutney | Usirikaya Pacchadi with Red Chillies | Gooseberry Chutney

$
0
0
usirikaya pacchadi
Usirikaya Pacchadi (Chutney) is a simple Pacchadi recipe which goes well with plain steamed rice or curd rice or few breakfast varieties like idli and dosa.It can be prepared in no time if we have the preserved Gooseberry chutney ready. I have already posted how to prepare the Niluva Usirikaya Pacchadi (preserved Gooseberry chutney) recipe.
We usually prepares two kinds of Usirikaya Pacchadi one with green chillies and the other with red chillies with minor variations. I have already posted the chutney recipe with green chillies  and today I am posting the chutney recipe with red chillies. This chutney is quite tangy and also an easy accompaniment and tastes nice when mixed with hot rice and ghee.

Usirikaya Pacchadi with Red Chillies recipe:
Serves 3-4
Prep time: 10 mins | Cook time: 5 mins | Total time: 15 mins
Cuisine: South Indian | Category: Accompaniments

Ingredients:
3-4 Red Chillies
1/4 tsp Fenugreek seeds
1/4 tsp Mustard Seeds
2 Garlic pods
1 medium Onion,finely chopped
Salt,as required
1/2 tsp Oil

to temper:
2 tsp Oil
1/2 tsp Mustard seeds
5-6 Curry leaves
1 Red chili,broken
a pinch of Asafoetida

Method:
  • Dry roast Mustard seeds and remove them.Heat 1/2 tsp oil in a pan and add fenugreek seeds and fry them until red in color and remove them aside.Add red chillies and fry for few seconds until they have blisters.Add garlic pods at the end and just saute it for half a minute and add niluva usirikaya pacchadi to the pan and fry for a minute and remove it.
  • Grind niluva usirikaya(preserved gooseberry) with all the roasted ingredients - red chillies, mustard seeds, fenugreek seeds, garlic pods to a smooth chutney.Now taste it and if you need to add salt then add required quantity to it and grind again.
  • Add finely chopped onion and just grind in whipper mode for half a minute or you can mix it with chutney later.
  • In a small tempering pan heat oil and crackle mustard seeds and add broken red chillies,curry leaves and asafoetida and fry them until they wilt and add this to the chutney.
Serve it with hot rice and ghee and raw onions.
amla chutney
Notes:
  1. You can mix chopped onion after you grind the chutney or add it while grinding.It is your wish.
  2. The addition of garlic pods is optional.I add it sometimes and skip it sometimes.
  3. If you do not have preserved gooseberry chutney,use the fresh gooseberry and add turmeric powder and salt accordingly.Also slightly fry the gooseberry pieces to remove the raw smell from them. 
If you are interested check other gooseberry recipes here.
nellikai chutney

    Gongura Pulihora | Gongura Rice | Red Sorrel Leaves Rice

    $
    0
    0
    gongura pulihora
    Gongura(Red Sorrel leaves) is very famous in Andhra Pradesh especially for its various varieties like Gongura Pacchadi(Gongura chutney),Niluva Gongura Pacchadi(Gongura pickle) and Gongura pappu(Gongura Dal), Rice and also some fusion side dishes to pair with rice or rotis.Whenever I find these greens I never miss a chance to prepare Gongura Pacchadi as it is my DH's favorite.I have not posted any of these famous varieties although I make them quite often. I had earlier posted a recipe of Gongura Pulusu Kura which is a stewed version of Gongura and chana dal which is quite tangy and goes well with rice and Noone Gongura,which is a tempered version of Gongura and can be stored for up to two weeks .
    gongura leaves
    Gongura Pulihora is slightly a modified version of  Chintapandu Pulihora and is a treat to those Gongura lovers.We get two varieties of Gongura - Red Sorrel leaves (Erra Gongura) and White Sorrel leaves (Tella Gongura which is actually green in color) where the red variety is tangier than the other one. Gongura imparts a nice tart taste to pulihora and makes it taste little different from the regular Chintapandu Pulihora. Try this Gongura Pulihora next time you find these greens, I am sure you will love it.
    gongura pulihora

    Also check out other Pulihora Recipes in my blog:
    gongura pulihora

    Gongura Pulihora | Red Sorrel Leaves Rice:
    Serves 2
    Prep time:10 mins | Cooking time:40 mins | Total time: 50 mins
    Cuisine: South Indian | Category: Lunch-Rice Varieties

    Ingredients:
    1 cup Sona Masuri rice or equivalent
    1 large bunch Red Sorrel leaves/Gongura
    1 tbsp Tamarind Pulp
    Salt to taste
    1 tbsp Sesame Oil
    1 tbsp Oil

    to roast and grind:
    1 tbsp Sesame seeds
    1 tsp Mustard seeds
    1/2 tsp Fenugreek seeds
    3 Red chillies

    to temper:
    2 tbsp Oil
    1 tsp Mustard seeds
    1 tbsp Urad dal
    1 tbsp Chana dal
    1/4 cup Groundnuts
    3-4 light colored long Green chillies,slit
    1/2 tsp Turmeric powder 
    2 Red chillies
    a sprig of Curry leaves
    a pinch of strong Asafoetida
    Method:
    to prepare Gongura Rice:
    • Dry roast fenugreek seeds,mustard seeds,red chillies and sesame seeds separately until they are well roasted and remove it and let it cool.

    • Remove the leaves from the stems carefully and wash them properly for 3-4 times.Drain them in the colander until all the water drains away.
    • In the same pan heat 1 tbsp oil and add stemmed and sorrel leaves and fry until they wilt and become slightly mushy,cool the mixture.Add tamarind pulp at the end.

    • Grind the roasted seeds to a fine powder and add sauteed sorrel leaves and grind to a smooth paste.
    • Wash and soak rice for 10-15 mins and cook it in rice cooker or pressure cooker with 2 cups of water until it is done. Let the rice sit for some time and spread it on a wide plate by smearing a tbsp. of sesame oil which helps in keeping the grains separate.
    • Heat 2 tbsp oil in a deep bottomed kadai/pan and crackle mustard seeds. 

    • Add ground nuts and fry them until they turn slight red in color and the skin begins to split.
    • Add chana dal, urad dal, red chillies and slit green chillies and fry until the chillies wilt and the dals turn light golden brown in color.Add curry leaves, asafoetida, turmeric powder and fry half a minute.Add ground gongura mixture and let it cook until it thickens and the oil separates from the edges. It takes 7-8 mins. Switch off the flame and let it cool completely.
    • Reserve some portion(2-3 tbsp) of the gongura mixture we prepared now and add cooled and spread rice along with salt and mix it nicely until everything is neatly incorporated. Now taste the rice and add more gongura mixture or salt as needed and adjust the rice according to your taste buds. Prepare it slightly sour so that it tastes delicious once it is rested for some time. Rest it for an hour at least.
    Serve it as a variety rice in your meal or as a meal by itself with Curd Rice/Daddojanam.
    Notes:
    1. Use rice varieties like sona masuri, ponni, jeeraga samba for these kind of rice varieties, I do not suggest basmati rice.
    2. Red Sorrel leaves are slightly tangy hence I added just little bit of tamarind,if you are using green sorrel leaves variety add more tamarind to it.Always make the rice bit tangy so that it will taste nice once it settles down.
    3. You can add roasted and peeled groundnuts at the end to keep them crunchy,but I prefer to add it while frying as I like the taste of groundnuts cooked in tart gongura mixture.
    4. This rice is ideal to pack for travel as well as for lunch box.

      gongura pulihora

    Sajjappa | Sojjappalu | Sojja Poorilu | Halwa Poori | Sajjobbattu

    $
    0
    0
    sojjappalu
    We prepare lots of holiges like Hoornada holige(Pappu Obattu) ,Coconut Holige, Sogasu Obattu, Sajjige Obattu(Sajjappa), Garugu Obattu and Paala Obattu(Haalu Holige) which tastes best on its own and has its own importance for the festivals.
    Although my regular cooking is very much modernized, I still prefer to indulge in the traditional dishes occasionally and especially during festivals. I select a very simple menu for festivals(though few festivals are exceptions) and I would end up making some kheer,sundal and a variety rice which makes my job easier as hubby dear does not like me spending more time in kitchen.But I miss those traditional dishes which my mom makes and which I cherished growing up.We have lots of traditional dishes which I never got to make after my marriage because of my laziness but I crave for few of them and I ask my mom to make it for me when I visit her.
    sajjobbattu
    Coming to the holiges I mentioned above Sogasu holige, Sajjige holige and Garugu Holige they all look similar and all are deep fried but the filling,taste and texture of each holige is different from the other.Sogasu and Sajjige holige uses rawa filling which is made differently for each holige and where as garugu holige uses rice flour filling.I know that it is very confusing if you are hearing all these names for the first time but once I put up all these recipes you can easily differentiate them.Now let us see how to make Sajja obattu.
    Sajjige Holige is more popularly called as 'Sajjappa' in Karnataka and ' Sojjappalu or Halwa Poori ' in Andhra,we usually call it as 'Sajjobbattu' at my place.It is a crispy fried Holige and try this holige on one of those navratri days and enjoy it.You can prepare it a day before if you are planning to serve it as Prashad during Navratri.

    Check out other Holige Recipes here:
    sajjappa

    Sajjappa | Sojjappalu | Halwa Poori | Sajjobbattu:
    Shelf life: 2 days | Yields: 10-12 Sajjappa
    Prep time:20 mins | Cooking time:40 mins | Total time:60 mins
    Cuisine: South Indian | Category: Sweets

    Ingredients:
    for Stuffing:
    1 cup Rava(Bombay Rava/Upma Rava)
    2 1/2 cups Water
    1 cup Sugar
    1 tbsp Rice flour
    1/4 cup finely chopped Cashewnuts
    1/2 tsp Cardamom powder
    2 tbsp Ghee

    for kanaka(outer cover):
    1 cup Chiroti/Holige rawa(baarik rava)
    a fat pinch of Salt
    1/2 cup Oil(to soak the kanaka)
    Oil for deep frying

    Method:

    for filling:
    • Heat ghee in a kadai and add cashewnuts and slightly fry them and remove the nuts aside or in the same ghee add rava and fry until you get nice aroma and keep aside.
    • Meanwhile boil water separately in a vessel and then add roasted rava with cashew nuts  and stir continuously until the mixture becomes thick.
    • Add sugar to it and cook well until the mixture thickens.
    • Add  rice flour and cardamom powder and mix it nicely and let the mixture cool completely.
    • Grease your palms and make big lemon size balls out of the filling and keep them aside.
     for Kanaka:
    • Mix chiroti rawa with a pinch of salt to it and add water to it and knead in to a very smooth dough.The consistency of the dough should be very loose than the regular roti dough.
    • Now using your fist hit the dough for few mins to get the softer dough.
    • Now place this dough in a deep vessel and pour oil over it until the dough is completely soaked in oil.Let the dough rest for a minimum of 1 hr and up to 2 hrs.Drain the excess oil and use it for other purpose.
    • See the pics to get to know the consistency of the kanaka.
    for making Sajjappa:

    • Cut the holige paper into a round and place it on the rolling stone which we use to roll rotis.Grease holige paper or banana leaf or a plastic cover with oil.
    • Pinch a small amla sized dough and flatten it a bit using your hands as shown in the pics and place one round of filling and seal it properly from all the edges like how we do for parathas.
    • Now flatten it slowly with hands to get 3" diameter circle to the size of big pooris.It should not be very thick like paratha nor thin like rotis,it should be slightly thicker than poori.See the pictures for clear idea.
    • Meanwhile heat oil for deep frying in a kadai and gently slide the patted holige from the sides into the oil taking care that oil would not splutter.
    • Deep fry them until they are slightly brown on both side.
    • Drain them on kitchen towels to remove the extra oil.
    • Repeat the process for making holiges,smear the holige paper liberally with oil and follow the same procedure.
    Serve them hot/warm or at room temperature.You can store them at room temperature for two days.
    halwa poori

    Notes:
    1. Always make kanaka before proceeding to make filling which helps in saving time.
    2. As these can be stored for two days you can make them ahead if you want.But the fresh ones are more crispier and tastier.
    3. The addition of nuts is entirely optional but it adds a nice taste to every bite of holige.
    4. If you are a health freak instead of deep frying you can even fry it on tawa like how we do for parathas,they taste still good but the deep fried ones taste anytime better.
    5. You can add 1 tbsp Rice flour to the cooked rava while making the filling, this will give crispier sajjappa. 
    6. You can use Maida in place of chiroti rava if you don't get it.

      sajjappa

    Navaratri Recipes 2014 | Navratri Vrat Recipes

    $
    0
    0
    Navaratri will be celebrated from 25th sept- 3th October. Navratri festival is celebrated for nine days worshiping Durga devi in different forms on each day and on the 10th day Vijayadashami is celebrated.This festival is celebrated in most of the states in India in various forms. Dasara is celebrated in a grand manner especially in cities like Mysore and Calcutta.While in North,a fast is observed on those days and also celebrated with garba and dandiya where as in South,many people celebrate the festival by keeping Golu(an array of Idols) and pooja is performed on those 9 days inviting many ladies for haldi-kumkum.Various varieties of sundal and kheer varieties are prepared on those 9 days during Navratri to offer to the people who visit the Golu. We make a traditional sweet like holige or any thing equivalent on the first day and last day of Navratri and a simple sundal and kheer variety during the other days.I am compiling few recipes at one place which are ideally prepared in south Indian homes during Navratri for Pooja.I would have preferred to do a pictorial index but the list was so long that I went with the simple recipe index.I hope it is useful for you.Happy Navaratri to all !!


    NAVARATRI RECIPES - SOUTH INDIAN:
    Sundal varieties:
    1. Ammini Kozhukattai | Undrallu Guggillu
    2. Chana Dal Sundal
    3. Lobia Sundal/Alasandula Guggillu
    4. Avarekaalu Kadubu/Spiced Steamed Rice flour Dumplings
    5. Kabuli Chana Sundal
    6. Kala Chana Sundal/Black Chickpeas Sundal
    7. Peanut sundal
    8. Sweet corn Sundal 
    9. Mixed Bean Sundal 
    10. Kosambari | Moong dal Salad
    Vada/Snack varieties:
    1. Alasandula(Lobia) Vada/Fritters
    2. Masala Vada/Chana dal Vada
    3. Medu Vada
    4. Mixed Dal Ambode(Vada)
    5. Mosaru Ambode/Dahi Dal Vada
    6. Dahi Vada/Perugu Vada/Mosaru Vade
    7. Saggubiyyam Bonda/Sago Bonda(with out onions)
    Traditional Sweet Varieties:
    1. Hoornada Holige/Obbattu
    2. Halu Holige | Paal Poori | Paala Obabttu 
    3. Boorelu | Sukkinunde | Suzhiyan
    4. Karida Kadubu | Kari Kudumulu | Fried Sweet Dal Dumplings
    5. Garugu Hollige/ Hollige with rice flour-coconut filling
    6. Puran Poli | Pooran Poli | Bobbatlu
    7. Sajjappa | Sojja Poorilu | Halwa Poori
    8. Karida Kayi Kadubu | Coconut Kadubu
     Kheer/Payasam Varieties:
    1. Carrot Kheer
    2. Hayagreeva/Chana dal Sweet
    3. Korra biyyam Payasam | Foxtail Millet Kheer 
    4. Moong Dal Kheer / Pesara Pappu Payasam
    5. Palada
    6. Phool Makhana Kheer
    7. Poha Kheer/Aval Payasam
    8. Paal Payasam / Rice Milk Pudding
    9. Rava Payasam | Sooji Kheer 
    10. Rasayana | Balehannu Rasayan
    11. Sabudana Kheer | Sago Payasam
    12. Semiya Kesari 
    13. Semiya Kheer | Vermicelli Payasam
    14. Undrallu Payasam | Paal Kozhukattai
    15. Pappulo Undrallu
    16. Palathalikalu 
    17. Paal Payasam
    18. Mango Sheera
    Rice Varieties:
    1. Aava Pettina Chintapandu Pulihora
    2. Chintapandu Pulihora- Andhra Style
    3. Coconut Rice | Kobbari Annam
    4. Cranberry Rice | Cranberry Puliyogre
    5. Dabbakaya Pulihora/Indian Grapefruit Rice
    6. Gongura Pulihora | Sorrel Leaves Rice
    7. Lemon Rice/Chitrannam
    8. Mamidikaya Pulihora/Maavinkay Chitranna
    9. Methi Peas Bath | Menthya Batani Anna
    10. Pulihora/Puliyogre
    11. Raw Mango Rice/Mamidikayi Gojju Annam
    12. Vangi Bath
    13. Rava Pulihora 
    14. Usirikaya Pulihora
    NAVRATRI VRAT RECIPES - NORTH INDIAN:

    People in North observe fast during those 9 days of Navratri,only few kinds of flours and vegetables are supposed to be eaten during vrat.Instead  of the regular salt, Sendha namak is used on the fasting days.Though I do not have many recipes in my blog I would like to share the recipes which comes under that category.
    Navratri Vrat Recipes:

    Sweets:
    1. Carrot-Beetroot Halwa using Condensed milk
    2. Carrot Phirni
    3. Phool Makhana Kheer
    4. Rava Payasam | Sooji Kheer 
    5. Sabudana Kheer | Sago Payasam
    6. Carrot Kheer 
    7. Basundi
    8. Orange Basundi
    9. Coconut Burfi/Koprapak/Kobbari Mithai
    10. Mango Fudge | Mango Burfi
    11. Lauki(Bottlegourd) Halwa
    12. Paneer Modak Peda  
    13. Semiya Kheer | Vermicelli Payasam
    Beverages:
    1. Butterfruit(Avocado) Milkshake
    2. Chikoo(Sapota) Milkshake 
    3. Mango Milkshake
    4. Mango Banana Smoothie  
    5. Bonda Juice/Tender Coconut-Malai Juice
    6. Musk Melon Juice
    7. Neer More/Spiced Buttermilk
    8. Watermelon Juice
    9. Mango Lassi
    10. Strawberry-Banana Smoothie
    11. Strawberry Lassi
    12. Sweet Lassi
    Snacks:
    1. Sabudana Thalipeeth
    2. Sabudana Tikki | Sabudana Cutlets
    3. Sabudana Khichdi - Maharastrian style
    4. Sabudhana Upma/Saggubiyyam Upma(with out onions)
    5. Spicy Phool Makhana | Roasted Lotus Seeds
    6. Aloo Jeera 
    7. Fruit Cocktail Sticks
    8. Fruit Chaat | Cut Fruits | Fruit Salad
    9. Sago Chiwda | Puffed Sago Snack   
    10. Alu Fry | Potato Fry - omit garlic in the recipe
    11. Groundnut Sundal/Peanut Sundal

    Rajma Sundal | Navaratri Sundal Recipes

    $
    0
    0
    rajma sundal
    Happy Navratri to all!!

    Yesterday was the first day of Navaratri and we offered Rajma sundal as prashad and I am here to share the same in my space.One can prepare various varieties Check out the various Navaratri recipes here for various sundal, kheer, snack and rice varieties.
    kidney beans sundal
    We always make a variety of sundal for any festival as it not only adds the number of items to the menu but also it is very easy to prepare and an absolutely guilt free snack to compensate the extra calories from the fried stuff and sweets made on festivals.Hubby is a big fan of sundal especially when made with kala chana,so I end up making Kala Chana Sundal more often compared to other sundals.It is a perfect guilt free snack which can be served as a snack or as a side dish in lunch or breakfast.
    Check out other Sundal Varieties in my blog here:
    kidney beans sundal

    Rajma Sundal | Kidney Bean Sundal Recipe:
    Serves: 3-4
    Prep time:10 mins | Cooking time:40 mins | Total time:50 mins
    Cuisine: South Indian | Category: Snacks

    Ingredients:
    1 cup Kidney Beans (Rajma)
    1/4 cup grated/chopped fresh Coconut
    3-4 Green chillies,sliced
    1/2" Ginger
    juice of 1/2 lemon
    Salt to taste

    to temper:
    1 tsp Urad dal
    1-2 Red chillies,broken
    1/2 tsp Mustard seeds
    a sprig of Curry leaves
    a pinch of Asafoetida(hing)
    1 tbsp Oil

    Method:
    • Soak rajma overnight or at least for 8-9 hrs and clean them again for 3-4 times with fresh changes of water.
    • Grind grated/chopped coconut,ginger and green chillies to a coarse paste in whipper mode.
    • Pressure cook Rajma for 5-6 whistles until soft,I generally pressure cook for 2 whistles and cook on low flame for 5-6 mins for making sundal.The rajma should be cooked soft but should holds its shape and it should not be either hard or mushy. You can add salt while cooking rajma or add it at the time of tempering.
    • Drain the rajma and keep it aside,you can use this drained water to make healthy rasam.
    • Heat oil in a kadai and crackle mustard seeds and add urad dal and red chillies and let them turn slight brown.
    • Add hing,curry leaves and ground coconut-green chilli-ginger paste and fry it for a minute.
    • Add cooked and drained rajma and required amount of salt and mix well and cook it on low flame for 2 mins.Do not fry them for long as it makes the sundal very dry.
    • Switch off the flame and add lemon juice and mix well.
    Serve them hot,warm or cold as a snack or with lunch.

    Variations:
    1. You can replace rajma with white kala chana, white chickpeas,lobia,green gram,yellow peas or chana dal for variation or you can even use mix of these legumes to make variety sundal.
    2. You can even add coriander leaves in the end.
    3. If you want softer sundal add 2-3 tbsp reserved water(drained from rajma) after you add rajma to the tempering and cook till soft and water dries off.Add ground mixture and salt later and fry for 2 mins.
    4. Use light Red color variety rajma for this, do not use rajma in deep red color or black color  as it does not cook properly.
    rajma sundal

    Groundnut Holige | Shenga Holige | Peanut Poli | Palli Bobbattlu

    $
    0
    0
    groundnut holige
    Holige is one of the most favorite sweets in our family and gets featured quite often either on a festival day or functions.There are various varieties of Holige and the most popular among them is Pappu Obbattu(Bele Holige) which is our typical community special as the stuffing is made up of toor dal and jaggery and Coconut Holige. Pappu Obbattu(Bele Holige) has shorter shelf life and has to be consumed in 2-3 days where as Coconut Holige has longer shelf and an be stored upto a week.
    Groundnut Holige(Shenga Holige) is a North Karnataka speciality and it can also be stored up to a week. Shenga Holige turns slightly crispy once it cools down, but if you reheat it on tawa it turns soft.
    shenga holige
    Check out other Holige Recipes here:
    peanut poli
    Groundnut Holige | Shenga Holige | Peanut Poli
    Yields: 9-10 Polis
    Prep time: 30 mins | Cooking time: 30 mins | Total time: 1hr + 1 hr resting time
    Cuisine: South Indian | Category: Sweets/Festival Sweets

    Ingredients:
    Ghee/oil, to fry poli/holige

    for outer layer/dough:
    1 cup Maida/Chiroti rava
    a pinch of Salt
    1 1/2 tsp ghee, melted
    1/3 cup Oil, to soak the dough
    Water, to mix the dough

    for filling:
    1 1/4 cup Groundnuts
    1 cup grated Jaggery

    Method:
    for outer layer/Dough:
    • Mix flour(maida) or chiroti rawa with a pinch of salt and ghee and add water to it and knead in to a very smooth dough. The consistency of the dough should be very loose than the regular roti dough, this is the most important step otherwise you will not get softer polis.You can add a pinch of turmeric powder to the dough if you want.
    • Now using your fist hit the dough for few mins to get the softer dough or lift the dough and drop it hard into the bowl and repeat it until the dough becomes very smooth.
    • Now place this dough in a deep vessel and pour oil over it until the dough is completely soaked in oil. Let the dough rest for a minimum of 1 hr and upto 2 hrs. Drain the excess oil and use it for other purpose. 
    for the filling:                

                                            
      • Dry roast groundnuts until they turn slightly crispy and has some black patches.Taste one groundnut and check whether it is roasted completely or not.Let them cool.Rub your palms thoroughly on the groundnuts to remove their skin and separate the peeled skin and groundnuts.
      • Grind roasted and skinned groundnuts to a powder in the mixie and then add grated jaggery to it and run it again to get a uniform mixture.The mixture might become sticky which is fine.
      • Store it in air tight container.Make this on the previous day itself to ease up the process on the festival day.
        to prepare Shenga Poli:

        • Cut the holige paper into a round and place it on the rolling stone which we use to roll rotis. Grease holige paper or banana leaf with oil.
        • Pinch a small amla sized dough(the amount of dough should be half the quantity of the filling you take) and flatten it a bit using your hands as shown in the pics and place one ball of filling and seal it properly from all the edges like how we do for parathas.Now flatten it slowly with hands to get 5" diameter circle. Alternatively you can roll it like parathas like how we do in between two greased transparent sheets. Adapt the method which ever is convenient for you
          .
        • Now place the holige paper along with the poli(with poli facing down the tawa)on a hot tawa over the low flame.


        • Let it sit for 20-30 seconds and now peel the holige paper gently scraping it along the edges using a spatula. See the pics to get a clear understanding of it. 
        • Now fry it on both sides applying ghee until light golden in color. Pour the ghee over it, do not try to spread ghee over the poli while frying it. Do not fry it for long time, it will make the polis bit hard so quickly remove it from stove when you get to see the brown patches on it.


        • Repeat the process for making all polis, smear the holige paper liberally with oil and follow the same procedure. 
        Serve the Shenga poli warm or hot with melted ghee.

        shenga poli

        Notes:
        1. These holiges can be stored upto a week.They turn slightly crispy and hard when it cools down, you can reheat them on tawa before serving for soft holiges.
        2. You can replace groundnuts with sesame seeds and follow the recipe to make nuvvula obbattu,even it tastes delicious.
        3. You can add 1/4 tsp cardamom powder to the groundnut filling.
        groundnut holige


        Kesar Peda Recipe | Easy Diwali Sweets

        $
        0
        0
        kesar peda
        Diwali is nearing by and all the blogs are flooded with diwali recipes. Though I had plans to post a few new recipes but given some personal commitments I could not do so - so I pushed myself to post a couple of recipes before Diwali.
        kesar peda

        Kesar Peda is an interesting traditional sweet in India which can be prepared in two ways. The traditional method is to reduce milk and make it from milk solids but I have used the other version which is prepared with Khoya (Mawa). This is a simpler version, and can be prepared in just 20 mins. So those searching for quick sweet recipes for Diwali this one should help. Kesar peda as the name suggests is yellow in color due to the saffron strands that are used - while when you buy it in a shop - the color is achieved through the use of synthetic colors - using saffron to get a natural color is much better from a health perspective and it also adds to the taste. Do prepare this sweet for Diwali and enjoy with your family.
        kesar peda

        kesar peda

        Kesar Peda Recipe:
        Yields: 15 pedas | Author: Prathibha
        Prep time: 10 mins | Cooking time: 10 mins | Total time: 20 mins
        Cuisine: North Indian | Category: Sweets/Desserts

        Ingredients:
        300 gms Unsweetened Khoya/Mawa
        1/2 cup Powdered Sugar
        1 1/2 tsp Maida/Flour
        15-20 Saffron Strands
        1 tbsp Milk
        1 tsp Ghee
        10-12 Pistachios

        Method:
        • Slightly warm the saffron strands in a pan and rub the strands in between your palms.Warm the milk and soak saffron strands in warm milk for 10 mins.
        • Chop Pistachios into fine bits and keep aside.

        • Crumble or grate the khoya nicely, if you are using frozen khoya thaw it thoroughly before using it.
        • Heat ghee in a pan and add maida and fry till you get nice aroma.
        • Add khoya, saffron milk and powdered sugar to the flour mixture and heat it on low flame by stirring it constantly till it bubbles and khoya melts.You can taste the mixture at this point and add more sugar if needed.
        • Remove the mixture from flame and mash it nicely with wooden masher in circular motion until the mixture becomes fine and thick,this step makes the pedas soft.Let it cool until you can handle the mixture with your bare hands.Knead the mixture nicely for a couple of minutes.
        • Divide the mixture into 15 equal portions and make even sized balls and flatten them, make sure the edges would not crack.If the mixture is sticking up grease your palms with ghee and prepare pedas.Once you make all pedas use clean finger and make a dent in the center and press finely chopped pistachios in the dent.Arrange them on a plate and leave them aside for an hour to set nicely.
        • Remove them gently once they set and store it in an air tight container and consume with in 3-4 days or it can be stored 7-8 days if refrigerated.

        Notes:
        1. If you like you can add 1 tsp cardamom powder to the mixture once you switch off the flame.
        2. If you are using frozen khoya thaw it thoroughly before using it.
        3. Instead of making pedas you can set the mixture in a greased flat plate and smoothen the top using a butter paper and cut them into different shapes using molds.Decorate with chopped pistachios and saffron strands.
        4. Do not over cook the mixture as it will turn the pedas hard.
        kesar peda

        33 Diwali Sweets | Diwali Sweets Recipes 2014

        $
        0
        0
        No festival is complete without sweets and especially for Diwali one likes to indulge in a lot of varieties of sweet. I have compiled a list of sweets across various categories - ranging from kheer to traditional sweets to several others that are specially prepared to distribute among friends and family. Check out the various sweet treats and do prepare them and enjoy with your friends and family and have a great Diwali. Another aspect of Diwali, is the preparation of sweets at home - its fun and keeps the festive spirit soaring - so if you dont have much time you can prepare some of the simple sweet varieties highlighted below - these include - Kesar Peda ,Paneer Peda ,7 Cups Cake all Payasam recipes.I am planning to prepare Moong Dal Ladoo  and Kobbari Louse this week. So whats your plan ?

        For a vast variety of Payasam recipes check out this post.


               Ariselu(Adhirasam)           Moong Dal Ladoo                 Kobbari Boorelu   

                        
                  Sunni Undalu                       Karanji                       Oats-Nuts Ladoo

                            
              Dry Fruits Ladoo              7 Cups Cake                          Kobbari Louse
           
                        
               Paneer Peda                  Coconut Choco Truffles          Coconut Burfi
                         
                Rabdi                               Beet-Carrot Halwa                  Shahi Tukra

                        
               Puran Poli                      Garugu Holige                      Boorelu/Poornalu         
         
               http://www.chefandherkitchen.com/2014/09/groundnut-holige-shenga-holige-peanut.html    http://www.chefandherkitchen.com/2014/08/kayi-kadubudeep-fried-version-kobbari.html      http://www.chefandherkitchen.com/2014/09/sajjappa-sojjappalu-sojja-poorilu-halwa.html
                Groundnut Holige           Kayi Kadubu                      Sajjappa
         
                          
               Semiya Kheer                    Sooji ki Kheer                     Carrot Kheer

                       http://www.chefandherkitchen.com/2014/10/kesar-peda-recipe-easy-diwali-sweets.html
               Sago Kheer                   Rice Chana Dal Kheer         Kesar Peda

                         
                  Semiya Kesari               Moong Dal Kheer                  Makhana Kheer 
                
             Basundi                               Lauki Halwa                              Carrot Phirni

        Check out Diwali Savouries Post here.

        Technorati Tags:  ,, , , , , , , , , ,               

        Diwali Snacks Recipes 2014 | Diwali Savouries

        $
        0
        0
        Diwali is just a few days ahead and I am sure most of you would be planning to prepare lot of sweets and savouries for Diwali.
        I had earlier posted a list of Diwali Sweets ,where I had compiled all the special sweets recipes at one place.If you have not checked that page please check it here for more ideas for this Diwali..I have included the various snack varieties of vada, bajji and bonda in the list so that it would be easy for those who can plan for them to make at the last moment during Diwali.
        Check out How to make Processed RICE FLOUR  at home to  make these savories and snacks.

                             
                 Chakli                                   Thengolu                             Spicy Seedai

                             
                 Manugu Poolu                 Ribbon Pakoda                       Sago Murukku
                                     
                            
                Plain Ribbon Murukku         Spicy(Khara) Sev             Ompodi/Plain Sev

                             
                Chekkalu/Thattai            Garlic Kara Sev                  Karam Gavvalu              
           
                           
               Spicy Chickpeas                 Spicy Makhana                        Poha Chiwda   

                            
                 Avarekalu Mixture           Kara Pori                             Spicy Puffed Sago

        Pakora/Vada Varieties

                            
                   Raw Banana Bajji          Babycorn Pakora                  Cabbage Pakora

              
        Ambode                       Masala Vada                    Medu Vada

              
                  Mosaru Kodubale            Punugulu             Stuffed Okra & Eggplant Bonda

              
        Mosaru Ambode           Lobia Vada                    Perugu Vada

               
            Sago Bonda                    Dahi Bhalla                   Maddur Vada 

        Check out Diwali Sweets Collection here.

        Gongura Pappu | Sorrel Leaves Dal | Gongura Recipes

        $
        0
        0
        gongura dal
        I am sure everyone would have celebrated Diwali nicely and enjoyed it with lots of fun and food. I had to pull myself to post this recipe especially after a along weekend.

        Gongura leaves are called 'Sorrel leaves' in English and 'Khatta Bhaji' in Hindi and 'Ambaadi' in Maharastra.Gongura leaves(Sorrel leaves) is used extensively in Andhra to prepare various recipes like Gongura Pickle, Pacchadi, Pappu(Dal),Rice and gravies.I have posted few recipes with Gongura earlier and I am yet to post the most popular recipe - Gongura Pacchadi which I promise to post it in near future.I had earlier posted a recipe of Gongura Pulusu Kura which is a stewed version of Gongura and Chana dal which is quite tangy and goes well with rice and today I am posting a simple yet delicious dal recipe with Gongura,which is again a popular recipe in Andhra cuisine.

        Check out other recipes with Gongura.
        gongura dal

        Gongura Pappu :
        Serves 3-4
        Prep time: 10 mins | Cooking time: 30 mins | Total time: 40 mins
        Cuisine: Andhra - Indian | Category: Side dish

        Ingredients:
        1 cup Toor dal(Kandipappu)
        1 medium bunch Sorrel leaves/Gongura or 5-6 cups loosely packed
        1 large Onion,cut into big chunks
        5-6 Green chillies,slit
        3-4 Garlic pods
        1/2 tsp Turmeric powder
        Salt to taste
        1 tbsp Oil

        to temper:
        1 tbsp Ghee/Oil
        1 tsp Mustard seeds
        2 Red chillies
        10-12 Curry leaves
        2-3 garlic pods,slightly crushed
        a pinch of Asafoetida

        Method:
        • Wash and chop Gongura and keep it aside.
        • In a kadai/pan heat oil and add green chillies, garlic pods and fry for half  a minute and then add onion chunks and saute for 2 minutes until they turn translucent.
        • Add Gongura leaves and fry again for 4-5 mins until the leaves wither and become slightly mushy.
        • Wash toor dal twice and add enough water and turmeric powder to it.
        • Pressure cook toor dal and gongura leaves mixture in separate containers of the pressure cook for 3-4 whistles until the dal turns soft.
        • Once the pressure drops remove extra water from cooked toor dal and mash the toor dal with a pappu gutti(wooden masher) to a smooth paste.
        • Slightly smash the gongura mixture if you want your dal smooth or leave it as it is.
        • In a kadai heat ghee/oil and crackle mustard seeds and add red chillies and crushed garlic pods and fry until it turns slight red in color.Add curry leaves and asafoetida and fry for half a minute.
        • Add cooked and slightly mashed gongura mixture and cook for a minute.
        • Add mashed toor dal to it and add enough reserved water(from dal) and salt and mix nicely and cook for 4-5 mins.
        Serve it hot with hot steamed rice,ghee and papad/fryums.
        gongura pappu
        Notes:
        1. You can even add onions while tempering or cook along with gongura.
        2. Sometimes the dal does not get cooked if cooked along with gongura because of the sourness of those leaves, hence cooking them separately is recommended.
          While boiling add water according to your desired consistency - add less water for thicker dal and more water for slightly running dal and boil accordingly.Also the dal thickens once its kept for long at room temperature.
        3. The red sorrel leaves are slightly tangy,so tamarind is not need.But if you are using white sorrel leaves add 1-2 tbsp tamarind pulp at the end while boiling the dal.
        4. Garlic adds a nice flavor,hence do not skip it.
        gongura pappu

        Chettinad Kuzhi Paniyaram | South Indian Breakfast Recipes

        $
        0
        0
        chettinad kuzhi paniyaram
        'Paniyaram' which is also called as 'Paddu' or 'Gunta Ponganalu' is a very common breakfast variety at my place. I have posted various paniyaram recipes before like Avalakki Paddu(Atukula Guntaponganalu)Instant Oats Paniyaram and Paniyaram using Dosa batter.
        Paniyarams can be prepared as sweet or spicy and today I am posting a spicy version of Chettinad Paniyaram.When the dosa batter turns sour, it is ideal to use it to make paniyaram and I usually make the paniyarams at least once when I prepare dosa batter. If I have to prepare for more number of people I prefer following this method to prepare Paniyaram, though there is not much of difference in taste when you compare with the regular Paniyaram made out of dosa batter,these Chettinad Paniyarams turns out slightly crispier because of the addition of the par boiled rice.The addition of coconut and shallots makes it taste slightly different when compared to the regular paniyaram.We can either add the ingredients raw or saute them in oil slightly and then add to the batter,both versions have their own taste and both ways it tastes nice.But I personally prefer the addition of raw onions to the batter rather than frying them as the raw onions add nice crunch to the paniyarams.We even add soaked chana dal to paniyaram but if you do not like you can skip using it.
        kara kuzhi paniyaram
        Check out other versions of paniyaram here.
        chettinad kuzhi paniyaram

        Chettinad Kuzhi Paniyaram Recipe:
        Serves 5-6 ppl | Author: Prathibha
        Prep time:45 mins | Cooking time: 30 mins | Total time: 1 hr 15 mins + Fermentation time
        Cuisine:Chettinad | Category:Breakfast/Snack

        Ingredients:
        for batter:
        1 cup Raw Rice
        1 cup Par Boiled Rice or Idli Rice
        1/2 cup Whole white Urad dal
        1 tsp Fenugreek Seeds
        Salt to taste

        to mix into batter:
        2 tbsp Bengal gram/Chana dal,soaked(optional)
        4-5 Green Chillies,finely chopped
        1 tbsp chopped Curry leaves
        2 tbsp finely chopped Coconut pieces or grated Coconut
        15-20 Shallots/Small Onions,finely chopped
        1/4 cup Sour Curd,beaten
        1/4 tsp Cooking Soda
        1 tsp Mustard Seeds
        1 tbsp Urad dal
        1 1/2 tbsp Oil

        Oil,to fry

        Method:
        to make batter:
        • Wash and soak rice varieties together and urad dal with fenugreek seeds separately for 3-4 hrs.Grind Urad dal in the wet grinder till smooth and frothy.
        • Grind rice separately into fine rawa consistency.
        • Mix rice and dal mixture nicely and add salt and ferment it for 10-12 hrs.
        to make Paniyaram:
        • Heat oil in a pan and crackle mustard seeds and add urad dal and fry.
        • Add chopped curry leaves, green chillies and shallots and fry until they become translucent.
        • Add grated/chopped coconut and saute for a minute and let the mixture cool.
        • Add sour curd to the batter and mix nicely.
        • Add the fried mixture and soaked chana dal to the batter and mix well.
        • In a ladle add cooking soda and 1 tbsp water and mix well and add to the batter and mix nicely.
        • Heat the paniyaram/gunta ponganalu pan/Aebliskever Pan and add 1/2 tsp of oil in each impression.When it is piping hot keep the flame on LOW and pour the batter using a table spoon until it covers 3/4th and pour some more oil over it and cover it with lid. Let it roast on low-medium flame until golden brown in color.
        • When you see the edges turning golden in color use a sharp knife and run it around the edges of  each paniyaram and turn them to the other side and roast until golden brown on both the sides.
        chettinad kuzhi paniyaram

        Notes:
        1. You can avoid adding curd and ferment the batter for 15-16 hrs until its sour.
        2. I like to add soaked chana dal as it adds nice bite to the paniyaram.
        3. The addition of cooking soda makes the paniyaram light and fluffy, so do not miss it.
        4. Shallots add nice taste,if you do not have them you can even add normal onions.
        5. If you are short of time you can skip tadka part and add everything raw to the batter and make paniyarams.Skip mustard and urad dal in this case.
        kuzhi paniyaram

        Sorakaya Telagapindi Kura | Easy Lauki Sabzi | South Indian Curries

        $
        0
        0
        bottlegourd curry
        A simple dry curry or a vegetable fry, along with dal or sambar and rasam makes a perfect south Indian meal for me any day. As DH is not very fond of few vegetables like bottlegourd, ridge gourd and few other varieties, I usually end up making them for lunch.During my Postnatal period, my mom used to prepare this bottlegourd curry with telagapindi a lot as it aids in good production of milk for new mothers.Telagapindi is basically the residual powder after the process of extraction of oil from sesame seeds and it is a good source for the increase of milk production for the new moms in their postnatal period.In case if you do not have it you can even use sesame seed powder or totally avoid both, still this curry tastes nice.

        Check out other Andhra style Curry recipes here:
        sorakaya kura

        Sorakaya Telagapindi Kura Recipe:
        Serves 2-3
        Prep time: 10 mins | Cooking time: 20 mins | Total time: 30 mins
        Cuisine: Andhra - Indian | Category: Side dish

        Ingredients:
        3 cups peeled and diced tender Bottlegourd
        1 large Onion, finely chopped
        2 tsp Garlic Chili powder
        2 tbsp Telagapindi or 1 tbsp Sesame seed powder(optional)
        1/4 tsp Turmeric Powder
        1 tbsp Chana dal
        1 tsp Urad dal
        1/2 tsp Mustard seeds
        1 red chilli, broken
        a sprig of Curry leaves
        1 1/2 tbsp Oil
        Salt to taste

        Method:
        • Heat oil in a kadai and crackle mustard seeds.Add chana dal and urad dal and fry until the dals turn red in color.
        • Now add red chili,curry leaves and fry until the leaves wilt.
        • Add finely chopped onion and fry until they become translucent.
        • Add the chopped bottle gourd and haldi and fry for 2 mins.Sprinkle little water and cover it and cook and until it is properly cooked.
        • Add garlic chili powder, salt and telagapindi(or sesame seed powder) and mix it nicely and cover it and cook for 2-3 mins.
        Serve it hot with rice/roti/chapati.

        Notes:
        1. The addition of telagapindi or sesame seed powder is optional,but it adds to the taste.
        2. If you do not have garlic chili powder, just add red chili powder.
        3. You can replace bottle gourd with ridge gourd or raw papaya and follow the same process.
        lauki sabzi


        Garlic Podi | Poondu Podi | Podi Varieties for Rice

        $
        0
        0
        garlic podi
        A typical south Indian meal is incomplete without a Podi(spicy powder).We prepare various podi varieties,while few are paired with breakfast others with rice.Mom makes various podi varieties and she always packs a few varieties for me when I visit her.Her Kakarakaya(Bittergourd) podi is quite tasty and is the most favorite one at our home.

        garlic podi


        I use more amount of garlic in my cooking as we both love it very much and this Garlic podi is no exception.It is fiery and loaded with lots of flavor and taste.As I usually stock these podi varieties sometimes it is really helpful on those lazy days. I just prepare steamed rice and mix various podi varieties with hot rice and ghee along with fryums and papads- a satisfying meal for me.


        Check out other Podi recipes for rice in my blog:
                          

        Garlic Podi | Velluli Karam Podi Recipe:
        shelf life:2-3 months
        Prep time:10 mins | Cooking time:40 mins | Total time:50 mins
        Cuisine: South Indian | Category: Accompaniments - Podis

        Ingredients:
        1 cup finely sliced Dry Coconut
        1/4 cup peeled Garlic cloves or 2 whole Garlic Pods
        8 Red Chillies(Spicy Guntur variety)
        4-5 Byadige Red Chillies
        1 amla sized ball of Tamarind
        2 tbsp grated Jaggery(optional)
        1 tsp Mustard seeds
        3 tbsp Oil
        Salt to taste

        Method:

        • Peel the garlic pods slightly and churn it in the mixer in whipper mode to a consistency of big granules.
        • Heat 2 tbsp oil and fry the churned garlic granules on a low-medium flame until they turn slightly crispy.
        • Grind dry coconut,red chillies(both the varieties),salt,jaggery and tamarind to a coarse powder.You taste the mixture at this point and adjust the taste by adding more of tamarind or red chillies or salt.
        • Heat 1 tbsp of oil in a kadai and crackle mustard seeds and add the ground powder and fried garlic granules and mix properly.Switch off the flame.
        • Let the mixture cool and store it in an airtight container and you can use it for 2-3 months.

        Serve it with hot steamed rice,ghee and raw onion.You can even serve it with Idli/Dosa.
        poondu podi

        Notes:
        1. The addition of jaggery is optional but it balances the taste properly.
        2. I do not peel the garlic pods completely and I prefer to keep a layer on garlic.

        garlic karam podi


        Pulusu Upma | Tamarind Upma | Pulusu Pindi

        $
        0
        0
        pulusu upma
        When it comes to breakfast,we prepare lot of varieties and there are so many recipes which are just common to our community. I have posted many of our community special recipes and today's post is also one among them. 'Pulusu Upma' is basically Tamarind upma which quite tangy,sweet and spicy and tastes much different when compared to regular upma as we use a combination of ingredients like tamarind,jaggery and sambar powder to get the balanced taste in this upma.Also, the usage of rice rava in this upma makes the texture different compared to regular upma.It is known as 'Pulusu pindi' in Andhra and it is slightly different from our version.I prefer this Pulusu Upma over the regular Sooji Upma any day because of its distinct taste,you can try this tangy Tamarind upma sometime for a different breakfast recipe.
        pulusu upma

        Check out more breakfast recipes of our Community style:
        pulusu pindi

        Pulusu Upma | Pulusu Pindi Recipe:

        Serves 2 | Author: Prathibha
        Prep time:10 mins | Cooking time: 20 mins | Total time: 30 mins
        Cuisine: Andhra | Category: Breakfast
        Ingredients:
        1 cup fine Rice Rava(see notes for how to prepare it at home)
        15-20 Shallots or 2 large Onions
        2-3 Green chillies,slit
        3 cups Water
        2 tbsp chopped fresh Coriander
        1/2 tsp Turmeric powder(optional)
        1/4 cup Groundnuts
        1 large lemon sized Tamarind
        2-3 tbsp Jaggery
        a sprig of Curry leaves
        1 tbsp Chana dal
        2 tsp Urad dal
        1/2 tsp Mustard seeds
        2-3 tbsp Oil
        Salt to taste
        1  tbsp Ghee

        Method:
        • Dry roast rice rawa in a kadai until the nice aroma starts from it.Remove it from the pan and let it cool.You can even roast rawa in a tsp of ghee which also gives a nice flavor to upma.
        • Soak tamarind in 1/2 cup of water for half an hour and extract pulp from it.
        • Heat oil in a thick aluminium kadai(which is ideal for making upma) or non-stick kadai and crackle mustard seeds.
        • Add ground nuts  fry until they turn little red in color and add chana dal and urad dal and fry until they turn golden brown.
        • Add slit green chillies,curry leaves and fry them until they wilt.
        • Add shallots or sliced onions and fry them until they are pink in color.
        • Add tamarind pulp extracted and 3 cups of water (1c rawa:3c water) to it.
        • Add turmeric powder,sambar powder,salt and jaggery to it and let it boil.
        • Add roasted rava to it with one hand and keep stirring with another hand using a ladle,make sure you make this process very quickly otherwise you will end up having lumpy upma.
        • Once everything is mixed,keep the lid on and cook it on low flame for 8-10 mins.Switch off the flame.
        • Add ghee and coriander to it and mix well.
        • Cover it and let it sit for 4-5 mins before you serve.
        Serve it hot with some boondi/chips/cucumber.
        pulusu pindi

        Notes:
        1. To prepare Rice rawa: Clean and Soak the rice for some time and drain it completely and spread over a cloth so that it will drain off excess water.Coarsely grind the pound mixture in a mixer and then sieve it(do it in whipper mode).Use the rawa which is in sieve and the flour that it is sieved can be used for dosa's or regular rice flour.
        2. This upma is sour,sweet and spicy at the same time so adjust the seasoning as per your taste.
        3. We prepare another version called 'Pulusu Biyyam' where the roasted rava is replaced with roasted rice but the rest of the procedure is similar.
        4. I highly recommend to use shallots for this recipe, if you do no have you can use thickly sliced onions instead.
                     tamarind upma
        Check out other Upma recipes in my blog:
        tamarind upma

        Pappula Podi | Putnalu Podi | Pappindi | Fried Gram Powder

        $
        0
        0
        putnala podi
        'Pappula Podi' is a common accompaniment apart from 'Avakay','Gongura Pacchadi' and 'Kandi Podi' which you find in any Andhra meal in restaurants.It is mostly mistaken with 'Gun Powder aka Kandi Podi' as they both look similar,but the taste and texture for both the powders is quite different. We call it as 'Pappindi' at ur place and our version is slightly different from Andhra style Pappula Podi as the additon of dry coconut, sugar and cumin seeds makes it taste different and nice.You should not miss to add the cumin seeds at the end while grinding as it adds a nice flavor to the powder and also make sure that you do not grind it completely,you just need to run it once in whipper mode.Try this simple Pappindi and I am sure even you will love it.It is usually mixed with hot rice and a generous dollop of ghee,a combination which is definitely a heaven on plate.My most favorite way of using this podi is to mix with curd and eat with Chakli,it is infact a favorite comboat my place and we usually prepare this powder in more quantity if we have huge supply of chaklis at home during marriage season,You can even use it as a quick chutney with dosa, it tastes nice.
        putnala podi

        Check out other powder varieties for Rice in my blog:
        pappula podi
        Pappula Podi | Fried Gram Powder Recipe:shelf life:2-3 months
        Prep time:10 mins | Cooking time:5 mins | Total time:15 mins
        Cuisine: South Indian | Category: Accompaniments - Podis

        Ingredients:
        1 cup Fried gram
        1/4 cup Dry Coconut pieces
        7-8 Red Chillies
        1 small amla sized Tamarind
        2 tsp Cumin Seeds
        2 tsp Sugar
        1 tsp Mustard seeds
        a Sprig of Curry leaves
        Salt to taste
        2 tbsp Oil

        Method:
        • Grind dry coconut,red chillies,salt and sugar to a powder.
        • Add tamarind and fried gram and grind again to a powder. Add cumin seeds and grind again.
        • Heat oil in a kadai and crackle mustard seeds and add curry leaves and add the ground powder and mix it once and switch off the flame.You should keep it on the flame just until you mix it,not for long.
        • Cool it and store it in an air tight container.
        Serve it with hot steamed Rice,Ghee and chopped Raw onions.You can even mix Avakay to this powder,it tastes yum.

        andhra gun powder
        Notes:
        1. You can add more dry coconut if you wish,it adds more taste to podi.
        2. The addition of sugar is optional but helps in balancing the flavors.
        3. This tastes yum when you mix it with hot steamed rice,ghee with fryums and raw onion on the side.You can even mix it with avakai pickle and ghee it tastes nice.
        4. You should not miss to add the cumin seeds at the end while grinding as it adds a nice flavor to the powder and also make sure that you do not grind it completely,you just need to run it once in whipper mode.
        5. You can add a couple of garlic pods while running in the mixer in the last round for different flavor.
        fried gram powder

        Bombay Chutney | Besan Chutney Recipe | Side dish for Dosa,Poori

        $
        0
        0
        bombay chutney
        'Bombay Chutney' is basically 'Besan Chutney' which is prepared as a combination for usually Dosa , Poori and Chapathy in South India.I personally like it with soft and fluffy Atukula dosa and chapathy.I wonder how it got the name 'Bombay Chutney' as I never came across something like that here in Mumbai.It is a simple yet delicious and can be made with the basic ingredients available in the pantry and also a perfect recipe to pair with chapathis if you run out of veggies.The addition of boiled potato to the bombay chutney makes a delicious combination with poori.

        Check out other gravies that pairs commonly with Dosa, Chapathy and Poori :
                        besan chutney
        Bombay Chutney | Besan Chutney Recipe:

        Serves 2-3
        Prep time: 10 mins | Cooking time: 20 mins | Total time: 30 mins
        Cuisine: Andhra - Indian | Category: Side dish

        Ingredients:
        2 tbsp Besan(chickpea flour)
        1 large Onion, sliced thin
        2 medium Tomatoes,chopped
        4-5 Green chillies,slit and cut
        8-10 Curry leaves
        2 tbsp Coriander leaves,chopped
        1/2 tsp Turmeric powder
        1/2 tsp Red chilli powder
        1/2 tsp Garam masala (optional)
        1 tsp Lemon juice or 2 tbsp Curd,optional
        1/2 tsp Mustard seeds
        1 tsp Urad dal
        1 tbsp Chana dal
        Salt to taste
        1 1/2 tbsp Oil

        Method:
        • Mix the besan with 1/4 cup of water properly to form a nice paste without any lumps.
        • Heat oil in a kadai and crackle mustard seeds. Add urad dal and chana dal and fry until the dals turn slight red in color.
        • Add cut green chillies and sliced onions,curry leaves,ginger-garlic paste and fry till the onions turn translucent.
        • Add chopped tomatoes and fry until they turn pulpy.Add turmeric powder,red chilli powder,garam masala and 3 cups of water,cover it cook for 6-8 mins until you see bubbles.
        • Remove the lid,add salt and add the mixed besan mixture slowly by stirring the entire mixture continuously as we do for upma and cover it and cook for 2-3 mins until thick.
        • Add lemon juice or curd,coriander leaves and mix well.
        Serve hot with Dosa or chapathy or Poori.It tastes nice with Atukula Dosa too.

        bombay chutney
        Notes:
        1. The addition of tomato is optional, you can skip it.
        2. You can even add one boiled potato by slightly mashing it to chunks or cut into pieces,this tastes better with poori.
        3. The addition of lemon juice or curd makes it tangy, you can skip it if you do not want it that way.
        4. You can always skip garam masala and ginger- garlic paste for simple bombay chutney.
        bombay chutney

        Parle G Biscuit Cake in Microwave | Microwave Biscuit Cake

        $
        0
        0
        parleg biscuit cake
        Few years ago,one of my aunt shared this recipe which she took it from a tupperware booklet.I was new to baking then and tried it immediately because of the simplicity of the recipe and I was really amazed by the texture of the cake .I had shared this recipe to my mom,mil and friends and everyone appreciated this cake as it is quite simple to prepare with very few ingredients available at pantry.This cake has been quite regular at my mom's place for her get togethers and kitty parties as this cake does not need oven and also the fact that it is eggless.All you need is a pack of parle-G biscuits ,a sachet of fruit salt and few basic ingredients from your pantry and you can prepare this cake in no time. I am sure many of you tried the instant version of biscuit cake in microwave.If you have not tried yet, I recommend you to try this simple biscuit recipe.It is the most easiest way to please your kids who demands for cakes with short notice.
        biscuit cake

        Check out other cake recipes for Christmas:

        microwave biscuit cake

        Parle G Biscuit Cake Recipe :
        makes an 8" cake | Author : Prathibha
        Prep time: 5 mins | Cooking time: 4-5 mins | Total time: under 10 mins
        Cuisine: Indian  | Category: Cakes/Bakes

        Ingredients:
        150 gms Parle G Biscuit packet
        3 tbsp Cocoa powder
        1/2 cup Sugar
        1 1/2 cups Milk,approx
        1 Eno fruit salt sachet, plain
        2-3 tbsp chopped Dry fruits(almonds,cashew nuts etc)
        Butter/Oil , to grease the pan
        Cocoa powder or Icing sugar, for dusting

        Method:
        • Chop dry fruits into small pieces and keep them aside.
        • Take a deep microwave bowl and grease it with butter or oil nicely and keep it ready.
        • Break biscuits into fine pieces and add cocoa powder, sugar to it and run it in the mixer to a fine powder.
        • Take milk in a bowl and add the ground powder to it and mix well.The mixture should be smooth,neither very thin nor very thick.
        • Add sliced almonds and cashewnuts to it and mix well.                                 
        • Add eno to it and give a quick stir, you will see a foamy batter ready.

        • Pour this batter into the greased bowl and level it off evenly.Sprinkle few more sliced almonds on top.Microwave it on HIGH for 4-5 mins.Check it after 4 mins, as the power differs for each microwave it is always better to check it in between.Insert a tooth pick and see if it comes out clean it is ready if it is slightly battery then again microwave it for a minute or more.Repeat the tooth pick test if needed.
        • Leave it undisturbed for 5 mins.Run a knife around the corner of the cake and unmould it on to a plate.Let the cake cool completely.
        Serve the cake as it is  or you can even dust it with cocoa powder or Icing sugar or pour chocolate ganache on top of it.Decorate it as per your wish with color sprinkles,gems etc.

        microwave biscuit cake

        Notes:
        1. You can use combination of biscuits like Parle G and Hide and seek biscuits or use just plain Parle G biscuits.
        2. You can reduce the sugar to 1/3 cup if you like it mildly sweet.
        3. As the Microwave power differs for each microwave it is always better to check the cake in between.Insert a tooth pick and see if it comes out clean it is ready, if it is slightly battery then again microwave it for a minute or more.
        4. Checck out the chocolate ganache recipe if you want to cover the cake with it.You can even use ready whipped cream or chocolate icing or simply dust it with icing sugar or cocoa powder like how I did.
        5. You can easily keep this cake for 2-3 days at room temperature.
        biscuit cake

        biscuit cake

        Udupi Sambar | Mixed Vegetable Sambar | Karnataka style Sambar Recipe

        $
        0
        0
        udupi sambar
        Udupi is known for the origin of the famous 'Masala Dosa' and also for various tiffin varieties.Udupi sambar is very aromatic because of the usage of freshly ground spices and also the addition of coconut,jaggery and red chillies makes it mildly sweet,sour and spicy in taste.It can be served with most of the breakfast varieties like idli,dosa,vada and even plain steamed rice,it tastes nice. You can prepare this sambar with just one vegetable or various combination of vegetables with or without onions.The addition of onions is optional but I love the addition of onions to sambar and in fact the addition of shallots adds to a better taste.
        udupi sambar

        Check out other sambar recipes in my blog:
        udupi sambar

        Udupi Sambar Recipe -Mixed Vegetable Sambar - Karnataka style:
        Serves 2-3 | Author: Prathibha
        Prep time:10 mins | Cooking time:30 mins | Total time: 40 mins
        Cuisine: South Indian | Category: Side dish for Rice - Main Course

        Ingredients:
        1/2 cup Toor dal
        2 cups diced Mixed Vegetables(Carrot,Potatoes,Beans,Drumstick,Brinjal)
        1 Onion, diced or 12-15 Shallots,optional
        1 large Tomato, chopped
        a small gooseberry size Tamarind
        1/4 tsp Turmeric powder
        1-2 tsp grated Jaggery,optional
        2 tsp Oil
        Salt to taste

        to roast and grind:
        2 tsp Coriander seeds
        2 tsp Urad dal
        1 tsp Chana dal
        1/4 tsp Peppercorns
        1/2 tsp Cumin seeds
        7-8 Fenugreek seeds
        2 Red chillies,spicy variety
        2 Byadige Red chillies
        1/3 cup grated coconut

        to temper:
        2 tsp Ghee/Oil
        1/2 tsp Mustard seeds
        1-2 Red chillies
        a sprig of Curry leaves
        a pinch of Asafoetida

        Method:
        • Chop the vegetables  into 1" cubes and keep them ready.
        • Wash and soak toor dal for 10 minutes in 1.5 cups of water. Add turmeric powder to it. In a separate container add chopped vegetables and tomato and pressure cook dal and vegetables separately for 3 whistles, Once the pressure drops slightly mash the dal with a wooden ladle.
        • Soak tamarind in water for some time and extract pulp from it and keep it ready.
        • Dry roast coriander seeds, cumin seeds, urad dal, chana dal,fenugreek seeds red chillies and pepper corns and grind them to powder first and then add freshly grated coconut and grind to a fine paste by adding some water.You can even saute the fresh grated coconut at the end for half a minute along with the spices,this way the sambar does not spoil quickly even in summers.
        • Heat oil in a big kadai/pan and add diced onions and fry until they turn translucent. Add boiled vegetable pieces and cooked dal to it.
        • Add ground mixture , tamarind pulp, salt, jaggery and mix nicely and boil it until the raw smell of the ground paste is gone.Also add enough water to get the required consistency while boiling.
        • Taste the sambar once and adjust the seasoning if needed. Sambar thickens slightly when it sits, so adjust the consistency according to your requirement. 
        • Heat ghee/oil in a small tempering pan and crackle mustard seeds and add red chillies, curry leaves and asafoetida and fry for half a minute and add the tempering to the sambar at the end and mix well.
        Serve it hot with steamed Rice and fryums and a vegetable stir fry. You can even serve it with  breakfast varieties like idlidosavada
        karnataka style sambar

        Notes:
        1. You can use any other vegetable like  cluster beans,  pumpkin, chow-chow,,raw papaya,broad beans(chikkudu) etc or a combination of mixed vegetables.
        2. You can follow the same process for ladies finger sambar, in that you need to fry the ladies finger pieces in oil first and then add to the sambar while boiling.You should not pressure cook the ladies finger pieces.
        3. You can even prepare sambar with greens like amaranth, fenugreek(methi), palak or mixed greens following the same process.It tastes nice with Ragi Mudde.
        4. If you want a no onion-no garlic version skip onion in the recipe.
        5. Instead of boiling the tomato, you can even grind the tomato with the other ingredients, that gives a nice color to sambar.
        6. For a quicker version you can even grind tomato,grated coconut with Karnataka style sambar powder to a fine paste and follow the same recipe.
        mixed vegetable sambar

        Viewing all 520 articles
        Browse latest View live