Quantcast
Channel: THE CHEF and HER KITCHEN
Viewing all 520 articles
Browse latest View live

Sabudana Khichdi Recipe | Vrat Recipes | Fasting (Upvas) Recipes

$
0
0
Tomorrow is Maha Shivratri, an auspicious Hindu festival performed in reverence of Lord Shiva. On Mahashivratri day,in South India, we usually do not eat rice and eat light tiffin items,sweets and fruits and few even observe fast with out consuming anything throughout the day.
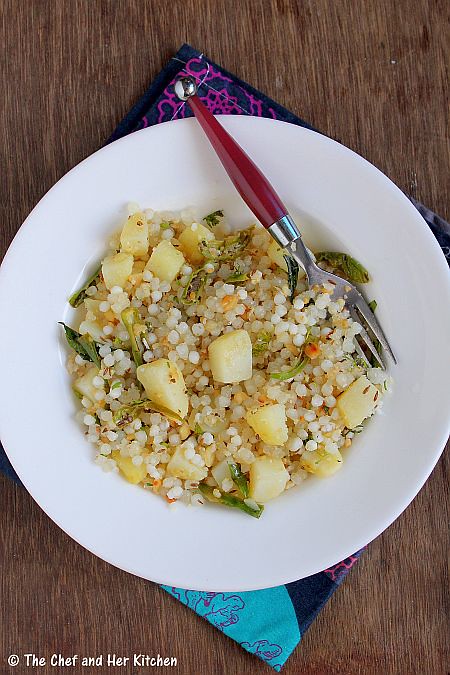
I  have already posted a south Indian version of Sabudana Upma,which is prepared with a different variety of Sago called 'Nylon Sago' and 'Moong dal' which tastes nice and different in its own way.Today, I am posting a simple and humble Sabudana Khichdi, which is a typical Maharasthrian style recipe and is ideal to prepare on the days of fasting.I love the addition of peanuts in the recipe which not only adds to the taste but also adds a nice crunch and texture to the khichdi.
In Mumbai, we get good quality sabudana and I often prepare various breakfast varieties like Sabudana Thalipeeth , Sago Tikki, Sabudana Vada and this simple Sabudana Khichdi.The process of soaking the sabudana is bit tricky;if we soak sabudana in more water or for a long time, we might end up with a mushy and lumpy khichdi.I have included few tips in the method and notes to get perfect Sago pearl Khichdi-please go through them carefully before you attempt this.

Other Sabudana recipes in my blog which might be interesting for you:

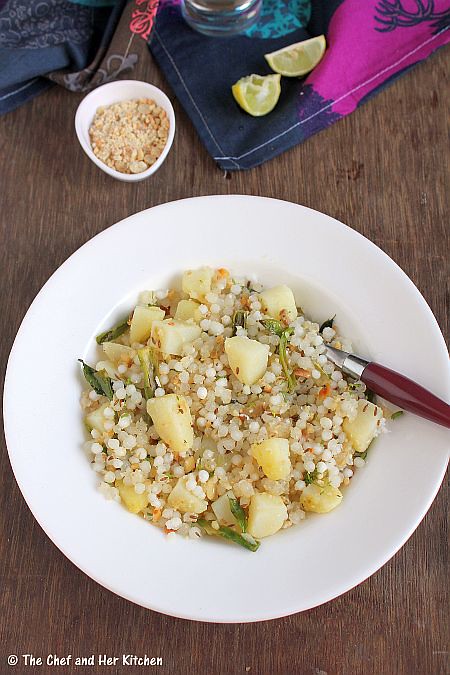
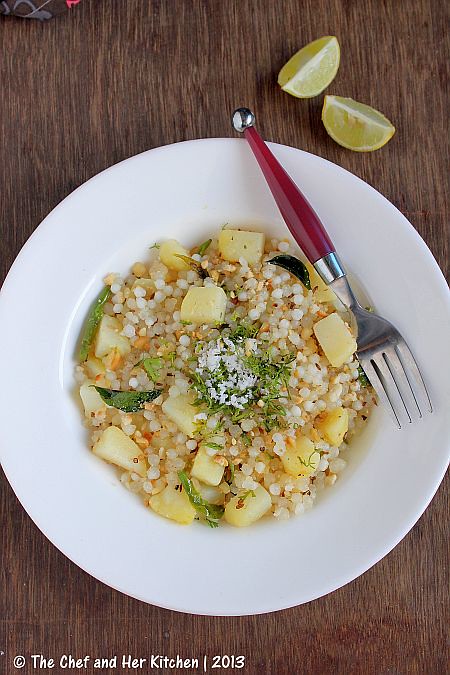
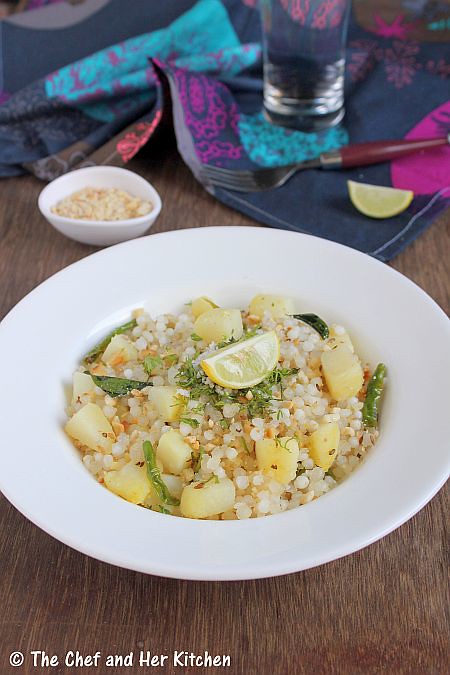
Sabudana Khichdi Recipe:
(Serves 2)

Ingredients:
1 cup Sago/Sabudana
1 big Potato
1/3 cup +  2 tbsp roasted Groundnut powder,coarse powder with bits of groundnuts
5-6 Green chillies,slit
1 tsp Ginger,grated(optional)
a sprig of Curry leaves
2-3 tbsp chopped Coriander leaves
2-3 tbsp grated fresh Coconut,for garnish
juice of 1/2 lemon
1 tsp Sugar(optional)
1 tsp Cumin seeds
Salt to taste
1 tbsp Oil
1 tbsp Ghee

Method:
  • Wash sago twice and add enough water until it is just above the level of Sago.Soak it for 4-5 hrs or overnight.Do not add more water as it will make sago soft and soggy.
  • Pressure cook potato with salt until soft for 3 whistles.Peel the skin and cut it into small cubes.
  • Heat ghee and oil in a big kadai/pan and crackle cumin seeds.
  • Add slit green chillies,grated ginger and curry leaves and fry until they wilt.
  • Add cubed potatoes and fry for 1-2 mins.You do not need to roast them until crisp,just saute them for some time.
  • Meanwhile in a wide bowl mix sago with roasted groundnut powder,salt and sugar and keep it ready. This process of mixing the groundnut powder will make sure that the sago will not sticky while cooking.
  • Add this mixed sago mixture to the kadai and mix well on low flame.Stir it continuously until you see some of the sago pearls turning transparent.Cover it and cook for 3-4 mins,this way they will get cooked uniformly with the steam.
  • Remove the lid and add lemon juice and mix well.
Garnish with chopped coriander and grated fresh coconut. Serve it hot with Curd/ sliced Cucumber/ Sev.

Notes:
  1. Instead of boiled potatoes you can add chopped potatoes and cook it in the pan.I prefer to cook the potatoes in advance before adding to khichdi.Add salt while cooking potatoes as they will absorb salt and makes it tasty.
  2. The addition of groundnut powder adds a nice taste to khichdi.I usually use my mortar and pestle to crush groundnuts and also I keep them slightly coarse.The bits of groundnuts adds a nice crunch and taste while eating khichdi.
  3. I add lot of green chillies in sabudana khichdi otherwise I find it bit bland.
  4. While soaking Sago add water to it until it is just above the level.This amount of water is enough and its a basic thumb rule to get nice non sticky Khichdi.
  5. Sugar is added in typical Maharsthrian style khichdi,you can skip it if you do not want.
 

You can check out other Vrat recipes for Shivratri here:
  1. Sabudana Thalipeeth
  2. Sabudana Upma - South Indian style(you can prepare this recipe with out onions) 
  3. Fruit Cocktail Sticks
  4. Phool Makhana Kheer
  5. Rava Payasam | Sooji Kheer 
  6. Sabudana Kheer | Sago Payasam
  7. Carrot Kheer 
  8. Basundi
  9. Orange Basundi
  10. Lauki(Bottlegourd) Halwa
  11. Paneer Modak Peda  
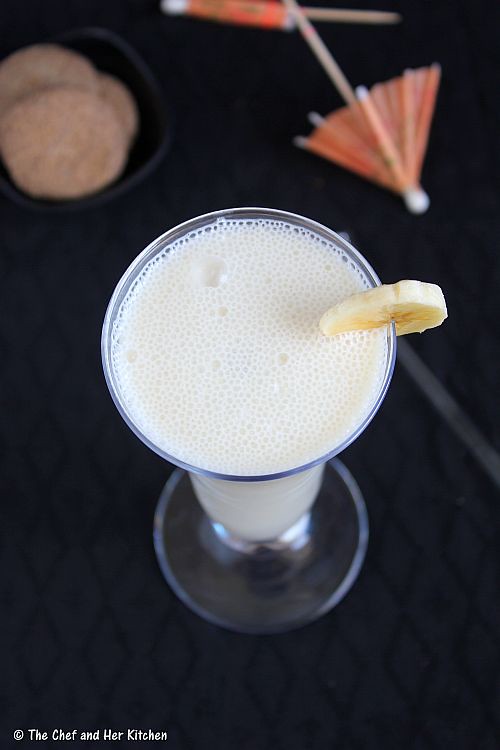
  12. Strawberry-Banana Smoothie
  13. Strawberry Lassi

Sprouts Fried Rice Recipe | Easy Lunch Box Ideas

$
0
0
Fried rice is an easy lunch option for me on weekdays as it is the most convenient one pot meal to prepare.While most of the times I prepare Chinese Vegetable Fried rice as it is the best way to consume lots of vegetables, I also prepare Sprouts fried rice if I have sprouts at hand.It is almost prepared in the same way as we prepare fried rice,but here in this recipe we use larger quantities of sprouts relative to vegetables to enhance the flavor of the dish.It is an ideal recipe even for lunch box.
Moong Sprouts Fried Rice Recipe:
(Serves 2)

Ingredients:
1 cup Basmati Rice
1 cup whole Moong Sprouts(Green gram)*
1/4 cup Cabbage,shredded
1/2 Green/Red Capsicum,finely chopped
3-4 bulbs of Spring Onion whites,sliced thin
3 stalks of Spring Onion greens,chopped
1 tsp Garlic,finely chopped
1 tsp Ginger,finely chopped
1 tsp Soya sauce
1/2 tsp Vinegar
1/2 tsp Black pepper powder
Salt to taste
2 tbsp Olive Oil
1 tbsp Sesame Oil

Method:
  • Wash and soak basmati rice for 10 mins.Cook it in a pot full of water over open flame until done and drain the rice or pressure cook the rice with 1 and 3/4th cups of water for 1 whistle and cook for 4-5 mins on low flame.Spread the rice on a wide plate and apply 1 tsp of olive oil to it so that the rice grains remains separate and let the rice cool completely.
  • Heat olive oil and sesame oil in a big wok and add finely chopped garlic and ginger and fry well.You should do this rice in high flame,so keep all the ingredients ready before you start and saute the ingredients quickly.
  • Add sliced spring onion whites and fry for a minute.
  • Add shredded cabbage and finely chopped capsicum and fry again on HIGH flame for 1-2 minutes.
  • Now add moong sprouts and spring onion greens and quickly saute for another minute.
  • Add soya sauce,vinegar,salt and pepper powder and quickly saute now.I usually add a pinch of sugar now which balances the sauce taste.It is your wish to add sugar or not.
  • Add cooled and separated cooked rice and quickly stir fry the rice so that it mixes with the vegetables nicely.Do this gently and take care that you would not mash up the rice.Stir fry or toss it on high flame for 2 mins.
Serve it hot with Tomato sauce/Ketchup or as it is.

* To make Moong sprouts  - Wash and soak whole green gram(moong) in water overnight for 12-14 hrs.Drain all the water and tie the sprouts in a thin muslin cloth and hang it to a stick(or nail) for 15-16 hrs or bit longer until you see the sprouts.Keep sprinkling some water in between to keep them moist.

Notes:
  • In chinese cooking Ajinamoto(chinese salt) is added to give extra taste,I have not added to it as it is supposedly not good for health.If you would like to add feel free to add 1/2 tsp Ajinamoto along with pepper powder.
  • It is always better to use finely chopped ginger and garlic bits in the recipe instead of ginger-garlic paste as a bite into crisp ginger adds a nice taste while eating fried rice.
  • I recommend you to refrigerate the cooled rice at least for half an hour which helps the rice in holding the shape while frying.
  • The entire cooking is to be done over a high flame which helps in retaining the crispiness of vegetables and sprouts and the flavor of the dish,so you should be quick while sauteing the veggies and rice.
  • I have used dark soya sauce in the recipe,if you are using light or regular soya sauce increase it to 1 tsp soya sauce.
  • You can use bean sprouts instead of moong sprouts in the recipe.
 

    Avarekalu Mixture | Hyacinth Beans Snack

    $
    0
    0
    As mentioned in my previous post, this Avarekalu mixture has also been sent by my mom.As a tradition, every year my Grandmom used to give these avarekalu(deep fried hitikida avare) to all her daughters. The tradition continued even now and with out fail every year my uncle sends a huge packet of this mixture to my mom.Right from childhood, I never developed a taste for this mixture though I like a few other varieties with Avarekalu like Pithikipappu, Avarekalu Usli, Avarekaalu Uppittu, Avarekalu Kadubu, Rotti, Saaru and few other varieties
    This Avarekalu mixture is a famous variety in Bangalore and in particular in our community.Back home,during the avarekalu season, we used to buy several kilos of it every week and my mom used to prepare various varieties with it.The process of shelling the flat beans,separating the tender ones from the hard ones,soaking the hard ones for a couple of hours and remove the skin to get the skinned avare(it is called 'hitikida avarekalu/hitikbele' in kannada) is all time consuming but my mom never complained about the process and at times even we helped her doing this process.Now a days we easily get the shelled beans as well as the skinned beans in the market, which makes life easier. Making the dishes with them is like a breeze now.But I think, my mom still enjoys her age old tradition of shelling and skinning them until and unless it is an immediate requirement she does not buy the ready stuff from the markets.
    Coming back to the Avarekalu mixture,it is usually served in our place after lunch when the whole family sit and chit-chat.Though I am not a fan of this mixture, I used to pick the spicy rice flour balls (palakayalu) from the mixture as I just love to munch them as they are really spicy and very tasty.That is the reason my mom sent me an extra packet of those spicy rice flour balls.I think its time I head to the recipe,here you go!!
    Avarekalu Mixture | Hyacinth Beans Snack Recipe:
    shelf life: 2-3 weeks

    Ingredients:
    4 cups of hitikida Avarekalu/Hyacinth beans(Shelled,soaked and the skin peeled)
    1 cup Spicy Diamonds/Palakayalu(Rice flour balls)
    1/2 cup Groundnuts
    1/2 cup Dry Coconut pieces,cut into thin slivers
    1/2 cup Cashew nuts,slit into two
    1/2 cup Curry leaves
    1 tbsp Red chili powder
    1 tbsp Cumin seeds
    Salt to taste
    Oil,for deep frying the hyacinth beans
    1/4 cup Oil for tempering

    Method:

    Preparing the Hyacinth beans:
    • Soak shelled avarekalu in water for 4-5 hours or in luke warm water for 2 hrs.De husk outer skin and keep aside.This picture would give an idea how they are done.
    to prepare Avarekalu mixture:
    • Spread the dehusked beans on a clean cloth for some time to dry up the moisture.
    • Heat enough oil in a deep kadai/pan to deep fry a handful of skinned avarekalu at a time.Once the oil is hot deep fry them on medium flame until they turn crisp.They would retain their slight green color and become crisp,do not fry them for long until they turn brown.Drain them and keep them aside.Remove all the oil from the pan and just keep 1/4 cup oil in the pan.
    • Add the cumin seeds and let them crackle.
    • Quickly add groundnuts and fry them on low-medium flame until they turn slightly red in color and the skin peels off slowly.
    • At this stage add cashew nuts and dry coconut pieces and fry them until they turn in golden brown in color.
    • Add curry leaves and fry them until they turn crisp.
    • Now switch off the flame and add salt and red chili powder to it and give a quick stir.
    • Quickly add deep fried Avarekalu and spicy Palakayalu(diamonds) to it and mix nicely until all are coated evenly with the spice mix.Check for the taste now and add if extra salt or red chili powder is needed.You need to adjust the spices while it is still hot and they blend nicely when it is hot.
    • Once the mixture comes to room temperature,store it in an air tight container.
    Serve it as an evening snack with a cup of tea.In our house it is ideally served after a meal which the whole family sit and chit-chat.

    Notes:
    1. You can even add mustard seeds while tempering or a mix of mustard and cumin seeds while tempering.
    2. Adjust the amount of red chili powder as per your liking.
    3. You can increase or reduce the amount of ingredients according to your wish and also adjust the seasoning accordingly.
    4. This can be stored even up to a month.
    5. Deep fried Hitikida Aavre(skinned hyacinth) can be stored up to 6 months in an air tight container and this mixture can be prepared using them when ever needed.

    Garam Masala Powder | Punjabi Garam Masala Recipe

    $
    0
    0
    I like to try out new varieties of masalas ranging from regional kind of masalas to the regular standard masalas.Though I do  buy some kind of readymade masalas , I never think of buying some kinds such as Sambar Powder, Rasam Powder, Garam masala, Coriander powder, Cumin powder as I like to make them fresh at home.
    Every house hold has their own recipe for Garam masala,though most of the ingredients are the same there might be a change in the mix of each ingredient used or maybe some variation in the kind of ingredients. After marriage, I have been following my MIL's recipe for Garam masala which I love because of its flavor. As I prefer to add coriander powder and cumin powder separately to any dish I usually do not add them to my Garam masala powder.This home made Garam masala is quite strong and hence I add just a pinch or 1/4 tsp of masala to the dishes I prepare. This recipe yields masala that lasts for over two months for me.
    You can check out other masala powders in my blog.

    Punjabi Garam Masala Powder Recipe:
    shelf life: 1-2 months

    Ingredients:
    5-6 3" long Cinnamon pieces
    2 tbsp Cloves
    6-8 Black Cardamom(Mota Elaichi)
    20-25 Green Cardamom(Chota Elaichi)
    2 tbsp Black Pepper Corns
    3-4 Star Anise
    3-4 Mace(Javithri )
    10-12 Bay leaves
    2 tbsp Caraway seeds(Shahjeera)
    1/2 Nutmeg(Jaiphal)
    1/2" Dry Ginger(Sonth)

    Method:
    • Clean and dry all the spices in the sun for 2-3 hrs.Alternatively you can dry roast them for few minutes,but take care that you would not dry roast them for long.I usually prefer to keep them in sun instead of dry roasting the spices.
    • You can either grate nutmeg and dry ginger or break them into tiny pieces using a pestle.
    • Grind all the ingredients to a powder.You do not need to grind it to a very fine powder,you can keep it slightly coarse.
    Store it in air tight container.Use it any North Indian style gravy, Dals, Curries, Stir fries, Snacks, Pulaos, Biriyanis etc.
     Notes:
    1. I usually do not add coriander seeds and cumin seeds to my garam masala as I add the powders separately to any dish.In case you want to add them, you can add around 1/2 cup Coriander seeds and 1/4 cup Cumin Seeds and grind with the rest of the ingredients to a powder.
    2. As the home made Garam masala is quite pure and strong I usually add a pinch(or 1/4 tsp) to any dish which itself is enough for the flavor.You can add the masala quantity according to your personal taste,but do remember that this masala is quite strong.

    Top 10 Andhra Mango Pickle Recipes | Andhra Avakaya Varieties

    $
    0
    0
    Summer is here and and this is the season for making Mango pickles. I have posted various Mango pickles over the past few years in my blog but I thought it was better to share all the pickle recipes at one place. Enjoy this summer, preparing these delicious Mango pickle varieties. Even I am waiting for preparing a few batches of these pickles in this summer.

     1. ANDHRA AVAKAYA Pickle

    Shelf life:  1+ year
    Description: Traditional Mango pickle prepared with a combination of spices - mustard powder, red chili powder,salt,fenugreek seeds,sesame oil and few more optional additional ingredients like garlic or chana.
    Combination: It tastes best when mixed with hot rice,ghee and podi(Kandi Podi) or mudda pappu.It goes well with Curd rice too.

    2. ALLAM AVAKAYA | Andhra Avakaya with Ginger Garlic Paste: 

    Shelf life: 1+ year
    Description: It is a similar version to Andhra Avakaya pickle but the addition of Ginger - Garlic paste makes it unique and tastes very delicious.This is my absolute favorite pickle and is a specialty pickle of  Telangana region of Andhra Pradesh.
    Combination: It tastes best when mixed with hot rice,ghee and podi(Kandi Podi).It goes well with Curd rice too. 

    3. BELLAM AVAKAYA | SWEET MANGO AVAKAYA PICKLE

     Shelf life: 1 year
    Description:  This is a unique Avakaya which is sweeter in taste because of the addition of jaggery and while the rest of the ingredients used are as similar to the regular avakaya.It has become my favorite pickle recipe along with Allam avakaya.
    Combination:It makes a great accompaniment for Idli/Dosa and even with hot rice and ghee and also with Rotis/Theplas/Parathas.

    4. NUVVU AVAKAYA |  Mango Avakaya with Sesame Seeds

    Shelf life: 15-20 days under normal conditions,upto a month when refrigerated
    Description: A variation to regular Avakaya pickle with the dominant taste of sesame seed powder which adds a mild tone of sweetness to the pickle which makes it taste unique from the regular Avakaya.
    Combination: It tastes best when mixed with hot rice and ghee.It goes well with Curd rice too.

    5. PALLI AVAKAYA | Mango AVAKAYA with Ground nut powder :

    Shelf life: 10-15 days under normal conditions,upto a month when refrigerated
    Description: This is another Telangana special mango Avakaya recipe.This avakay is quite unusual with the subtle taste of ground nut powder and is a great combination with hot rice and ghee.
    Combination: It tastes best when mixed with hot rice and ghee.It goes well with Curd rice too. 

    6. PESARA AVAKAYA | MANGO AVAKAI with roasted Moong dal Powder

    Shelf life: 15-20 days under normal conditions,upto a month when refrigerated
    Description: It is my most favorite Avakay among the instant versions which gets marinated very quickly.This avakaya is prepared using the roasted moong dal powder instead of mustard powder which makes it delicious.
    Combination: It tastes best when mixed with hot rice and ghee.It goes well with Curd rice too. 

    7. MUKKALA PACCHADI | MANGO PICKLE with SMALL PIECES

    Shelf life: 2-3 months
    Description:  This is the first pickle which we prepare in mango season as this pickle gets ready very quickly.It is a simpler version of regular Avakaya recipe which is prepared with fine pieces of mango.
    combination:
    Combination:It tastes best when mixed with hot rice,ghee and podi(Kandi Podi).It tastes best with Curd rice too. 

    8.MAAGAYA PICKLE | Mango Pickle using Sun dried Mangoes

    Shelf life: 1-2 years
    Description: This is a different mango pickle  recipe which is prepared using sun dried mango pieces and can be stored for long.This magaya pickle can be ground with curd to a chutney called "Magaya Perugu Pacchadi' which makes a nice combination with Idli/Dosa.
    Combination:It tastes best when mixed with hot rice and ghee.It tastes nice with Curd rice too.


    Shelf life: 15-20 days
    Description: Mango pickle with absolutely no oil in the recipe and instead water is used in the recipe. Try this different mango pickle recipe definitely in this mango season.
    Combination: tastes best with Curd rice.


    Shelf life: 1+ year
    Description: This is a typical North Indian style Mango pickle which is prepared with various blend of spices like yellow mustard,fennel seeds,kalonji and various spices which makes this pickle special tongue tickling.
    Combination: This is ideal pickle with Rotis/Theplas/Parathas.
        
    Also check out other South Indian Pickle recipes if you are interested:
    1. Usiri Avakaya | Gooseberry Pickle 
    2. Mango Ginger Pickle | Mamidallam(Maa Inji) Mukkala Pacchadi
    You can check out few other North Indian Pickle recipes here:
    1. Mixed Vegetable Achar - North Indian style 
    2. North Indian style Stuffed  Mirch ka Achar(Green Chili pickle)

    Homemade Ginger Garlic Paste | How to make Ginger-Garlic Paste

    $
    0
    0
    Today I am back again to highlighting the must have basic items in Kitchen. This post is about the preparation of - 'Ginger-Garlic Paste,' an essential item to have handy while cooking. As I use ginger-garlic paste in most of my curries, pulaos etc, I always store a jar of  it, in my refrigerator.Though we get readily available Ginger garlic paste in the market, I never buy it, as the smell of preservatives used in it puts me off and in any case, nothing beats home made freshly prepared Ginger Garlic paste.I usually make small quantities, which lasts for 2 weeks.
    Ginger Garlic paste:
    shelf life:3-4 weeks when refrigerated

    Ingredients:
    200 gms Ginger
    200 gms Garlic
    2 tsp Salt approx
    1/4 tsp Turmeric Powder
    1 tsp Oil

    Method:
    • Wash and peel the skin of ginger and wipe it with a clean cloth and cut it into small pieces and spread them on a kitchen towel for half an hour.
    • Peel the skins off the garlic pods and keep them ready.
    • In a mixer grind ginger and garlic with salt,oil and turmeric powder to a coarse paste in a whipper mode.
    • Grind it in intervals rather than grinding them in a single pulse.Do not add water while grinding which will reduce the shelf life of the paste.If you want smooth paste you can grind it for long.
    Store the mixture in a clean jar in refrigerator.It can be stored for 3-4 weeks and use it when required.

    Notes:
    1. Always use a clean spoon to scoop out the required amount of ginger-garlic paste.
    2. You can skip turmeric powder but it preserves the color of ginger garlic paste for long.
    3. In order to peel the garlic pods I always cut the tip of garlic pod or smash it on a hard surface and peel it off,it peels off easily.

    Special Candied Amla | Dry Amla Candy | Post meal Digestives

    $
    0
    0
    Amlas(Indian Gooseberries) are considered very good for healthand as they are rich in vitamin-C, it is suggested to include them in one's daily diet.As these are available only in a particular season, we usually make various varieties with it and preserve it for the rest of the year.We make niluva pacchadi,pickle,dried amla gratings-salted version and candied amla varieties with it.
    These candied amlas are quite addictive and they can be eaten as a post meal digestive or when ever you want to eat something which is tongue tickling.This is a special recipe which my MIL prepares using rock candy(not the sugar) and hence it is suggested even for diabetic people.I must warn you that these candied amla berries are extremely addictive,we have already finished a huge batch of them and are planning to prepare the next one!

    Special Candied Amla Recipe:
    stores upto 5-6 months 

    Ingredients:
    1 kg Amla/Gooseberries
    200 gms Kalakanda(Patika bellam)/Rock Candy/Mishri
    1 tbsp Cumin powder
    2 tbsp Ginger juice
    2 tbsp Lemon juice

    Method:
    • Clean and wipe the gooseberries and place them in a bowl.
    • In a cooker fill water in the bottom and place a rack to get some height in it and place this vessel with gooseberries and pressure cook for 2 whistles.You should not pour water in the container which is filled with gooseberries.
    • Once they are cooled down,cut them into pieces and discard the seeds.
    • Crush the rock candy(patika bellam/mishri) into a powder and take it into a bowl.
    • Grate approx 2 " ginger and press it in your hands to extract juice.
    • Add cumin powder,ginger juice to the powdered rock candy and mix well.
    • Add the chopped gooseberry pieces to it and mix well.
    • Transfer this to a kadai and keep it on low-medium flame and mix it occasionally.
    • You can stir it in between carefully,try not to crush them while mixing it.
    • Cook it for 12-15 mins until the mixture becomes sticky and sticks to the gooseberries.
    • Remove it from stove and add lemon juice and mix well.
    • Dry them on a clean plastic sheet in sun for 2-3 days until they are dried completely.
    • Store it in an air tight container.It stays good for several months.
    Eat them after a meal and also during journeys or just like that.
    Notes:
    • Do not get confused with rock candy which is patika bellam and patika(which looks similar to patika bellam but it is totally different).
    • Patika bellam is called Kalakanda in telugu,mishri in hindi,rock candy in english,kallu sakkare in kannada.

    Matar Kachori(Green Peas Kachori) and Alu Sabzi - Delhi style

    $
    0
    0
    I have mentioned in many of my posts that fried foods appear very rarely at home and when I make it we relish them to the fullest extent.TH has a profound love for Medu wada and Chole Batura,especially the way his mom prepares.Ohhh!! Did I tell anytime about my MIL's Chole Batura?? Hubby loves his mom's Chole batura very much and he always keep it as a benchmark when I prepare it;of course I do follow the same recipe and also learnt from her to please him.I have been planning to post my MIL's chole batura recipe from ages but somehow it never happened as we cannot control ourselves on the day we make it at home.I think I should be posting this recipe soon- stay tuned.
    Coming back to today's post...during the green peas season we shelled several kilos of fresh green peas and I used them in various dishes. I  could not control myself to prepare this stuffed Matar Kachori which is a typical Delhi preparation.
    This Matar Kachori is a cross in between regular khasta kachori and stuffed poori and is usually served as breakfast or evening tiffin.It tastes best when served with Aloo sabzi which is a thin alu gravy spiced up in masalas. Do definitely give this recipe a try if you love variety food and especially the typical Delhi style street food.However this needs a bit of preparation but its worth the effort.

    You can check out other varieties using fresh Green Peas here:

    Matar Kachori Recipe:
    (makes 12-14 kachoris)
    source:Nita Mehta

    Ingredients:
    for dough:
    2 cups All purpose flour(Maida)
    a pinch of Baking powder
    1/2 tsp Salt
    2 tbsp Ghee
    1/2 cup water to knead,approx
    Oil,to deep fry

    for filling:
    2 cups fresh/frozen Grren Peas
    2 tbsp Chickpea flour(Besan)
    1 tsp Coriander powder
    1/4 tsp grated Ginger
    2 Green chillies,finely chopped
    1/4 tsp Red chili powder
    3/4 tsp Chaat masala
    3/4 tsp Amchur powder
    1/2 tsp Garam masala
    1/4 tsp Cumin seeds
    2 pinches Asafoetida(Hing)
    1 tsp Salt,approx
    1 tbsp Ghee

    Method:
    to prepare dough:
    • Sift flour with baking powder and salt through a sieve.
    • Add ghee and mxi well till it appears like bread crumbs.Knead well with water to a soft and pliable dough.Keep it aside for half an hour.
    to prepare filling:
    • Bring 4-5 cups of water with 1 tsp salt and 1 tsp sugar.Add peas to the boiling water and boil for 4-5 mins.Let the peas sit in hot water for another 10-15 minutes.Strain and keep aside.Mash the peas lightly with a back of a big spoon or a masher.
    • Heat ghee in a kadai,add asafoetida and cumin seeds.
    • Reduce the heat and add grated ginger,coriander powder and turmeric powder and fry for a minute.
    • Add the chopped green chilli and fry again for a minute.
    • Add slightly mashed peas to it and mix well.Fry for 7-8 mins on low heat until it turns slightly brown.
    • Add the salt,red chili powder,chaat masala,amchoor powder,garam masala and besan and fry for another 2 mins.Remove it and let the mixture cool.
    to make Matar Kachori:
    • Heat oil in a kadai for deep frying the kachoris.
    • Pinch a lemon sized ball out of the dough and flatten it to small poori.
    • Fill  2-3 tbsp peas mixture and cover it to form a ball and flatten it slightly .Do not roll it much or do not keep it very thick.
     
    • Gently drop 2-3 pieces at a time into the hot oil in kadai(depends on the size of kadai and quantity of oil you are using) and fry them until they turn brown.When you put the kachoris in oil you should keep the flame in HIGH and reduce it later and fry them on LOW flame until they turn brown.Flip it in between.
    Serve it with Aloo Sabzi(recipe below),sliced Onions and North Indian Aam ka Achar or Mixed Veg Pickle.
      Notes:
      • The original recipe asked for 1/2 tsp baking powder and also mentioned to use warm water for kneading.As I wanted my kachoris to be neither too hard like a regular kachori nor too soft like a stuffed poori,hence I had done few changes like adding less baking powder and also used regular water in the recipe.It is your wish to adapt the recipe how you want.

      Alu Sabzi | Thin Potato Gravy Recipe:
      (Serves 3-4)

      Ingredients:
      3-4 large Potatoes
      1 tsp Coriander powder
      3/4 tsp Red chili powder
      1 tbsp Aam ke Achar ka masala
      1 green chilli,finely chopped
      2 tbsp chopped Coriander leaves
      1 tsp grated Ginger
      1/2 tsp Turmeric powder
      1/4 tsp Fenugreek seeds(Methi)
      1 tsp Fennel seeds(Saunf)
      3/4 tsp Cumin seeds
      a fat pinch of Asafoetida
      1 1/2 tsp Salt,approx
      3 tbsp Ghee/Oil

      Method:
      • Pressure cook potatoes for 3 whistles and peel the skin and cut each potato into 8-10 chunks and mash pieces roughly.
      • Heat ghee in a kadai and keep the flame on LOW and add asafoetida, cumin seeds, fennel seeds and fenugreek seeds.
      • When the fenugreek seeds starts turning brown add turmeric powder,coriander powder and red chili powder and fry for 1 minute on low heat.
      • Add aam ke achar ka masala and fry again for a minute.
      • Add cooked potatoes and chopped green chilli,coriander and grated ginger.Stir fry on medium heat for 3-4 mins.
      • Add 2- 21/2 cups of water and bring to a boil.Reduce heat and cook for another 10 mins.This gravy would be slightly watery than the regular gravies,so adjust the consistency accordingly.
      Serve it hot with Matar Kachori /Poori.

      Try this Matar Kachori with the aloo sabzi for this weekend brunch or breakfast.i would say it is the perfect way to start the weekend.One more look of this delicious Matar kachori with alu sabzi and mirch ka achar..I am hungry again seeing this pic!!

      Banana Milkshake | Easy Milkshake Recipes

      $
      0
      0
      Summers have already begun in Mumbai and its scorching hot in the afternoon.I usually prefer to stay indoors in Summers and also love to go for my walks in the evening rather than mornings.
      We usually prefer to eat whole fruits rather than having them in the form of juice to retain the fiber of the fruit.But in summers, as we tend to drink something cold I usually make milkshakes or juices from various fruits. Though my ideal choice of fruit for milkshake would be either 'Mango' or 'Chikoo', I do like other fruit milkshakes and of course all the new concoctions with nutella, jam, peanut butter etc.
       Check out various milkshake/smoothie recipes which I have blogged earlier.
      Banana is a very versatile fruit and is available in all seasons and my favorite variety among bananas is 'Yelakki Banana'. I like to use bananas in custard, milkshakes, fruit salad or eat just as it is.
      Check out another interesting preparation with Banana - Balehannu Rasayana which is ideal to use ripen bananas sitting in your kitchen counter.

      Banana Milkshake Recipe:
      (Serves 2)

      Ingredients:
      1 big ripen Banana(any variety should do)
      3-4 tbsp Sugar
      2 cups cold Milk 
      2 scoops of Vanilla ice cream (optional)
      few drops of Vanilla essence (optional)

      Method:
      • Remove the skin and cut the banana into pieces.
      • In a mixer/blender add banana pieces, sugar, vanilla essence and 1/2 cup of milk and blend into a smooth puree.Check the sweetness and if needed add extra sugar.
      • Add remaining 1 1/2 cups of milk and vanilla ice cream and run again to the desired consistency.Add more milk if you need a thin milkshake and also adjust the sugar accordingly.
      Serve the chilled Banana milk shake immediately.
      Notes:
      1. Sugar should be adjusted according to the sweetness of banana and also to your desired sweetness.Sugar can be replaced with honey too.
      2. Banana milkshake changes its color quickly and hence in order to avoid that you can add few drops of lemon juice to milkshake to avoid discoloration.You should not add more just 2-3 drops should be fine.If you are serving it immediately you do not need to add it.
      3. Milk also is to be adjusted according to your desired thickness.
      4. Addition of ice cream is entirely optional,it adds a nice creamy touch to milkshake.
      5. Vanilla essence enhances the flavor of banana milkshake,it is optional if you do not like any other flavor in the milkshake.
      6. Banana pairs up with many fruits,you can even use mix of fruits like Avocado-Banana, Strawberry-Banana, Apple-Banana etc to prepare milkshake.
      7. You can even add a tbsp of nutella to make it nutella banana milkshake or even a tbsp of grated dark chocolate to make Choco banana milkshake.The options are endless.

      HOLI RECIPES | HOLI SPECIALS

      $
      0
      0

      HOLI- the festival of Colors is nearing and it falls on March 27th next week.It is a major festival celebrated in all parts of India with lots of enthusiasm. During Holi people play with colors and color sprinklers and is usually followed with music,dance and the most important -lavish food.I am sharing you a list of recipes in my blog which might be helpful in case if you are planning to have a party or you want to make something special for the festival.

       (pic source:google)

      HOLI Special - SWEETS | KHEER | HALWA
      HOLI Special - SNACKS | APPETIZERS | CHAATS
       MAINCOURSE

      Flat Breads | Poori:
      Pulao | Biriyani:
      Side dish - Dry curries:
      Side dish - Gravies:
      Side dish - Dals | Lentils:
      BEVERAGES

      Baby Corn Pakora | Babycorn Recipes

      $
      0
      0
      Babycorn Pakora
      Last week, I purchased a large quantity of my my favourite veggie, "babycorn" and used them in two dishes which I prepared, Babycorn Bell peppers Stir fry and Babycorn Capcium Gravy . I though saved a few, for making my favorite babycorn fritters (not the usual besan based pakoras) over the weekend.
      Babycorn Pakora
       I dream about food at times and in one of those dreams , I had a mental note that I would have my sunday evening tea with those babycorn fritters.When I started blanching the babycorns and started preparing the batter, I realized that I have run out of maida (all purpose flour) which is essential for preparing these yummy fritters. I had to hence change my plans and converted them into these beautiful pakoras.These Pakoras look deceptive and look very much like our Mirch Bajjis becauss of their shape.Though I could not make what I wanted, we enjoyed these golden crisps with our cup of tea.I though plan to post those delicious Babycorn Fritters next time I prepare it.
       Babycorn Pakora
      Also check out other Babycorn recipes in my blog.
      Babycorn Pakora

      Babycorn Pakora Recipe:
      (Serves 2-3)

      Ingredients:
      12-15 tender Baby corns
      Oil,to deep fry

      for Batter:
      1 cup Besan/Chickpea flour
      1/4 cup Rice flour
      1 tsp Red chilli powder
      a pinch of Turmeric powder
      1 tsp Ginger-Garlic paste
      1/4 tsp Garam masala (optional)
      a pinch of Asafoetida or 1/2 tsp Carom seeds
      1/4 tsp Baking soda
      2 tsp hot Oil
      Salt to taste

      Method:
      • Cut baby corns into 2 pieces lengthwise and par boil them in hot water with salt for 1-2 minutes.Do not boil for long.You can even add a pinch of turmeric powder while boiling them.Drain them and keep them aside.
      babycorns
      • Mix all the items(mentioned under 'for Batter') well and make it into a smooth paste by adding enough water.Add the water slowly and use a wire whisk and whisk to the consistency of thick idly batter consistency and make sure you don't add too much water at once.The more you beat the mixture the better and fluffy the pakoras would be.You should ideally beat the batter for 3-4 mins.
      pakora batter
      • Mean while heat oil for deep frying.
      • Hold the tips of baby corns and dip each of them in batter and individually and drop them slowly into hot oil and deep fry them till it becomes golden brown in color on medium flame.
      pakoras
      • Drain them on to a kitchen towel to remove excess oil.
      Serve them hot with Imli Chutney/Green Chutney/Tomato Sauce.
      babycorn Pakora
      Notes:
      1. You can use the same process for making pakoras like Cauliflower,Broccoli and Poblano peppers(remove the seeds) by blanching them in hot water initially and follow the same process.
      2. You can use the same batter as base for all pakora varieties like Potato(cut into thin slices),Brinjal(cut into thin slices),Onion(thin round slices as well as lengthwise) and Capsicum rings.
      3. The addition of garam masala is completely optional,as babycorn is a bland vegetable I added it to spice up the batter.
      4. The addition of rice flour makes the pakoras crisp.
      5. I like to add hot oil to the batter mixture as it will make the pakoras crisp and also makes them consume less oil.Make sure you beat the batter which will makes the pakoras more fluffy.
      babycorn Pakora

      You can try this for HOLI Snack,also check out other HOLI recipes here . If you have not decided your menu for Holi,go through my list and I hope it will help you in fixing your menu. I also recommend you try the famous Delhi style Matar Kachori and Alu ki Sabzi and pair it with Shahi Tukra which is ideal for HOLI breakfast/brunch and make it more special.

      I could not stop myself from posting another pic for you all....
      babycorn pakora

      Mixed Vegetable Pickle | Mixed Vegetable Achar - spicy version

      $
      0
      0
      mixed vegetable pickle

      Before I get to the post ,I wish all my readers and friends a very HAPPYHOLI !!

      I have posted Mixed Vegetable Achar recipe some time back but that was not a spicy version so today, I am posting a spicy version of Mixed Vegetable. The preparation is similar to Mixed Veg Achar which I posted earlier -just a few minor tweaks though.
      mixed vegetable pickle
      Personally, I prefer the non spicy version due to its appetizing green color and because it goes very well with Parathas.However, when my MIL makes the non spicy Mixed Vegetable Pickle she also prepares a small portion of Spicy version along with it.The recipe for both is similar but the addition of red chili powder plays a key role in changing the taste of the pickle.My MIL says that the addition of Saunf(fennel seed) powder to the spicy version of Mixed Veg pickle is optional but I do recommend to add that, as it gives a nice flavor to the pickle.
      mixed vegetable achar

      Spicy Mixed Vegetable Pickle Recipe:
      shelf life: upto 1 year

      Ingredients:

      2 tbsp Nigella Seeds(Kalonji)
      3 tbsp Vinegar
      1/2 liter Mustard Oil

      Vegetables (8 cups of  cut vegetables):
      2-3 Carrots,peeled and cut into 1" thin long pieces
      1 small Cauliflower,separate and cut into small florets
      2 Radish,peeled and cut into 1" thin long pieces
      1 Raw mango,cut into 1" thin long pieces
      15-20 French Beans,remove the strings and cut into 1" thin long pieces
      5-6 Lemons,cut into 8 pieces length wise
      8-10 Gooseberry,cut into 6-8 pieces length wise(remove the seeds)
      100 gms light colored Green chillies,cut into 2 pieces
      1 whole Garlic pods,separate into pods and remove the skin
      100 gms Ginger or Mango Ginger,peeled and cut into 1" thin strips

      Powders:
      2 cups Red chili powder
      2 cups Mustard powder
      1 3/4 cups Salt
      1 tbsp Fenugreek powder
      50 gms Amchur(Dried mango) powder
      50 gms Fennel seeds(Saunf) powder,ground to a very coarse powder
      2 tbsp Turmeric powder

      Method:

      Cleaning,Cutting and drying the Vegetables:
      • Wash and wipe all the vegetables with a dry cloth.Cut various vegetables as per the instructions I mentioned above.Take care that you cut all the vegetables into a similar length and sized pieces.
      • Spread them over a dry cloth in sun and let them dry completely.You should take care that the vegetables are dry with out any moisture content in it.If you have really good sun it should take half day otherwise you can keep it in shade up to a day.
      for making pickle:
      • Keep ready the sterilized and sun dried jars ready before you start pickling.
      • Grind fenugreek seeds to a fine powder.
      • Grind saunf in whipper mode until coarse powder.Do not run it for long time just run it for 2-3 times until you get coarse powder.
      • Now take a big bowl and mix the saunf and fenugreek powder,red chili powder,mustard powder,salt,kalonji seeds,mustard tukda and turmeric powder until everything is mixed well.
      • Now take another wide small bowl and take 1 cup of mixed powders and add sufficient mustard oil until the mixture is wet completely and mix with hands.
      • Take 2 cups of vegetable pieces at a time and apply the mixture all over the mixed vegetable pieces with your hands.Using your hands for this step is better than mixing it up with ladle.
      • Put the masala coated vegetable pieces in a big bowl and repeat the process of coating the vegetable pieces in small portions and put them in a big bowl.
      • Once all the vegetable pieces are mixed,add vinegar and remaining pickle masala and mix well again.
      • Carefully fill the sterilized jars with the vegetable pieces and pour the remaining oil over it.
      • Cover the jar with lid and keep it aside for 3 days.
      • On day-1 check it some oil might have started floating over the pickle.Do not panic if the oil does not float on day-1,if not on day-1 you will see oil floating on day-2.
      • Mix with a clean and dry ladle all over and repeat the same process on day-3.
      • Now taste the masala mixture in the pickle,it should be perfect and slightly salty as the pickle has to be yet marinated for atleast one week before its usage.But if you feel the salt is less add a tsp or 2tsps of salt to it and mix well.I don't think it would be necessary if you follow the measurements accurate.
      • On the day-3 if you see the oil is floating on the pickle up to an 1/2" height then it is perfect.Otherwise add extra mustard oil over the top until the oil floats on top.
      • Store it in air-tight tupper ware container or glass bottles.This way your pickle stores for long with freshness in it and even the vegetable pieces do not get soft.
      Serve it with piping hot Parathas/Theplas or it can be served with Rotis/Naans/Kulchas/Pulavs. 

      Other Vegetable Options:
      • Shalgum(Turnip) and Lotus Stem(Kamal Kakdi/Bhein) can also be added to the pickle according to the availability of them.
      Notes:
      • Always transfer a small portion of pickle into a small jar and use a clean and dry spoon.
      • Increase the amount of mustard oil as required in the recipe.The basic thumb rule is to make the oil float over the pickle after 3 days.So feel free to add extra mustard oil.
      • Do not replace or remove any of the ingredients in the recipe,all the ingredients are must to get a tasty Vegetable achaar in North Indian style.
      • This pickle stays good for an year.It might turn slightly sour after 5-6 months but it is good to eat with hot hot parathas and curd.
      • You can easily halve the recipe,the basic rule is to use 4 cups of vegetable pieces with 1 cup(slightly less than 1 cup) of salt,1 cup red chili powder and 1 cup mustard powder.  
      mixed vegetable achar

      Summers are here and Mangoes are in season ,do not miss out to check various authentic Andhra Mango pickles and also the famous Punjabi Aam ka Achar recipe here.

        Beetroot Spicy Curry | Beetroot Stir fry Recipe

        $
        0
        0
        Beetroot Soicy Curry
        Simple stir fries and curries are a part of our daily meal.They are not only quick to make but also makes a healthy side dish for rice and rotis.I am posting a spicy version of Beetroot stir fry which I absolutely love and the recipe is so versatile and can be adapted for many vegetables,do check the notes for more variations of this recipe.If you are bored of usual simple stir fries you should try this spicy version of stir fry which is really delicious.You can check out another version of simple Beetroot stir fry here.
        Beetroot Soicy Curry

        Beetroot Spicy Curry Recipe:
        (Serves 2)

        Ingredients:
        2 medium Beetroots
        1 tbsp roasted(fried) Gram powder(chutney dalia)
        2 Red chillies,broken
        a sprig of Curry leaves
        2 tsp Chana dal
        1 tsp Urad dal
        1/2 tsp Mustard seeds
        1-2 tbsp Oil
        Salt to taste

        Method:
        • Wash,peel and cut the beetroot into tiny cubes or small pieces or cut into thin lengthy pieces.
        • Heat oil in a thick bottomed kadai/pan and crackle mustard seeds.
        • Add Chana dal and urad dal and fry until they turn in red color.
        • Add broken red chillies and curry leaves and fry them until they turn crisp.
        • Now add chopped beetroot pieces and fry or 2 mins.
        • Add 2-3 tbsp of water and cover it and cook for 7-8 mins until the beetroot is soft and cooked.If it is not cooked cook for another few mins,add few tbsp of water if required
        • Remove the lid and increase the flame and cook until the moisture is evaporated.
        • Add salt,vangibath powder and mix well and cook for another 2 mins on low flame.
        • Now add roasted gram powder to it and give a nice stir and remove it from flame immediately.
        Serve it hot with Rice/Roti/Chapati.

        Notes:
        1. You can follow the same process for vegetables like Carrots, Broadbeans(chikkudukaya), French beans, Long beans, Cluster beans, Potatoes etc.You need to adjust the cooking time accordingly.
        2. If you do not have Vangibath powder,you can add normal chili powder along with roasted gram powder in the recipe.
        3. Beetroot pieces can be steamed ahead and add to the tempering and add the powders at the end.
        4. You can add 1 tbsp of dry coconut powder at the end,as my vangibath powder has that I did not add it extra.But even if you add extra it adds a nice taste to the curry.
        Beetroot Soicy Curry

        You can check out another version of Simple Beetroot stir fry recipe here.

          Rasam Powder Recipe | Andhra Style Rasam Powder

          $
          0
          0
          I have posted  Andhra style Sambar Powder recipe recently and today I am posting Andhra style Rasam powder recipe which I got from my MIL.The addition of liberal quantity of cumin seeds, pepper corns and coriander seeds makes the rasam flavorful and spicy.A small quantity of toor dal is added to the powder which helps in thickening the rasam.It is a very simple and basic recipe which might help many who are new to kitchen.
          Andhra Style Rasam Powder Recipe:
          (stores upto a month)

          Ingredients:
          1 1/2 cups Coriander seeds
          1/3 cup Toor dal(split Pigeon peas)
          2 tbsp Cumin seeds
          3 tbsp black Peppercorns

          Method:
          • In a thick kadai dry roast coriander seeds until they turn slight brown in color and keep them aside.
          • In the same kadai dry roast toor dal until red in color and keep them aside.
          • Add cumin seeds and peppercorns and fry them separately and keep them aside.
          • Once they cool down grind them to a fine powder.
          • Store it in an air tight container.
          Add a couple of tsps of rasam powder while making rasam.

          Notes:
          • You can dry roast and add 10-12 red chillies while making the rasam powder.
          You can use this Rasam powder in the following rasams:
           

          Palak Aloo Paratha Recipe | Stuffed Paratha Recipes | Paratha Fillings

          $
          0
          0
          Stuffed Parathas are always a favorite at my place as its a complete meal when paired with pickle and curd.I had posted Palak Paneer Paratha recently where I used usual Paneer stuffing in a palak based atta dough.Today's recipe is very similar and is prepared in a same manner just that Iused the regular Aloo stuffing which we make for Aloo parathas.
          Aloo paratha is the most common favorite paratha for everyone,the addition of palak in the dough adds a healthy touch and a nice variation to the usual Aloo paratha.I have given a detailed tutorial to make a perfect paratha,so go through the recipe and the step by step pics to make a perfect paratha.

          Palak Aloo Paratha Recipe:
          (makes 6 parathas)

          Ingredients:
          for dough:
          1 1/2 cups Wheat flour
          2 cups Spinach
          1/2" Ginger
          2-3 Green chillies
          Salt to taste
          2 tsp Oil
          Water,to mix

          for filling:
          2 big Potatoes,boiled and peeled
          1 medium Onion,finely chopped(optional)
          2-3 Green chillies,finely chopped
          1 tsp grated Ginger
          2 tbsp chopped Coriander
          1 tsp Amchur(dried mango) powder
          1 tsp roasted Cumin powder
          Salt to taste

          Wheat flour,for rolling
          Ghee and Oil,to roast parathas

          Method:
          to make dough: 
          • Bring water to a boil in a big vessel and add salt to it.
          • Add spinach,green chillies and blanch the greens for 2 minutes.Strain the spinach and run cold water over it.Cool it completely.
          • Grind spinach with green chillies,ginger to a fine paste.
          • Add the ground spinach mixture to the wheat flour and add required salt and 1 tsp oil and mix well.
          • Add little water(if needed) and knead it into a smooth and soft dough.The dough should be slightly softer than the regular chapati dough for parathas as it will not only make easy to stuff the filling it will help in easy and even rolling of parathas.
          • Apply oil on top of the dough and cover it and keep it aside for at least half an hour.
          to make filling:
          • Grate the boiled potatoes and put it in to the bowl.
          • Add finely chopped green chillies,onion,grated ginger,chopped coriander and mix well.
          • Add amchur powder,salt and cumin powder and mix well and keep it ready.
          to make paratha:
          • Pinch the dough and take a big size lemon sized dough and place the dough in your left hand palm.
          • Dip your right hand fingers in the flour and try to make a cup shape(which can hold 3-4 tbsp filling) out of the dough by moving your fingers pressing with the thumb in the center.Take care that the edges should be slightly thinner and in the center it should be thick.
          • Fill the cup with 3-4 tbsp filling and seal the two sides of the dough(it would look like Karanji now) and gently press the corners to get a big round ball out of it.See the pictures for better idea.
          • If you stuff the filling in the dough in this way you will get evenly filled paratha and it also forms like pocket.If you find all the above process bit difficult,you can easily roll a 3" circle out of the dough and place the filling in the center and pleat the dough and seal it by gathering the dough around the edges.
          • Slightly flatten the dough(stuffed with filling) with hands and dip it in the wheat flour and gently roll it to a 6" disc of 1/2" thickness.You should not apply more pressure while rolling,so roll it gently.If you apply pressure the stuffing would come out.
          • Flip it on to a hot tawa and fry it until you see bubbles.
          • Turn it and apply oil/ghee and fry and then turn and apply oil/ghee on the other side.
          • Fry the parathas on both sides until you get crisp brown patches on both sides.
          Serve them piping hot with Aam ka Achar/Mirch ka Achaar,curd/masala dahi and sliced onions.

          Notes:
          1. You can skip spinach puree while making dough and make it plain as Aloo Paratha.
          2. You can even mix various greens along with palak like methi,dill along with palak while making puree for the dough in the recipe
          3. Paneer can also be stuffed instead of Aloo in the dough to make Palak Paneer Paratha,it tastes nice too.
          The above pic shows you how the filling is spread across paratha evenlywhich makes the paratha tastes delicious in each and every bite.

          Check out other Stuffed Parathas recipes:

          Chettinad Cauliflower Masala Dosa Recipe | Dosa Recipes

          $
          0
          0
          After a long time I am posting a DOSA recipe in my blog.Many of you know my love for Dosa as I have mentioned in many posts about my views/tips on preparing a wonderful Dosa .Hence I would not get into the technical details of  Dosa again and bore you guys.
          chettinadu cauliflower masala dosa
          Coming to today's Dosa recipe, I have never tried Cauliflower dosa in any restaurant and also I  am also not aware of any particular Chettinad style preparation for this dosa. A few recipes that catch my attention haunt me until I try it. This is one such recipe, which I saw at Anu's space and I had the huge urge for few months to prepare and finally prepared it a few months back and loved it too.This time I wanted to share it with my readers and hence I made it again to share it in my space.
          cauliflower masala
          This dosa tastes different and is a good change from the regular Masala Dosa because of its spicy cauliflower filling.What attracted me the most was the mashed version of cauliflower in the filling.Though I am not sure of the authenticity of the chettinadu style preparation, I have adapted the filling recipe from her blog and modified it to as per my requirements.The batter which I am mentioning here can be used to make any dosa like plain dosa, utappam or Masala dosa,it works wonders!!
          Check out other must try Dosa recipes in my blog.
          1. Atukula Dosa/Sponge Dosa 
          2. Davanagere Benne Dosa 
          3. Erra Kaaram Dosa...from Rayalaseema 
          4. MLA Pesarattu / Upma Pesarattu 
          5. Paper Thin Rava Dosa..Hotel Style
          6. Mysore Masala Dosa
          7. Pav Bhaji Dosa
          8. Vegetable Dosa
          cauliflower masala dosa 

          Chettinadu style Cauliflower Masala Dosa:
          Ingredients:

          for Batter:
          2 cups Raw rice
          2 cups Idli Rice or Par boiled rice
          1 cup whole white Urad dal
          1/4 cup Toor dal
          1/4 cup Chana dal
          1/4 cup Flattened rice(Poha)
          1 tsp Fenugreek seeds
          Salt to taste 
          Oil/Ghee, to roast dosas

          to mix in batter before making dosas:
          2 tbsp chiroti Rava
          1 tbsp Sugar
          a pinch of Cooking Soda

          for Cauliflower Masala:
          2 cups Cauliflower florets
          1 big Onion,finely chopped
          1 big Tomato,chopped
          5-6 Garlic pods,peeled
          1/2" Ginger,finely chopped
          1 Green chilli,finely chopped
          2 tbsp chopped Coriander leaves
          1/2 tsp Rasam powder
          1/2 tsp Sambar powder
          1/2 tsp Red chili powder
          1/4 tsp Turmeric powder
          a sprig of Curry leaves
          2 Red chillies,broken
          1/2 tsp Mustard seeds
          Salt to taste
          to grind:
          2 tbsp fresh grated Coconut
          2 tsp Poppy seeds,soaked in water
          1/2 tsp Saunf 
          5-6 Pepper corns

          Method:
          to make dosa batter:
          Wash and soak raw rice,idli rice(or par boiled rice), urad dal, toor dal, chana dal, fenugreek seeds together in water for  4-5 hrs.
          Soak flattened rice(poha) for 1/2 hr.
          Grind all the ingredients in the wet grinder to a fine batter by adding water at regular intervals.
          Add required amount of salt at the end of grinding and mix well.
          Allow the batter to ferment for 12-14 hrs.
          On the day of preparing dosa take out the required amount of dosa batter into a vessel and add chiroti rava and sugar to it and mix well and let it keep for an hour.

          to make Cauliflower masala:
          • Clean and wash the cauliflower florets and soak them in salted hot water for 10-15 mins.Drain them and chop them finely.
          • Heat oil in a kadai/pan and crackle mustard seeds and add broken red chillies and curry leaves fry until they wilt.
          • Add garlic pods,chopped ginger and green chili and fry for a minute.Now add finely chopped onions and fry until they become translucent.
          • Add chopped cauliflower florets and fry well for 2-3 mins and add chopped tomatoes to it and fry for 3-4 mins.Cover it and cook until the tomatoes turns mushy and cauliflower is cooked.
          • Grind grated coconut with poppy seeds,pepper corns and saunf to a fine paste.Add little water if required for grinding.
          • Add rasam powder,sambar powder,red chili powder,turmeric powder and salt to the cauliflower mixture and mash it nicely with a masher.It is your choice to keep the texture how ever you want.I mashed it completely like a spread,if you want you keep it chunky too.
          • Add the ground coconut mixture to it and let it cook for 3-4 mins until the raw smell disappears.You should keep the consistency of this very thick as we will apply this inside the dosa.
          • Switch it off and let it come to room temperature.Add chopped coriander leaves to it and mix and keep it ready.
          to make Cauliflower Masala Dosa:
          • Make the tawa ready for making dosa,keep the stove on medium flame and pour a ladle full of batter in the middle of the pan and spread in a circular motion to form a 9 " dosa and pour some oil/ghee (1 tbsp roughly) all over the edges and in the center cover it with a lid.
          • After it is roasted for a minute remove the lid and smear the cauliflower mixture(approx 3-4 tbsp) all over the dosa.
          • Keep the flame on HIGH and let it roast for another minute until it turns golden brown and crispy.
          • Fold it into half and serve.
          Serve it with Coconut chutney and Sambar. Check out other side dishes for Idli/dosa here.
          cauliflower masala dosa

          cauliflower masala dosa
          Tips:
          • The addition of sugar to the batter makes the dosas crisp and also gives a thick golden crust to dosas.
          • If your dosas did not turn out good,do not panic.Add 1/4 tsp cooking soda to a ladle and mix with 2 tbsp water well and that to the dosa batter and mix well and start making dosas.This will make the interior of dosa fluffy.
          • If you want you can avoid mashing the cauliflower florets and keep them as they are and follow the same process for the filling.I personally liked the idea of mashing it.
          • The dosa batter can be used to make any dosa like plain dosa, Utappam or Masala dosa.
          cauliflower masala dosa

          If you are interested in other dosa recipes,check out more varieties here.

          Pandu Mirapakaya Niluva Pacchadi | Andhra Red Chili Chutney

          $
          0
          0
          Andhra is known for its spicy pickles - Avakaya,Gongura and Pandumirapakaya(Red chili) Pacchadi being the most famous.During the season we get fresh red chillies in the market,it is usually ground with tamarind and salt and is stored in clean air-tight bottles for over an year.When we need to serve it with rice,scoop out a small portion of the pacchadi and temper it with mustard seeds and asafoetida in generous amount of oil.It is really a fiery chutney and if you are not used to spice, it can even bring tears in your eyes.We usually mix it with hot steamed rice and dal powder or kandi podi and a big dollop of ghee.It mellows down the spiciness to an extent and makes it very tasty too.

          Pandumirchi Niluva Pacchadi | Red Chili Chutney Recipe:
          shelf life: upto one year

          Ingredients:
          1 kg Fresh Red chillies
          250 gms Tamarind
          1 tsp Turmeric powder
          250 gms Salt

          Method:
          • Wash and wipe the fresh red chillies,remove the stalks and dry them on a kitchen napkin for 3-4 hrs until the moisture on top of red chillies is dried up completely.
          • Clean the tamarind and remove the fibres and keep it ready.
          • Grind red chillies with tamarind,salt and turmeric powder to a coarse paste.DO NOT add water while grinding.
          Store it in air tight glass bottles.They stay good for several months to an year.

          Pandu mirapakaya Pacchadi for Rice:

          Ingredients:
          2-3 tbsp Pandumirchi Niluva Pacchadi(as prepared above)
          1 tbsp Oil
          1 tsp Mustard seeds
          a pinch of Asafoetida

          Method:
          • Grind pandumirchi niluva pacchadi with few tbsp of water to a smooth paste.
          • Heat oil in a small pan and crackle mustard seeds and asafoetida and add this to pandumirchi pacchadi and mix well.
          Serve it with hot steamed rice,dal powder/Kandi Podi and ghee.You can serve chopped raw onions along with it.

          Notes:
          1. This Niluva Pacchadi would be very spicy initially and it reduces its spiciness over a period of time.
          2. You can use any variety of spicy red chillies to make this pacchadi.
          3. Pandumirchi Niluva pacchadi can be stored for long,when you need to serve all you need to do is to add a tempering of mustard seeds and asafoetida and add it to the pacchadi and mix. 

            Ugadi Recipes | Ugadi Menu

            $
            0
            0
            Ugadi festival is on the 11th of April. Ugadi is a major festival in Andhra and Karnataka as it is considered as the start of a new year.On Ugadi day, we prepare 'Ugadi Pacchadi' which is a mix of all the basic tastes 'shadruchulu'. It is a mix of tamarind juice, salt, chopped raw mango, jaggery and neem flowers and is adjusted according to our taste buds.
            We usually prepare either 'Holige (Obattu)' or 'Boorelu (Poornalu)' or 'Bele Kadubu' for Ugadi as the main sweet along with some kheer/payasam and other festival delicacies.At our place,the usual Ugadi menu comprises of Maavinkayi Chitranna ( Raw mango rice) ,stir fry, vada, sundal, Holige Saaru, Holige, Payasam and Rice.
            I am trying to give various options for Ugadi menu in every category to make your planning easy.So please go through it and celebrate the festival with more fun and food.
            Ugadi Recipes

            Check here to find out how to make Ugadi  Pacchadi for Ugadi.
            Traditional Sweet Varieties:
            1. Hoornada Holige/Obbattu
            2. Halu Holige | Paal Poori | Paala Obabttu 
            3. Boorelu | Sukkinunde | Suzhiyan
            4. Karida Kadubu | Kari Kudumulu | Fried Sweet Dal Dumplings
            5. Garugu Hollige/ Hollige with rice flour-coconut filling
             Sundal & Stir fry varieties:
            1. Chana Dal Sundal
            2. Lobia Sundal/Alasandula Guggillu
            3. Kabuli Chana Sundal
            4. Kala Chana Sundal/Black Chickpeas Sundal
            5. Peanut sundal
            6. Sweet corn Sundal 
            7. Mixed Bean Sundal 
            8. Kosambari | Moong dal Salad 
            9. Beans Stir fry
            10. Beans-carrot Palya
            11. Raw Banana Stir fry
            Vada/Snack varieties:
            1. Alasandula(Lobia) Vada/Fritters
            2. Masala Vada/Chana dal Vada
            3. Medu Vada
            4. Mixed Dal Ambode(Vada)
            5. Mosaru Ambode/Dahi Dal Vada
            6. Dahi Vada/Perugu Vada/Mosaru Vade
            1. Korra biyyam Payasam | Foxtail Millet Kheer 
            2. Moong Dal Kheer / Pesara Pappu Payasam
            3. Paal Payasam / Rice Milk Pudding
            4. Rava Payasam | Sooji Kheer 
            5. Sabudana Kheer | Sago Payasam
            Rice Varieties:
            1. Chintapandu Pulihora- Andhra Style
            2. Dabbakaya Pulihora/Indian Grapefruit Rice
            3. Lemon Rice/Chitrannam
            4. Mamidikaya Pulihora/Maavinkay Chitranna
            5. Methi Peas Bath | Menthya Batani Anna
            6. Pulihora/Puliyogre
            7. Raw Mango Rice/Mamidikayi Gojju Annam
            8. Vangi Bath

            Rava Pulihora | Nimmakaya Rava Pulihora | Pulihora Pindi

            $
            0
            0
            rava pulihora
            The word 'Pulihora' makes my mouth water. I like Chintapandu Pulihora (Puliyogre) or Lemon Rice(Nimmakaya Pulihora) for its tangy taste.I prepare some variety of Pulihora during festivals and also when I run out of time for a simple lunch along with Curd rice.
            rava pulihora
            Today, I am posting another Andhra special Pulihora which is made up of Rava and is usually prepared using lemons.It is also called Pulihora Pindi in coastal region of Andhra and is a specialty in that region.It is a very simple recipe and do definitely give it a try as it hardly takes any time to make .As this does not have any onion or garlic in the recipe, you can prepare this even during festivals instead of preparing a rice variety. Try it for Ugadi . You can include this as a lunch or breakfast item during Ugadi. Check out my Ugadi menu planner here.
            rava pulihora
            Nimmakaya Rava Pulihora | Pulihora Pindi Recipe:
            (Serves 2)

            Ingredients:
            1 cup Rice Rava(see notes)
            5-6 light colored Green chillies,slit
            1/4 cup Groundnuts
            12-15 Curry leaves
            juice of 1 1/2 lemons
            1-2 Red chilies(optional)
            2 tbsp Chana dal
            1 tbsp Urad dal
            1/2 tsp Mustard seeds
            1/2 tsp Cumin seeds
            1/4 tsp Turmeric powder
            Salt to taste
            2-3 tbsp Oil

            Method:
            • Boil 2 cups water with little salt,turmeric powder.Once it comes to a boil add rice rava and stir it well and let it cook for sometime until done.It takes 4-5 mins.Once it is done spread the cooked rice rava mixture on a wide plate until it is cooled down.
            • Meanwhile heat oil in a pan and crackle mustard and cumin seeds.
            • Add groundnuts and fry them until they turn crisp and slightly red in color.
            • Add chana dal and urad dal and fry them until they turn slightly red in color.
            • Add slit green chillies and fry them until they wilt.
            • Add curry leaves,red chillies and fry them for few seconds.
            • Cool the tempering mixture for some time and add this to the cooled rava mixture.
            • Mix the required amount of salt to lemon juice and keep it ready.We have already added some salt to the rava mixture while cooking,so do add the salt quantity accordingly.
            • Mix everything with hands as it ensures even mixing.Check for the taste of salt and lemon juice and add more if required.Let it sit for 1-2 hrs so that the flavors to blend well.
            Serve it at room temperature with some fryums/chips/sliced cucumber.
            rava Pulihora
            Notes:
            1. Adjust the amount of chillies,salt and lemon juice as per your taste buds.
            2. I personally prefer it slightly on the sour side,hence I add more lemon juice.
            3. To prepare Rice rawa: Clean and Soak the rice for some time and drain it completely and spread over a cloth so that it will drain off excess water.Coarsely grind the pound mixture in a mixer and then sieve it(do it in whipper mode).Use the rawa which is in sieve and the flour that it is sieved can be used for dosas or regular rice flour.
            rava pulihora

            Semiya Payasam | Vermicelli Kheer Recipe| Ugadi Recipes

            $
            0
            0
            semiya kheer
            I would like to wish all my readers and friends ' HAPPY UGADI '. Ugadi is on the 11th of April. 
            Today, I am posting a simple Vermicelli kheer recipe to celebrate the festival.The process of preparation of this kheer is no different from any other kheer. This kheer is usually prepared during festivals. If you havent planned anything yet with regards to what to make during Ugadi , then you should check out my Ugadi menu planner here.This should help you to plan a simple menu for the festival.
            semiya payasam
            Check out other Kheer recipes in my blog here.
            vermicelli kheer

            Semiya Payasam | Vermicelli Kheer Recipe:
            (serves 3-4)

            Ingredients:
            1 cup Vermicelli
            3/4 cup Sugar
            3/4 liter full cream Milk
            10-12 Cashew nuts
            2 tbsp Raisins
            a pinch of Cardamom powder
            2 tbsp Ghee

            Method:
            • Boil milk and simmer it for 12-15 mins until it reduced to 3/4th of the quantity.
            • Meanwhile heat ghee in a kadai and fry cashew nuts and fry them until golden in color and remove them and keep aside.
            • In the same kadai add raisins and fry them until they fluff up and remove and keep them aside too.
            • Now add vermicelli to the remaining ghee and fry for 1-2 mins.
            • Add boiling milk and reduce the flame andcook till the vermicelli becomes soft.
            • Add sugar and mix gently till it dissolves and let it continue cooking over low flame.Always cook over low flame otherwise the milk might curdle.
            • Add ghee roasted cashew nuts and raisins and cardamom powder to the kheer and mix and switch off the flame.
            Serve it hot/warm/cold or at room temperature.
            vermicelli payasam
            Notes:
            1. You can add a pinch of saffron to the kheer while it is boiling.Rub it in a tbsp of milk before adding to milk for better color and flavor.
            2. I sometimes add condensed milk to the kheer ,so I usually reduce the quantity of sugar in the recipe.This makes the kheer more tastier,creamier and rich.

            semiya kheer
              Viewing all 520 articles
              Browse latest View live