Quantcast
Channel: THE CHEF and HER KITCHEN
Viewing all 520 articles
Browse latest View live

Dry Fruit Modak Recipe | Kharjur Modak | Ganesh Chaturthi Recipes

$
0
0
dry fruit modak
As Ganapati festival is nearing, I am sure many of you might have started preparations for the festival. Steamed Modak called Ukadiche Modak and Fried Modak are mostly prepared for Ganesh Chaturthi festival in Maharasthra. You would see various flavored Pedas like simple doodh peda modak, dry fruits modak, chcolate modak, mango modal, kesar modak etc shaped in the form of Modaks in most of the sweet shops during Ganesh Chaturthi.
dry fruit modak
I have posted a Paneer Modak Peda recipe last year and this year I thought of posting something simple and hence chose Dry fruit Modak recipe. I have posted a version of Dry fruits- Oats Ladoo recipe earlier and I have prepared this dry fruit modak in a similar way with few modifications. The modak mold gives a nice shape to it which makes it look even more appetizing. This recipe is definitely a boon to those calorie watchers and also for those who are looking for quick sweet recipes for Ganesh chaturthi. More over you can prepare this much ahead so that you need not worry on the festival day.
dry fruit modak
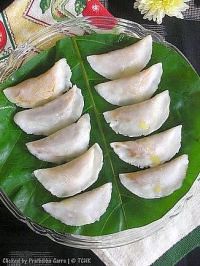
If you want to make it on normal days, prepare it in the form of ladoos instead of modak and can be packed in your kids snack box. It is a really healthy recipe with no sugar and almost no fat. As my mixture was a little chunky you cannot see the design exactly like how the regular modak would be, but modak mold works very nicely for simple plain peda with a lovely pattern on them. Try this simple Dry fruit modak recipe for Ganesh Chaturthi and enjoy!!
 kharjur modak
I had a tough time capturing these photos as the brown food is very difficult to capture, I am not very happy with the photos. But it did not stop me to share this easy and delicious Modak recipe.Try this simple Dry fruit modak recipe for Ganesh Chaturthi and enjoy!!
dates mdoak
Check out other important recipes for Vinayaka Chavithi:
For a complete list of Various options for Ganesh Chaturthi menu, check out here.

dry fruit modak

Easy Dry fruit Modak Recipe:

Yields 15 modaks roughly
Prep time: 40 mins | Cooking time: 15 mins | Total time: 45 mins
Cuisine: Indian | Category: Sweets/Festival Sweets
Ingredients:
1.5 cups of Seedless Dates
1/4 cup Almonds
1/4 cup Cashew nuts
1/4 cup Walnuts
1/4 cup Raisins
1/4 cup Dry coconut pieces
2 tbsp Poppy Seeds (Khus Khus)
1 tsp Ghee

Method:
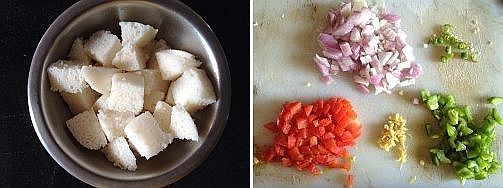
  • Chop all the nuts - cashew nuts, almonds and walnuts finely. Also chop the seedless dates and dry coconut pieces to fine pieces.
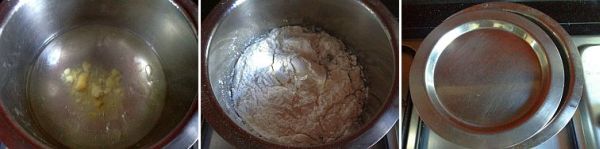
  • Dry roast the chopped nuts one by one separately for 1-2 mins taking care that they would not get burnt, remove them and keep aside in a plate.
  • Dry roast coconut pieces until they turn slight brown in color and remove them aside too. In the same pan add poppy seeds and roast them slightly until they start popping, remove and keep aside.
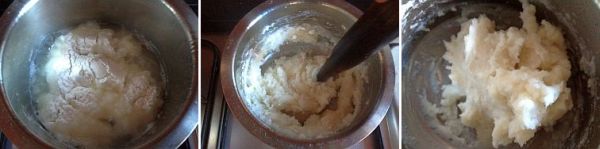
  • Heat ghee in the same pan and add chopped dates and raisins and fry continuously until it comes together and becomes like a thick mass.This takes 4-5 mins roughly. Do not leave it unattended as the raisins might get burnt. Switch off and let it cool slightly.
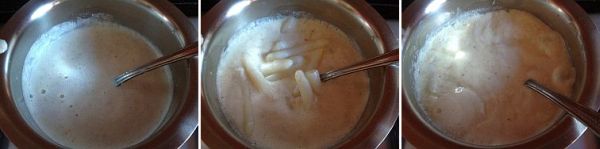
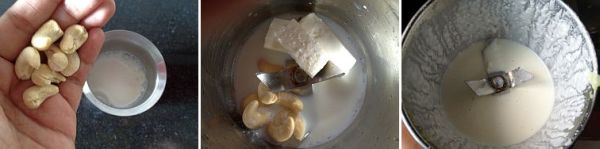
  • Grind the roasted nuts with dry coconut pieces and poppy seeds to a coarse powder in pulse mode. I like the bite of dry fruits, so I do not powder them completely and hence keep them very course. It is your wish to grind them how you want.Remove the mixture aside into a plate.
  • Now add the date-raisin mixture and pulse it in the mixer to get a coarse mixture. Again it is you wish here to grind it smoothly or keep it coarse like I did.
  • Take out the mixture into the same pan and add coarsely ground nuts and mix nicely and bring it back on the flame and stir continuously for 2-3 mins until the mixture becomes slightly sticky and hold the dry fruit mixture nicely.
  • Remove the mixture into a plate and let it cool slightly until you can handle with bare hands.
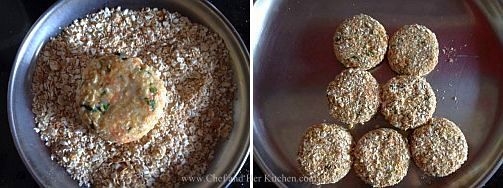
  • Press the mixture slightly hard to form a sticky mass.
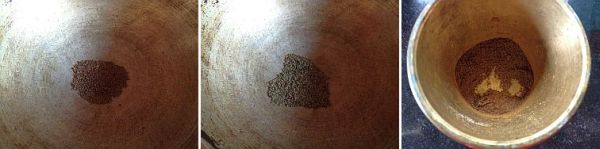
  • Make gooseberry sized balls out of it and place them in a modak press(as shown in pic) and press it tightly by levelling the down and pressing it firmly to get modak shaped ladoos. If you do not have modak press you can make into ladoos.
  • Prepare all the modaks(ladoos) and store them in an air tight container.
Serve it as it is as a snack/dessert.
mixed dry fruit modak

Notes:

  • You can add nuts like pistachios or any other nuts of your choice.
  • Anjeer(figs) can also be added along with dates, in that case reduce the dates to 1 cup and add 1/2 cup of figs and follow the same process.
  • If you like cardamom flavor add 1/4 tsp of Cardamom powder to the mixture when you are mixing it.
  • There are no hard rules for this recipe, you can make it a per your wish. You can grind the mixture smooth to get smooth modak(ladoo) or keep it coarse to enjoy the dry fruit bites.
  • You can even alter the nuts and dry fruit quantities according to your wish, the mixture should hold its shape when we try to make ladoos.
  • You can store them up to a couple of weeks.
dry fruit modak
    dry fruit modak

    Ammini Kozhukattai | Undrallu Sundal | Ganesh Chaturthi Recipes

    $
    0
    0
    ammini kozhukattai
    We usually prepare Undrallu Sundal with the left over dough of the modak(kudumulu) and also we make very less quantity to offer for Neivedyam on Vinayaka Chavithi as we prepare lot of other varieties too. Otherwise we usually make this as a snack for evening to enjoy it.During the season of Avarekalu(hyacinth beans) we prepare this with the tender hyacinth beans known as Avarekalu Kadubu which is really tasty. I had prepared this Undrallu Guggillu along with Pappulo Undrallu as the base for both the recipes are same.It is a very simple and delicious snack.
    undrallu sundal
    We call 'Undrallu Sundal' as 'Regi Undralla Guggillu' but as it is bit unusual name for many I named it with the most commonly known name - 'Ammini Kozhukattai' as it is called in Tamilnadu. The preparation process for this snack is really time consuming as the rolling of tiny balls takes lot of time and it would be easy to make in large quantity if you have some one to help.
    ammini kozhukattai

    Check out other important recipes for Vinayaka Chavithi:
    For a complete list of various options for Ganesh Chaturthi menu, check out here.
      ammini kozhukattai

    Undrallu Sundal | Undralla Guggillu | Regi Undrallu Kadubu Recipe:
    Serves 3-4
    Prep time: 30 mins | Cooking time: 30 mins | Total time: 1 hr
    Cuisine: South Indian | Category: Snacks/Accompaniments

    Ingredients:
    for Rice Flour Marbles:
    1 cup  Homemade Rice flour
    2 cups water
    2 tsp oil
    1/2 tsp salt

    for Seasoning:
    1/2 cup grated fresh Coconut
    1/4 cup chopped Coriander
     3-4 Green chillies, slit or 1 tsp Green Chilli Paste
    2 Red chilies, broken
    1-2 tsp Lemon Juice(or to taste)
    1 tsp Mustard Seeds
    1/2 tsp Cumin seeds
    1 tbsp Chana dal
    1 tsp Urad dal
    2-3 tsp Oil
    a pinch of Asafoetida
    Salt to taste

    Method:
    to prepare Undrallu/Rice flour Balls:
    • In a vessel, add water, salt and oil and let it come to a boil.
    • After it boils, reduce the heat and add rice flour. At this point don't touch the rice flour, leave it as it is for exactly 15 mins over medium heat.
    • Switch off the flame and using a ladle mix it well until you get it into a smooth consistent dough (as shown in the picture). Once it cools a bit, you can use your hand at the end to knead into a smooth dough as shown in picture.
    • Take an empty vessel and apply oil on its base and edges.Take some dough in your hand, and using your fingers make small balls as shown in picture (the smaller the balls, the better the taste.it all depends on your patience).If the dough keeps sticking to you hand, smear little oil to your fingers to continue making the balls. This is the most time consuming process but the end product makes you forget all the pain you have taken while making it.
    • After you finish making all the balls, place the vessel in a pressure cooker without any lid on the vessel. Do sprinkle one or two tea spoons of oil on the top of the balls and steam it for 10-15 min without using a weight (like you would make idly).
    • Once the pressure drops open the cooker and place the vessel aside. You should be seeing shiny balls as shown in the picture.
    to do Seasoning Part:
    • Heat oil in a pan and add mustard seeds and let them splutter and then add urad and chana dal until golden brown.
    • Now add cumin seeds, asafoetida, red chillies and green chillies (or green chili  paste).
    • Add rice balls from the vessel and mix it well in medium heat for about 5min.
    • Finally switch off the stove and add salt, lemon juice, grated coconut and cilantro and mix it well.
    Serve it hot and enjoy the snack!

    regi undrallu guggillu

    Notes:
    • During the season of Avarekaalu(hyacinth beans), you can boiled Avarekalu to the tempering and fry nicely and follow the same process. It tastes nice.
    • You can even add 1-2 tbsp. Idli Milagai podi at the end and mix nicely for a more spicy version.

    Palathalikalu | Pala Thalikalu | Vinayaka Chavithi Recipes

    $
    0
    0
    palathalikalu
    Palathalikalu, Undrallu Payasam, Undrallu, Kudumulu, Bele KadubuUndrala Guggillu etc are the most favourite foods for Lord Ganesha and we prepare them without fail for Vinayaka Chavithi every year. Palathalikalu and Undrallu Payasam are made very similar just that the shapes are different where as in the former one the rice flour mixture is rolled into thin cylinders(or pressed even in sevai press) where as in the latter one the rice flour mixture is rolled into small balls also known as Ammini Kozhukattai in Tamil.
    palathalikalu
    Palathalikalu is a typical Andhra sweet but it is also prepared in few regions of Karnataka. 'Thalikalu' are made with rice flour in the shape of long cylinders and are steamed and then cooked in thickened milk. One can make thalikalu by using a sev press as well- using the big holed one if you are short of time, but there are chances that the sev will get broken into tiny pieces or melt into the payasam and hence I adapt to make the cylinders by hand even though it is time consuming.
    pala thalikalu
    In Andhra the base for payasam is milk which is thickened with rice flour and grated coconut is added to it, but in our house my mom thickens the milk by adding  ground coconut-cashew nut-poppy seed mixture which not only thickens the payasam nicely but also adds the taste to it. I strongly recommend you to try this way of payasam base- I am sure you will love it.

    Check out other important recipes for Vinayaka Chavithi:
    For a complete list of Various options for Ganesh Chaturthi menu, check out here.

    palathalikalu

    Palathalikalu Payasam Recipe:
    Serves 2-3
    Prep time: 20-30 mins | Cooking time: 30 mins | Total time: 1hr
    Cuisine: Andhra - South Indian | Category: Festival Sweets

    Ingredients:
    for Thalikalu:
    1/2 cup Rice flour *(use freshly home made)
    2-3 tbsp grated Jaggery
    1 cup Water
    a pinch of Salt
    1 tsp Oil/Ghee

    for Payasam:
    1/3 cup grated fresh Coconut
    1 tbsp Poppy seeds
    6-8 Cashew nuts
    1 1/2 cup Milk
    1/2 cup Water
    1 1/4 cup grated Jaggery
    1/4 tsp Cardamom powder

    Method:
    to prepare Thalikalu: 
    • In a vessel, add water, salt and oil and let it come to a boil.
      palathalikalu
    • After it boils, reduce the heat and add jaggery and rice flour. At this point don't touch the rice flour, leave it as it is for 10-12 mins over medium heat.
    • Take some dough in your hand, and using your fingers make small balls and make them into thin cylinders of 1 1/2 inches length as shown in picture.If the dough keeps sticking to you hand, smear little oil to your fingers to continue making the cylinders. This is the most time consuming process but the end product makes you forget all the pain you have taken while making it.
    • After you finish making all the cylinders, place the steamer(or vessel) in a pressure cooker without any lid on the vessel. Do sprinkle one or two tea spoons of ghee on the top of the cylinders and steam it for 10-15 min without using a weight (like you would make idli).
    • Once the pressure drops open the cooker and place the steamer(vessel) aside. You should be seeing shiny thalikalu as shown in the picture. 
     to prepare payasam:

    • Soak cashew nuts and poppy seeds in 1/4 cup warm milk for 15 mins.Grind cashew nuts, poppy seeds, grated coconut and cardamom into a fine paste.
    • Mean while boil milk and water and add jaggery and the ground coconut mixture. Cook it on low flame until the jaggery is melted.
    • Add steamed rice balls and simmer for 6-8 mins until they absorb all the flavours and starts floating up. At this stage adjust the thickness of payasam by adding more milk to suit your required consitency. Do not boil for long as the mixture might curdle up sometimes.
    • Let it sit for few minutes before serving which will help it to absorb the flavours and sweetness.
    Serve it warm or at room temperature.

    palathalikalu
    Notes:
    1. Jaggery can be replaced with sugar in the recipe.
    2. The addition of jaggery while making the rice balls makes them mildly sweet and makes it delicious when cooked in the coconut-poppy seed kheer. How ever it is optional to add jaggery while making those rice balls, but I suggest you to add.
    3. If you do not have time to make those cylinders, you can use a sev maker(slightly big holes) to press them into long cylinders. You do not need to steam them, you can press them directly into the milk-water mixture and boil it until they float and then add ground coconut mixture and jaggery and boil for some time. 
    pala thalikalu

    Aava Pettina Pulihora | Tamarind Rice | Vinayaka Chavithi Recipes

    $
    0
    0
    aava pulihora
    I love Andra style Chintapandu Pulihora for its tanginess and it is also an easy rice variety to prepare with basic ingredients at home. It is usually prepared for any festival or any happy occasions. Today I am posting an Aava pettina Pulihora recipe which is a slight twist to the regular pulihora recipe but gives a new dimension to it. 'Aavalu' means mustard seeds  in telugu and we are giving a mustard flavour to the traditional pulihora by adding the freshly pounded roasted mustard powder in this recipe and hence it is called 'Aava pettina Pulihora'. The preparation process is quite similar to the regular chintapandu pulihora but the mustard powder adds a new flavour to the usual pulihora. If you have not tried this Aava pettina pulihora you can try this recipe for a change from the usual rice variety. Try this Aava Pulihora along with Puran poli(Bobbatlu) for Vinayaka Chavithi festival as it is nearing by.
    aava pettina chintapandu pulihora

    If you are interested you can also check out my earlier post Aratikaya Aava pettina Kura (Raw Banana curry with mustard flavor).
    Also check out other Pulihora Recipes in my blog:
    For a complete list of Various options for Ganesh Chaturthi menu, check out here.
    aava pulihora

    Aava Pettina Pulihora Recipe | Tamarind Rice flavoured with Mustard powder:
    Serves 2
    Prep time: 10 mins | Cooking time: 30 mins | Total time: 40 mins
    Cuisine: Andhra - Indian | Category: Rice Varities

    Ingredients:
    1 cup Rice(Sona masuri or equivalent)
    1 big lemon sized Tamarind
    2 tsp grated Jaggery(optional)
    3/4 tsp Mustard seeds
    Salt to taste
    1 tbsp. Sesame Oil

    for  tempering:
    1 tsp Mustard seeds
    3-4 tbsp. Groundnuts
    1 tbsp. Chana dal
    2 tsp Urad dal
    2 tsp Sesame seeds
    3-4 whole Red chillies
    4-5 light colored long Green chillies, slit
    1/2 tsp Turmeric powder
    a sprig of Curry leaves
    a pinch of strong Asafoetida
    2 tbsp. Oil

    Method:
    • Wash and soak rice for 10-15 mins and cook it in rice cooker or pressure cooker with 2 cups of water until it is done. Let the rice sit for some time and spread it on a wide plate by smearing a tbsp. of sesame oil which helps in keeping the grains separate.
    • Soak tamarind in water for 15 mins and extract the pulp and keep it aside.
    • Dry roast mustard seeds until they start popping and pound it into a fine powder using a pestle and mortar. You can even grind it in mixer but the pestle and mortar works efficiently here and adds a nice taste.
    • Heat oil in a deep bottomed kadai/pan and crackle mustard seeds.
    • Add ground nuts and fry them until they turn slight red in color and the skin begins to split.
    • Add chana dal, urad dal, red chillies and slit green chillies and fry until the chillies wilt and the dals turn light golden brown in color.
    • Add curry leaves, sesame seeds, asafoetida, turmeric powder and fry half a minute.
    • Add extracted tamarind pulp and jaggery and let it cook until it thickens and the oil separates from the edges. It takes 7-8 mins.
    • Switch off the flame and let it cool completely.
    • Reserve some portion(2-3 tbsp) of the tamarind mixture we prepared now and add cooled and spread rice along with freshly ground fine mustard powder and salt and mix it nicely until everything is neatly incorporated. Now taste the rice and add more tamarind mixture or salt as needed and adjust the rice according to your taste buds. Prepare it slightly sour so that it tastes delicious once it is rested for some time. Rest it for an hour at least.
    Serve it as a variety rice in your meal or as a meal by itself with Curd Rice/Daddojanam.

    tamarind rice
    Notes:
    1. Use rice varieties like sona masuri, ponni, jeeraga samba for these kind of rice varieties, I do not suggest basmati rice.
    2. Always make it bit tangy so that it will taste nice once it settles down.Do not add more mustard powder as it might give bitter taste.
    3. You can even mix the mustard powder with a tbsp. of lemon juice before adding to the rice. Also adjust the tamarind mixture accordingly.
    4. You can even add 1 tsp of chopped ginger in the tempering but I do not prefer to add it.
    5. You can cook the tamrind pulp separately until thick and do the seasoning separately and mix everything together - rice, thickened cooked tamarind pulp, seasoning, roasted mustard powder and salt until everything is mixed nicely.But I prefer to cook my seasoning in tamarind as it will enhance the taste of pulihora as the seasonings absorb the taste better when it is cooked in tamarind pulp.
    6. This rice is ideal to pack for travel as it does not get spoilt, you can keep it for long up to a day.

    Vinayaka Chavithi Lunch Menu | Ganesh Chaturthi special Menu

    $
    0
    0
    While I have already posted a pictorial menu (click here) but as there are several more recipes that I could not highlight there, I am compiling all the recipes at one place which are part of Ganesh Chaturthi (Vinayaka Chavithi)Menu so that it would give one wide options for planning the menu. This is largely Andhra/Karnataka Recipes and I have given a typical Andhra and Karnataka Menu which is prepared at your home. I have sorted the food stuffs in various sections, so all you need to do is go through the menu and plan the menu according to your convenience.
    Wish you all a very happy Ganesh Chaturthi!!

    Ganesh Chaturthi Specials(Any ONE - but MUST HAVE):
     
    1) KUDUMULU/MODAK - 3 Varieties with coconut filling, groundnut filling and Sesame filling2) Karida KADUBU / Deep fried MODAK / Kari Kudumulu :Breakfast Menu on Ganesh Chaturthi:
    1. Idli Recipe with Coconut Chutney
    2. Medu Vada
    3. Avarekaalu Kadubu/Spiced Steamed Rice flour Dumplings
    4. Billa Kudumulu/Rice Rava Dumplings
    5. Kandi nooka Billa Kudumulu/Toor dal-Rice Rava Dumplings
    6. Upma Kozhukattai
    7. Undraalu with Biyyam rava - Andhra recipe
    Lunch Menu on Ganesh Chaturthi:

    Sundal and stir fry varieties(ONE or TWO varieties from each category):
    1. Lobia Sundal/Alasandula Guggillu
    2. Avarekaalu Kadubu/Spiced Steamed Rice flour Dumplings
    3. Kabuli Chana Sundal
    4. Kala Chana Sundal
    5. Peanut sundal
    6. Mixed Bean Sundal
    7. Sweet Corn Sundal
    8. Kosambari 
    9. Chana dal Kosambri
    10. Beans Stir fry
    11. Beans-carrot Palya
    12. Raw Banana Stir fry
    13. Cabbage Carrot stir fry 
    14. Cabbage Moong dal fry
    15. Vankaya Kobbari Karam | Stuffed Brinjals with fresh Coconut
    16. Vankaya Kothimeera Karam | Aromatic Brinjal Curry with Coriander
    Vada/Snack varieties(ONE or TWO Varieties):
    1. Alasandula(Lobia) Vada/Fritters
    2. Masala Vada/Chana dal Vada
    3. Mixed Dal Ambode(Vada)
    4. Mosaru Ambode/Dahi Dal Vada
    5. Dahi Vada/Perugu Vada/Mosaru Vade
    6. Kandi Vuntalu / Steamed Toor dal Dumplings
    7. Stuffed Capsicum with Lentils
    8. Avarekaalu Kadubu/Spiced Steamed Rice flour Dumplings
    9. Aratikaya(Raw Banana)  Bajji
    10. Ammini Kozhukattai
    Rice Varieties(ONE or TWO Varieties):
    1. Aava Pulihora  | Tamarind Rice flavoured with Mustard
    2. Dabbakaya Pulihora/Indian Grapefruit Rice
    3. Lemon Rice/Chitrannam
    4. Mamidikaya Pulihora/Maavinkay Chitranna
    5. Rava Pulihora
    6. Pulihora/Puliyogre
    7. Chintapandu pulihora - Andhra style
    8. Raw Mango Rice/Mamidikayi Gojju Annam
    Dal/Stew/Rasam Varieties(All Varieties-ONE each):
    1. Moong dal /Pesara Kattu
    2. Kandi Vunta Majjiga Pulusu / Steamed Toor dal Dumplings Stew
    3. Holige Saaru/ Special Toor dal Rasam
    Main sweet recipes(ONE- compulsory):
    1. Steamed Kudumulu - with 3 fillings
    2. Karida Kadubu Fried Modak
    3. Paneer Modak Peda
    4. Bele Holige Pappu Obbattu - for Gowri Habba
    5. Bellam Kudumulu Vella Ammini Kozhukattai
    6. Boorelu | Suzhiyan | Sugunta
    7. Garugu Obbattu-Holige with rice flour and coconut stuffing -  for Gowri Habba
    8. Paal Kozhukattai | Undralla Payasam
    9. Pappulo Undrallu 
    10. Dry Fruit Modak 
    11. Puran Poli - for Gowri Habba
    12. Palathalikalu  
    Kheer/Payasam(ONE or TWO Varieties):
    1. Moong Dal Kheer / Pesara Pappu Payasam
    2. Phool Makhana Kheer
    3. Poha Kheer/Aval Payasam
    4. Paal Payasam / Rice Milk Pudding
    5. Sabudhana Kheer / Sago Payasam

    Typical Andhra Menu for Vinayaka Chavithi(at my MIL's place):

    Breakfast:Undrallu or Idli with Coconut Chutney
    Main Sweet:Bellam Kudumulu or Undralla Payasam
    Rice Varieties:Chintapandu Pulihora or Nimmakaya Pulihora or Rava Pulihora
    Vada/Snack:Medu Vada or Masala Vada(with out onions)
    Payasam:Semiya Payasam  or Sago Kheer
    Stir fry:Cabbage Carrot stir fry or  Cabbage Moong dal fry or Beans Stir fry
    Sundal: Kabuli Chana Sundal or Kala Chana Sundal
    Dal:Pesara Kattu
    Rasam: Pappu Chaaru or Drumstick Rasam or Lemon Rasam

    Typical Karnataka Menu for Ganesh Chaturthi(at my Mom's place):

    Breakfast:Idli with Coconut Chutney
    Main Sweet:Kudumulu with various fillings or Karida(Fried) Kadubu
    Rice Varieties:Chintapandu Pulihora or Nimmakaya Pulihora
    Vada/Snack: Masala Vada(with out onions) or  Kandunta or Capsicum Kandunta
    Payasam:Undralla Payasam
    Stir fry:Cabbage Carrot stir fry or Beans-Carrot Palya or  Beans Stir fry
    Kosambari:Kosambari  or Chana dal Kosambri
    Sundal:Kabuli Chana Sundal  or Kala Chana Sundal
    Dal:Pesara Kattu
    Rasam:Kandunta Majjiga Pulusu and/or Special Toor dal Rasam

    Babycorn Capsicum Soup | Clear Soup Recipes

    $
    0
    0
    babycorn capsicum soup
    A bowl of hot Soup with warm garlic bread or a bowl of pasta is always a comfort food for me in the monsoons. Though I prepare soups often they never find their way to my blog as I usually prepare it for dinner and I find it difficult to click photos in the night. Few days back, I had prepared this soup along with pasta for a quick weekend lunch and hence I got the opportunity to click the soup !!
    babycorn soup
    I love any kind of soups like thick, clear or rich milk based ones where as DH prefers clear soups or vegetables shorbas and hence I prepare mostly thin soups according to his preferences. Baby corn and capsicum makes an amazing combo in various forms such as Stir fry, curry , gravy, pulao or soup. I just love this combo and never get tired of it. This is a very easy clear soup which can be prepared in a matter of minutes.Try this and enjoy the hot soup with your family.
    baby corn capsicum soup

    If you are interested check out other Babycorn-Capsicum combos like Babycorn-Capsicum Stir fry, Babycorn-Capsicum Gravy.

    baby corn capsicum clear soup

    Also check out other Soup recipes:
    baby corn capsicum soup

    Babycorn Capsicum Clear Soup Recipe:
    Serves 2-3
    Prep time: 10 mins | Cooking time: 15 mins | Total time: 25 mins
    Cuisine: International | Category: Soups- Appetizers

    Ingredients:
    3-4 Baby corns, thinly sliced into rounds
    1 small Capsicum, seeded and finely chopped
    2-3 small Garlic pods, finely chopped
    1 tbsp Corn flour
    3-4 cups of Vegetable stock or 1 veg Maggi soup seasoning cube
    1 tsp Vinegar
    1 tbsp Coriander leaves, finely chopped
    juice of 1/2 Lemon
    1/2 tsp Pepper powder(or to taste)
    Salt to taste
    1 tbsp Olive oil/Butter

    Method:
    • Heat olive oil/ butter in a deep bottomed pan and add finely sliced garlic and saute it for a minute.
    • Add thinly sliced baby corn pieces and fry for 2 mins and then add chopped capsicum and fry for a minute.
    • Add 3-4 cups of vegetable stock to it. If you are using seasoning cube add 3-4 cups of water and add the seasoning cube along with it.
    • Mix corn flour in 2-3 tbsp of water nicely with out any lumps in it.
    • Bring the stock to a boil and then add corn flour mixture and stir continuously while you are adding the corn flour mixture.
    • Boil it for 3-4 mins until it thickens and the color of the soup turns transparent.
    • Add vinegar, salt and pepper powder and mix it.Switch off the flame.Adjust the seasoning according to your taste buds by tasting it if necessary.
    • In the individual bowls add 1/2 tsp lemon juice and 1 tsp chopped coriander leaves and divide the hot soup equally into those bowls.
    Serve the soup hot with Garlic bread / Pasta/ Salad. Add more seasoning to the soup if required.
    baby corn capsicum soup
    Notes:
    • Do not add lemon juice to the soup pot directly as it might make the soup bitter. Hence add it to the bowl directly before you ladle the soup into the bowl.
    • You can replace baby corn with fresh corn or sweet corn and follow the same process.
    • You can even prepare the soup in a similar way with mixed vegetables like finely chopped carrots,beans,cabbage and follow the same process.
    • If you do not have vegetable stock or seasoning cube you can still prepare the soup in the same manner with out using them but the vegetable stock(or cube) adds more flavor to the soup.
    • You can use even knorr seasoning cube instead of maggi cube.
    baby corn capsicum clear soup
     
    Technorati Tags:

    Schezwan Fried Rice Recipe | Veg Schezwan Fried Rice | Indo Chinese Recipes

    $
    0
    0
    schezwan fried rice
    If  I am given a chance in between a regular Veg fried rice and Schezwan fried rice I would definitely choose the latter as I love the schezwan varieties very much. The slight sweet and spicy schezwan sauce makes the fried rice extremely delicious.You can serve the schezwan fried rice as it is or pair it with any manchurian gravy.Chinese recipes take lot of time in preparation work but in order to put up the final product it does not take much, you can finish the tossing in just mins if you have all the ingredients ready.It tastes best when it is done on high flame,so its better to keep all the ingredients handy before you start the tossing job.
    schezwan fried rice
    In restaurants the Chinese food taste still better when compared to the home made version as they usually toss in the high flame and it also lends a nice smoky flavor which is difficult to recreate in the home made version but nevertheless it tastes nice.I have mentioned few tips and tricks in notes section, so please go through it to make delicious schezwan rice at home.
    The secret of Schezwan fried rice lies in the Schezwan sauce preparation , if you get the sauce right the fried rice tastes just delicious.I had prepared this Schezwan fried rice for a week end lunch recently and served it with Chili Paneer, that was one delicious meal which we thoroughly enjoyed.
    schezwan fried rice

    If you are interested check out other Indo-Chinese recipes in my blog.
    schezwan veg fried rice

    Schezwan Vegetable Fried Rice Recipe:
    Serves 2
    Prep time: 15 mins | Cooking time: 30 mins | Total time: 45 mins + cooling time of rice
    Cuisine: Indo-Chinese | Category: Rice- Main  Course

    Ingredients:
    1 cup Basmati rice
    1/2" Ginger, finely chopped
    3-4 Garlic pods, finely chopped
    1 tsp chopped Celery( or thick coriander stems)
    3-4 tbsp Schezwan Sauce
    1 tsp dark Soya sauce
    1 tsp Vinegar
    1/4 tsp black Pepper powder, freshly ground
    2 tbsp Olive oil
    1 tbsp Sesame oil
    Salt to taste

    Vegetables needed:
    1 medium Carrot, finely chopped
    1/3 cup Cabbage, finely shredded
    1 small Capsicum, finely chopped
    7-8 french beans, finely chopped
    5-6 Spring onions( greens-finely chopped, whites-finely sliced)

    Method:
    • Soak Basmati rice for 10 mins and cook in rice cooker with (1-rice:2-water) ratio and cool the rice completely. Apply some olive oil to it and mix well and keep it aside, it is best if you refrigerate for 1/2 hr so that rice holds its shape when frying it.
    • Cut the vegetables finely as mentioned.
    • Heat olive oil and sesame oil in a big wok over a high flame and add finely chopped ginger, garlic and celery pieces and fry until they turn slight crisp.
    • Add thinly sliced spring onion whites(or onions) and fry them on high flame until they turn soft.
    • Add chopped carrot, beans, cabbage and stir fry on high flame for 2 mins. Do not let the carrots and beans loose its crunchiness, they should be crisp and crunchy and hence do not stir fry for long.
    • Add sliced capsicum to it and fry again for a minute.
    • Add salt, pepper powder, vinegar, schezwan sauce and soya sauce and mix well. Do not add more salt as all the sauces contain some salt.
    • Add cooled rice and spring onion greens, slightly run the rice through your fingers while adding to the wok so that it does not have any lumps. Mix everything well until the rice is hot and do this gently and take care not to make the rice mushy.
    Serve it piping hot with any Manchurian gravy. I served it with Dry Chilli Paneer.

    schezwan veg fried rice
    Notes:
    • In chinese cooking Ajinamoto (chinese salt) is added to give extra taste, I have not added to it as it is supposedly not good for health. If you would like to add feel free to add 1/2 tsp Ajinamoto along with pepper powder.
    • I recommend you to refrigerate the cooled rice at least for half an hour which helps the rice in holding the shape while frying.
    • If you are preparing it in large quantity, mix all the rice together and toss small portions of rice in a tbsp of oil and serve it piping hot.
    • The entire cooking is to be done over a high flame which helps in retaining the crispiness of vegetables and the flavor of the dish, so you should be quick while sautéing the veggies and rice.
    • You can adjust the spiciness of the rice according to your wish.
    • You can use white pepper powder instead of black pepper powder, as I did not have it at that time I used freshly ground pepper in it.
    schezwan vegatble fried rice

    schezwan veg fried rice

    Technorati Tags: , , , , , ,,

    ONAM RECIPES | ONAM SADYA MENU | ONAM SADYA RECIPES

    $
    0
    0

    ONAM is on September 16 i.e. this monday. I am compiling a list of few recipes which are a part of ONAM sadya menu. ONAM sadya typically comprises of various items ranging from Pickle, Puli Inji, pachadi, kichadi, thoran, parippu, aviyal, kalan, olan, pulissery, sambar, rasam, steamed rice, banana chips, pappadam, payasam, pradhaman that are spread on a banana leaf. It is really a feast to have so many items on the sadya. Do go through the recipe list and adapt the recipes as required for Onam sadya.  I though wish I would make the complete Onam sadya once.Happy ONAM in advance !!!

    Main Course - Snack/Sundal/Stirfry:
    Main Course - Sambar/Stew/Rasam:
    Pickles:
    Kheer Recipes:
    Beverage:


    Oats Tikki | Oats Cutlet Recipe

    $
    0
    0
    oats tikki
    I have been getting few requests for Snacks using Oats from my readers and hence I had come up with an Oats Tikki recipe which is an easy and healthy snack. I have included oats in my breakfast in many interesting options and now slowly started to include them in various varieties other than breakfast. I have earlier posted Oats pakoda recipe which is a deep fried version but a very good snack and today let us see a low fat version of  Oats Cutlet. I have prepared it like any other cutlet but included oats in a large quantity and also gave a coating of oats for the crust. As oats itself is a nice binding agent when it is moist you don't need to add any other binding agents like bread or corn flour to the mixture.If you have boiled potato ready you can prepare this snack in less than 20 mins.You can send this for your kids tiffin box too, it stays good!!
    oats tikki
    Check out other Snack options with Oats in my blog here:
    If you are interested to check other oats recipes, click here.

    oats cutlet

    Oats Tikki | Oats Cutlet Recipe:
    Yields 12-14 Tikkis
    Prep time:10 mins | Cooking time:20 mins | Total time:30 mins
    Cuisine: Indian | Category: Snacks

    Ingredients:
    1 1/2 cups Quick cooking Oats (Kellogs/Quaker)
    2 medium Potatoes
    1/4 cup grated fresh Paneer
    1 small Carrot, grated
    2-3 tbsp chopped Coriander leaves
    2 Green Chillies, finely chopped
    3/4 tsp Chaat masala
    1/2 tsp roasted Cumin powder
    1/2 tsp Garam masala
    1/2 tsp Amchur powder
    juice of 1/2 Lemon
    Salt to taste

    3 tbsp Milk or Water,to coat cutlets
    2 tbsp Bread Crumbs,optional
    2-3 tbsp Oil,to shallow fry cutlets

    Method:
    • Dry roast oats until they turn slight brown and reserve 1/2 cup of oats aside and use the remaining 1 cup of oats in the cutlet mixture.
    • Boil the potatoes in pressure cooker for 3-4 whistles or microwave it for 5-6 mins.Peel the skin and when they are still warm mash the potatoes nicely.
    • Add chaat masala, cumin powder, Garam masala, amchur powder, salt, lemon juice, grated paneer, carrot and chopped green chillies, coriander to the mashed potato mixture and mix nicely.
    • Now add roasted 1 cup oats to the potato mixture and mix nicely. Oats give enough binding for the tikkis, if you feel you need more binding add 1-2 tbsp roasted oats to it and slightly knead it again.
    • Divide the mixture into 12-14 equal portions and shape them into rounds of 2" diameter and 1/2" thickness. Prepare all the cutlets and keep them ready.
    • In a plate spread 1/2 cup roasted oats and mix it with 2 tbsp bread crumbs(if you are using).
    • Dip each cutlet in a bowl of milk or water quickly on both sides and drop them into the oats mixture and coat the oats and bread crumb mixture on all sides by moving the tikkis all around and keep them on a plate. 
    • Repeat the same process for all the cutlets.You can refrigerate them for half an hour or prepare them immediately.
    • In a wide non stick pan heat 2-3 tbsp oil and place the cutlets and fry them on low- medium flame until they are roasted to light golden brown in color. Turn them and add a tbsp of oil from the sides if needed and roast until crisp on both sides.Drain them on a kitchen napkin.
    Serve hot with Green Chutney, Imli Chutney or Tomato Sauce. Sprinkle Chaat masala over the cutlets for extra taste.

    oats tikki

    Notes:
    1. Roast the oats nicely to avoid the stickiness of oats in the cutlets.
    2. The addition of bread crumbs is optional, but it makes the crust crisp and hence I recommend you to add it. You can even use rusk powder if you do not have bread crumbs in hand.
    3. Initially mix all the spices in the potato mixture which helps the potato mixture in absorbing the spices nicely and then add rest of the ingredients and mix nicely.
    4. You can make the cutlets in various shapes like hearts, ovals etc.
    5. You can refrigerate the prepared tikkis for 2 days and shallow fry when needed.
    6. If you like you can add few chopped cashew nuts or raisins into the mixture before making tikkis, they add a nice bite to the tikkis.
    oats cutlet


    Shahi Paneer Recipe - Restaurant style Gravies

    $
    0
    0
    shahi paneer
    Paneer gravies like Paneer Makhani, Palak Paneer or Paneer Butter Masala are always a  hit and I am sure most of us prefer ordering at least one paneer gravy if we visit any restaurant. Another rich gravy in Paneer category is Shahi Paneer which is a royal recipe fit for special occasions. Shahi Paneer is a true rich gravy which is definitely a treat to any one.
    restaurant style shahi paneer
    The gravy for Shahi Paneer is not the usual tomato based one, it is prepared with less(or no) tomato and has a beautiful rich white gravy made up of onions, cashew nuts, cream, curd and milk and is scented with cardamom powder. This gravy is very aromatic and the taste of it lingers you even after a while you finish eating it.Take my words and try this Shahi Paneer recipe in your next party and I am sure everone will like it. I have mentioned few tips to make it low fat in case if those extra calories by cream is worrying you.
    shahi paneer
    Shahi Paneer pairs up nicely with Naans, Kulchas or any other Indian flat breads and even with Jeera Rice, Matar pulav etc. Make sure you have the soft quality paneer to prepare this as we are even going to use the paneer in the gravy as well which is a real twist to the actual recipe and makes it even more delicious. As we are adding curd and milk in the gravy one should be careful while adding them to avoid the curdling- read the recipe carefully before you proceed to prepare the recipe.
    shahi paneer restaurant style

    Check out various Paneer Recipes in my blog:
    shahi paneer

    Shahi Paneer Recipe:
    Serves 2-3
    Prep time:10 mins | Cooking time: 30 mins| Total time: 40mins
    Cuisine: Mughlai-Indian | Category: Gravies - Main Course

    Ingredients:
    200 gms Homemade Paneer (Cottage cheese) (or store bought)
    1 small Tomato, finely chopped
    1 tsp Coriander power
    1/2 tsp roasted Cumin powder
    1/2 tsp Red chili powder
    1/4 tsp Turmeric powder
    1/2 tsp Kasuri Methi
    3-4 tbsp. fresh cream or 1/4 cup Milk
    2-3 tbsp. fresh Curd, beaten
    1 Bay leaf
    2 Cardamom pods, seeded and powdered
    Salt to taste
    2-3 tbsp. Oil/Ghee
    2 tsp Coriander leaves, to garnish

    to grind- Paste1:
    2 Onions, roughly chopped
    2-3 Green chillies

    to grind- Paste2:
    8-10 Cashew nuts
    1/4 cup Warm milk
    1/4 cup(roughly 50 gms) grated Paneer

    Method:
    • Cut paneer into 1 1/2" squares of 1/2" thickness and dip them in medium hot water until its usage. You can even sauté them in butter for few minutes on both sides and then keep them immersed in hot water until its usage.
    • Remove the skins of cardamom pods and pound the cardamom seeds in a mortar and pestle to a fine powder.
    • Soak cashew nuts in warm milk for 10-15 mins.
    • Grind soaked cashew nuts with warm milk and paneer pieces(or grated paneer) to a smooth and creamy paste(let us say this paste no-2).
    • Bring 2-3 cups of water to a boil in a vessel and add roughly chopped onions and green chillies and boil until they turn slightly soft. Drain the onions and green chillies and once they come to room temperature. Grind them along with ginger-garlic paste to a very smooth puree(let us say this is paste no-1). The ginger-garlic paste I used had some turmeric powder and hence there is a slight change in color.
    • Heat oil/ghee in a pan/kadai and add bay leaf and add ground paste-1(onion paste) and fry it for 2 mins and then add chopped tomato and fry it nicely until the paste stops sticking to the pan. It takes nearly 5-7 mins.
    • Now add all the spice powders- red chili powder, garam masala, turmeric powder, roasted cumin powder and coriander powder and fry nicely until the whole mixture stop sticking to the pan. If necessary add few tbsp. of water while frying but do not let the masala burn at any stage.
    • Remove the pan from the stove and add nicely beaten yogurt(curd) and mix it well. Bring it back on the burner on LOW flame and add 1/3- 1/2 cup water approx. and mix nicely and bring the gravy to a boil. Do not increase the flame from now on wards to avoid the curdling of gravy. The gravy thickens as it sits and hence make the gravy slightly thinner so that it would be of nice consistency during serving time.
    • Add kasuri methi and salt to it and also the ground paste-2(cashew nut paste) and cream(milk) and mxi it nicely.
    • Add paneer pieces and let the gravy comes to a boil on very low flame. It takes nearly 3-4 mins.
    • Now add freshly pounded cardamom powder and give a gentle stir and switch off the flame.
    • Garnish it with coriander leaves and grated paneer.
    Serve it hot with flat breads like  Naan/Roti/Kulcha or Jeera rice/Bagara Rice/Matar Pulao

    shahi paneer

    shahi paneer

    Notes:
    1. Add nicely beaten curd and also add it to the pan by removing it from the flame to avoid curdling. From then onwards boil the gravy on low flame.
    2. Do not miss the addition of paneer while grinding the cashew nuts , this really adds the richness and taste to the gravy and also you can avoid cream and add some milk instead to the gravy.
    3. I love to cut the paneer pieces into squares for this gravy, you can cut them in cubes, triangles etc like the way you want.
    4. I avoided turmeric powder adding to the gravy as the ginger-garlic paste already had enough turmeric in it.
    5. Shahi Paneer is not a red colored based gravy. As we do not add more tomatoes and red chili powder to the gravy and also the addition of cream, cashew nut paste and milk at the end ensures that the gravy would be slightly whitish in color.
    6. Add cardamom powder at the end to retain the flavor of it in the gravy.
    7. You can even mash the paneer and add instead of grinding it but I prefer to grind it to get a smooth texture,You can do either ways.
    shahi paneer

    Capsicum Chutney | Chutney Recipes for Idli and Dosa

    $
    0
    0
    capsicum chutney
    Most of the times Idli and Dosa would be accompanied with Coconut Chutney at my place as it is the most preferred chutney at home. However I do make variations for the regular coconut chutney like Red Coconut Chutney , Coconut Green chutney, Coconut chutney with Garlic, Coconut chutney with ginger etc. to give a twist each time so that we do not get bored. I do like other chutney varieties like Peanut Chutney, Onion Chutney, Tomato-Onion Chutney but DH is not very fond of them and he would prefer either Coconut chutney or Magaya Perugu Pacchadi . Apart from these chutneys one more chutney in common for both of us is this Capsicum chutney.
    capsicum chutney
    Capsicum chutney is a very simple and nice variation to regular chutney varieties. It does not need any coconut in the recipe. The addition of peanuts adds a nice taste where as capsicum gives a new flavour to the chutney. If you are bored of regular chutney varieties, try this capsicum chutney for a change to pair with your Idli and Dosa varieties. I am sure you would definitely love this chutney, give it a try and let me know how you liked it.
    capsicum chutney

    Check out other chutney varieties for Breakfast items:
    capsicum chutney

    Capsicum Chutney Recipe:Serves 2-3
    Pep time: 10 mins | Cooking time: 10 mins | Total time: 20 mins
    Cuisine: South Indian | Category: Chutney for Idli/Dosa - Accompaniments

    Ingredients:
    2 medium Green Capsicums, seeded and chopped
    1 small Onion, chopped
    1/4 cup Peanuts
    2-3 Garlic pods
    2-3 Green chillies
    1-2 Red chillies
    1 tsp Tamarind Pulp
    Salt to taste
    1 tbsp. Oil

    to temper:
    1 tbsp. Ghee/Oil
    1/2 tsp Mustard seeds
    1 tsp Urad dal
    a sprig of Curry leaves
    a pinch of Asafoetida

    Method:
    • Dry roast ground nuts in a pan until the skin turns dark and remove them and let them cool. Remove the skin of ground nuts by rubbing them or keep the skips on if you wish.
    • Heat 1 tbsp. oil in a pan and add garlic pods, green chillies and red chillies and fry them until the chillies wilt and change their colour. Remove them and keep aside.
    • In the same pan add chopped onions and fry until they turn translucent and add chopped capsicum pieces and fry well until they wilt. It takes 4-5 mins roughly. Switch off the flame and let the mixture cool a bit. If you are using dry tamarind(mine is semi soft tamarind) add at this stage and mix in the mixture so that it will become soft.
    • Grind ground nuts with roasted green chillies, red chillies, garlic pods and salt to a coarse powder.
    • Add onion, capsicum and tamarind mixture and grind to a smooth or slightly coarse chutney in mixer. Remove the chutney into a bowl.
    • Heat oil/ghee in the same pan and crackle mustard seeds and then add urad dal, curry leaves and asafoetida and fry until the dal changes color and add this tempering to the chutney and mix well and cover it immediately.
    Serve it with Idli and Dosa varieties.

    Notes:
    1. You can use only green chillies or a combination of green and red chillies in the recipe.
    2. Green capsicum can be substituted with red capsicum in the recipe and also use red chillies instead of green chillies in the recipe.
    3. Adjust the spiciness according to your taste buds.
    4. I sometimes do not remove the skin of ground nuts, do not bother you would know about it once it is ground. 
    capsicum chutney

    Tawa Idli | Spicy Tava Idli Recipe

    $
    0
    0
    tawa idli
    Mumbai Street food is mostly fusion recipes and I just love to try everything which sounds interesting .Though I am an ardent fan of Bangalore style Idli and Dosa ,I would take a bow for the creativity of Mumbai when comes to street food especially for their innovations in the south Indian food.
    tawa idli
    Here in Mumbai you can get dosa with literally any flavor - like Pav Bhaji Dosa or Spring roll Dosa or Chinese Chopsuey Dosa or Schezwan Dosa etc to name a few and I am a fan of Schezwan dosa. Even the south Indian Idli has got a make over with few variations like Tawa Idli, Chili Idli, Dahi Idli , Idli Chaat etc.
    mumbai style tawa idli
    I usually do not have left over Idlis at my place but in order to prepare these yummy snacks I prepare more Idlis on weekends so that I can turn few of them to a simple and delicious evening snack. Tawa Idli is a closer cousin to Chili Idli but prepared with Indian spices. I prepare Tawa Idli in a way similar to how I prepare Chilli Parotta with just a few modifications and the addition of the special spice- Pav Bhaji Masala, which takes this Tawa Idli to a whole new level.
    Tawa Idli makes a nice snack for Kids Tiffin box and it is also an ideal recipe to turn those Idli haters to Idli Lovers.
    spicy tawa idli
    If you are interested check out few interesting recipes with left over Idlis -
    For Idli recipe - refer either Idli Recipe using Idli Rawa or Idli recipe using Idli Rice. You can use any of the recipes to prepare Idlis.
    tawa idli

    Tawa Idli | Spicy Tava Idli Recipe:
    Serves 2
    Prep time: 5 mins | Cooking time: 10 mins | Total time: 15 mins
    Cuisine: Indian | Category: Snacks/Light Meals

    Ingredients:
    4-5 left over Idlis(Idli recipe- here and here)
    1 medium Capsicum,finely chopped
    1 medium Onion,finely chopped
    1 medium Tomato,finely chopped
    1-2 Green chillies,finely chopped
    1/2" Ginger,grated
    1 tbsp Coriander leaves
    juice of 1/2 Lemon
    1 1/2 tsp Pav Bhaji masala
    1/2 tsp Red chili powder
    1/4 tsp Turmeric powder
    4-5 Curry leaves(optional)
    1/4 tsp Cumin Seeds
    2 tbsp Oil
    Salt to taste

    Method:
    • Cut idlis into medium cubes and keep it ready.Use left over idlis which are best for this.If you are using fresh Idlis make sure you cool them before you cut.
    • Heat oil in a pan and crackle cumin seeds.Add grated ginger, chopped green chillies and curry leaves and fry for a minute.
    • Add finely chopped onions and fry until they turn slight pink in color.Now add chopped capsicum pieces and fry for a  couple of minutes.
    • Add chopped tomatoes and fry until the mixture becomes pulpy,it takes 3-4 mins.
    • Now add all the masalas - red chili powder, pav bhaji masala, turmeric powder and salt and fry for 1-2 mins.If the mixture turns dry sprinkle a tsp of water and mix nicely.
    • Add the chopped idli cubes and mix well until the masalas coats the idli pieces nicely.
    • Increase the flame now and fry for 2-3 mins until the idli pieces get roasted slightly.
    • Switch off the flame.Add chopped coriander and lemon juice and mix.
    Serve it hot just like that or with Coconut Chutney.

    spicy tava idli
    Notes:
    1. Adjust the spiciness according to your requirements.If you are preparing it for kids avoid green chillies in it.
    2. It tastes best when made spicy and served hot.
    3. You can follow the same process and use chopped pav buns or parottas instead of idli pieces in the recipe.

    Pani Puri Recipe | Mumbai Style Ragda Pani Puri

    $
    0
    0
    pani puri
    'Pani Puri' is the one of the most popular Chaats in India and does not need any introduction. It is the King of Chaats in my opinion and is my most favorite chaat with out any doubt. It is also known as 'Golgappa' in North and 'Puchka' in Calcutta and 'Pani Puri' in the rest of India. The debate between all these versions about which one tastes better than the other is never ending - either Mumbaiyya Pani puri or Delhi Golgappe or Kolkata Puchka, I do not bother much about which version it is as I absolutely love Pani puri and thoroughly enjoy all the versions. Every version differs from the other in the proportions of the ingredients used to make pani and also the fillings used which makes each version taste different from the other.
    ragda pani puri
    In Delhi style Golgappa the filling is mainly steamed moong sprouts with a combination of mashed potatoes and soft boondi(soaked in water and squeezed) or even soft cooked white chickpeas with potato.Where as in Puchka, the filling is with kala chana and potato combination and is totally spiced up with the bhaja masala,which plays a major role in bringing out the key flavors.In Mumbai style Pani Puri the filling used is ragda,which is softly cooked white peas and more over the filling used in Mumbai Pani puri is HOT unlike the other versions.
    ragda pani puri
    pani puri

    Many of my North Indian friends complain that they do not like the idea of using hot ragda in pani puri which is Mumbai version and they always say that they love their Delhi style Golgappa. But as I am from south, I am used to eat pani puris in Bangalore and other places where the filling used is made up of hot gravied green peas. Hence I did not find the usage of hot ragada in pani puri strange and I totally enjoy it. But if you ask me -which version of Pani Puri I love the most? - I would definitely opt between 'Puchka' and 'Bangarpet style Pani Puri'. It is a really a tough one to choose between both these versions. For those who are hearing for the first time about 'Bangarpet Pani Puri', let me tell you a bit about it.Unlike the deep green or brown colored pani, this version of pani used in Bangarpet pani puri is a flavored and spiced up water which is transparent and almost looks like water and the filling used is hot gravied green peas and potatoes.The process of preparation of Bangarpet pani is totally different, it is an infused version unlike the other versions.I have already posted the recipe for Bangarpet Pani Puri, if you are interested check out more details- click here.
    With out any further delay let us see how to prepare Mumbai style Pani Puri at home.
    ragda pani puri
    If you are interested check out other versions of Pani puri here:
    ragda

    Mumbai style Ragda Pani Puri Recipe:
    Serves 2-3
    Prep time:10 mins | Cooking time:15 mins | Total time:25 mins + chilling time
    Cuisine: Indian | Category: Chaats

    Ingredients:
    24 homemade Pani puris (or store bought)
    1 small Onion,finely chopped(optional)
    1-2 tbsp. Coriander leaves,chopped

    for ragda:
    1/2 cup White peas
    1/4 tsp Kala namak(black salt)
    1/4 tsp Roasted Cumin powder
    1/4 tsp Chaat masala
    1/4 tsp Turmeric powder
    a pinch of Asafoetida(hing,optional)
    1/2 tsp Oil
    Salt to taste

    for pani:
    3/4 cup Mint leaves
    1/3 cup Coriander leaves
    2 small Green chillies
    1/2" Ginger,chopped
    1 tbsp. Sugar
    1 tsp Lemon juice
    2 tsp Panipuri masala(I use Everest brand)
    3/4 tsp roasted Cumin powder
    3/4 tsp Kala namak(black salt)
    1/2 tsp Chaat masala
    Salt to taste
    4-5 cups of water

    Method:
    for ragda:
    • Wash and soak white peas for 5-6 hrs or overnight. Wash and drain again and add fresh water and pressure cook for 1 whistle and simmer it for 5-6 mins. White peas really cook fast and it is better if you simmer it after the first whistle otherwise it will become really mushy.
    • Heat oil in a pan/kadai and add asafoetida and then add cooked white peas, salt, turmeric powder and roasted cumin powder and simmer it for 5-6 mins until the mixture is thick. Ragda thickens gradually when it sits,do not make it very thin(runny) or dry.Ragda should be thick and slightly runny.
    • Add kala namak and chaat masala and mix well. Keep it HOT until you serve pani puri.
    for pani:
    • Grind mint leaves and coriander leaves with ginger, green chilles, salt, sugar, lemon juice, chaat masala, cumin powder and black salt(kala namak) to a fine paste.
    • Reserve half the paste aside and mix the rest of the ground chutney with 4 cups of water and mix nicely. You can store the left over green chutney and use it for other chaats or freeze it for later use.
    • Add 3-4 tbsp. of Meetha(sweet) chutney and pani puri masala and mix well. Now taste the water and adjust the pani taste according to your wish by adding either extra sweet chutney or ground mint chutney or pani puri masala or more water. If you balance the pani right the pani puri tastes more delicious. It should be slightly chatpata but well balanced with flavors. Remember that the ragda is slightly bland and also we do not serve Meetha chutney along, so balance the flavors accordingly. Sprinkle some coriander leaves and chill it for 3-4 hrs until the flavours are blended well. Keep the pani COLD until serving. 
     to serve Ragda Pani Puri:
    • Arrange 8 puris in a plate with some ragda ,onion-coriander mixture aside and a bowl of pani.
    • Make holes in the puris and stuff it with 1 tbsp. hot ragda and top it with onion-coriander mixture and dip it in cold pani and enjoy!!
    ragda pani puri
     Notes:
    • I strongly suggest to use Meetha chutney in the pani recipe as it elevates the taste of pani puri to a different extent. In case if you do not have Meetha chutney soak a gooseberry sized tamarind in 1/4 cup of water and extract pulp. Simmer it along with 4-5 tbsp. of sugar or Jaggery until it is thick and let it cool completely before you use it. Though you can use the tamarind mixture mixed with sugar directly, I suggest you to simmer the tamarind-sugar(jaggery) mixture which tastes better than just the plain tamarind-sugar mixture.
    • If you do not have pani puri masala in hand you can even use jaljeera powder instead. If you do not have both you can increase the quantity of chaat masala in the recipe.
    • This Ragda puri tastes best when the ragda is served hot and the pani is served chilled.
    • The usage of onions is entirely optional, I add it sometimes and skip sometimes.
    • You can slightly spice up the ragda by adding 1/2 tsp red chili powder to it while it is simmering.
    • If you like you can even add boiled and slightly mashed potato to the ragda mixture.
    ragda pani puri

    If you love chaats, check out few other chaat recipes here in my blog:

    Moong Dal Kheer | Hesaru Bele Payasa | Easy Kheer Recipes

    $
    0
    0
    moong dal kheer
    Moong dal kheer is one of the easiest kheer varieties to prepare and is also my most favorite one. I have posted a version earlier-Moong dal Payasam which is a thicker version much like payasam, check out the recipe here. Today I am posting another version of kheer which my mom prepares.My mom prepares this quite often, saying that it will give a cooling effect to the body.She always prepare this kheer which would be of the consistency like badam kheer and hence she always used to serve this in a glass instead of a cup.
    moong dal kheer
    Though the ingredients used in this kheer and the regular Moong dal Payasam are similar the taste and consistency is entirely different. The former version  is prepared using sugar and the consistency is thin where as the latter one can be prepared using either sugar or jaggery and is prepared thick like the other payasam varieties. I like both the versions but I prefer this lighter moong dal kheer as it is mildly sweet and love the idea of drinking the kheer biting into the fried cashew pieces and few moong dal bits here and there.This kheer is a treat when served cold on those hot summer days or as a warm kheer in the winters, it tastes nice either cold or hot.
    pesarapappu payasam
    Moong dal Kheer | Hesarubele Kheer | Pesarapappu Payasam Recipe:
    Serves 2
    Prep time:5 mins | Cooking time: 30-40 mins | Total time: 45 mins
    Cuisine: Indian | Category: Sweets

    Ingredients:
    1/2 cup Moong dal(yellow variety)
    1/3 cup Sugar
    2.5 cups whole cream Milk
    1 1/2 cups Water
    1/2 tsp Cardamom powder
    10-12 Cashew nuts, broken
    2 tbsp. Raisins
    2 tbsp Ghee

    Method:
    • Heat ghee in a small pan and add cashew nuts and raisins and fry them separately until they turn light golden brown in color and keep them aside.
    • Boil the milk over the low flame until it becomes thick and reduces to 3/4th of volume.
    • In a small pressure cooker add the remaining ghee and add moong dal and fry until it turns slightly red in color.
    • Meanwhile boil water in another vessel and add the boiling water to the roasted moong dal.
    • Pressure cook moong dal for 2-3 whistles until the moong dal splits and is cooked. It should be properly cooked,you can cook the dal with a bite or little mushy however you like.
    • Add sugar to it and boil for 5-7 mins until the sugar is melted and the kheer starts thickening.
    • Add boiled milk to it and simmer for another 5 mins.The kheer would not be very sweet, it should be mildly sweet.If you like it more sweet add a couple of tbsp. of sugar more.
    • Add cardamom powder and fried cashew nuts and raisins mix well and switch off the flame.
    Serve it hot/cold/warm or at room temperature.
    hesaru bele payasam
     Notes: 
    1. You can also add fried badam along with cashew nuts to the kheer.
    2. You can make the kheer really rich by even pressure cooking the moong dal in complete milk,in that case you would need approximately 3 cups of milk.
    3. The kheer would be slightly runny in consistency so it is better to serve it in a glass instead of a cup.
    moong dal kheer

    Technorati Tags: , , , , , , , , ,

    Pulihora Recipes | Pulihora Varieties | Puliyogre - Chitranna Recipes

    $
    0
    0
    Pulihora is the most popular rice variety in South India. Pulihora is prepared using either lemon or tamarind where the lemon based one is known as 'Chitranna' in Karnataka and 'Chitrannam' or 'Nimmakaya Pulihora' in Andhra and the tamarind based one is called 'Pulihora' or 'Puliyogre' or 'Puliyodharai' in various south Indian states. The most popular pulihora varieties are Nimmakaya Pulihora(Lemon Rice) and Chintapandu Pulihora(Tamarind Rice). There are several versions of Tamarind Rice like Andhra style Chintapandu Pulihora, Karnataka style Puliyogre and Tamilnadu style Puliyodharai which are prepared differently with few variations. Apart from the regular Lemon rice and Tamarind rice, there are other variations to the pulihora like Maamidikaya Pulihora(Raw Mango Rice), Usirikaya Pulihora(Amla Rice), Dabbakaya Pulihora(Indian Grape fruit rice) etc which tastes good in its own way. There are new variations to the regular pulihora which are bit innovative like Cranberry Puliyogre, Gongura Pulihora etc. Apart from rice, one can use various ingredients like Poha(atukulu), Sooji, Semiya, Rice Noodles, Sago, Puffed Rice to prepare Pulihora which is suitable for breakfast. I have tried to compile all the pulihora recipes and would update the list when I post new recipes. As most of the pulihora recipes do not have onion(except for few breakfast recipes), they are suitable to prepare on festival days. Try few of the pulihora recipes for naivedyam during Navaratri.For complete collection of Navaratri recipes,check out here.

                           
                Aava Pulihora                 Nimmakaya Pulihora          Chintapandu Pulihora

                         
               Mango Gojju Pulihora     Usirikaya Pulihora             Cranberry Puliyogre
         
                 
              Puliyogre                       Mango Pulihora        Dabbakaya Pulihora                  

                       
              Semiya Pulihora               Rava Pulihora                      Lemon Shavige

              
            Tamarind Shavige        Maramarala Pulihora       Gojju Avalakki | Tamarind Poha

                 
               Atukula Pulihora                        Sabsige Soppu(Dill leaves) Chitranna


    Tomato Chutney Recipe | Easy Chutney Varieties for Idli/Dosa

    $
    0
    0
    tomato chutney

    Tomato chutney is one of the easiest options for Idli and Dosa varieties and also is a nice change from regular Coconut Chutney. I have posted earlier a version of Tomato-Onion chutney and I am posting a simple and easy version of Tomato chutney today. It is very tangy and tastes delicious with Idli and Dosa or other Breakfast varieties.

    Check out other chutney varieties for Breakfast items:
    tomato chutney

    Tomato Chutney for Idli/Dosa Varieties:
    Serves 2-3
    Prep time: 10 mins | Cooking time: 10 mins | Total time: 20 mins
    Cuisine: South Indian | Category: Chutney for Breakfast - Accompaniments

    Ingredients:
    3-4 Tomatoes, roughly chopped
    2-3 Garlic pods
    4-5 Green chillies
    1 tsp Cumin seeds
    1/2 tsp Tamarind Pulp
    1 tsp Sugar/Jaggery
    Salt to taste
    1 tbsp. Oil

    to temper:
    1 tbsp. Oil/Ghee
    1/2 tsp Mustard seed
    1 tsp Urad dal
    a sprig of Curry leaves
    a pinch of Asafoetida

    Method:
    • Heat 1/2 tsp oil and add cumin seeds, green chillies and garlic pods and fry the chillies wilt. Remove it and keep aside.
    • Heat remaining oil in the same pan and add chopped tomatoes and fry them until they turn pulpy. This might take some 4-5 mins. Add soft tamarind at the end and mix well, if you are using tamarind pulp add it while grinding. Cool it a bit.
    • Grind roasted garlic, green chillies and cumin seeds with salt to a coarse paste.
    • Add cooked mushy tomatoes, sugar(jaggery) and tamarind pulp and grind it to a smooth or chunky chutney according to your preference. Add little water if required while grinding. Remove the chutney to a bowl.
    • In the same pan heat 1 tbsp. ghee/oil and crackle mustard seeds and add urad dal, curry leaves and asafoetida and fry for some time and add this tempering to the chutney and mix well.

    tomato chutney
    Notes:
    1. You can add 1 roughly chopped onion and fry along with tomatoes and grind together to make tomato-onion chutney.
    2. You can grind this chutney smooth or slightly chunky according to your preference.
    3. You can even add 1/2 cup- 3/4 cup of coriander leaves when you are frying tomatoes, it adds a nice flavour to the chutney.
    4. In case if you do not like smooth chutney you can also roast 2 tsp urad dal along with cumin seeds and grind it first before adding tomatoes, this adds some body to the chutney and also makes the texture different.
    5. As the tomatoes add sourness it is important to add some sugar or jaggery to balance the taste. If you like it sour you can avoid adding sugar.
    6. Green chillies can be replaced with red chillies in the recipe.
    tomato chutney

    Aratikaya Vepudu | Raw Banana Stir fry

    $
    0
    0
    aratikaya vepudu
    'Stir Fry' or 'Vepudu' is a part of typical Andhra meal and we prepare various stir fries on a daily basis to pair with steamed rice. One can prepare either the deep fried stir fries, which are definitely tastier and also the shallow fried simple stir fries. Vegetables like Potatoes, Ladies finger(Okra), Arbi(Taro root), Brinjal, Raw Banana and Yam taste really delicious in the form of stir fries, you can either deep fry them or shallow fry them based on your requirementsand season it with Garlic chili powder, it tastes yumm!! I would say a simple Stir fry and Rasam with hot rice and few fryums is a comforting meal for me .
    raw banana stir fry
    'Raw Banana' also known as 'Raw Plantain' or 'Aratikaya' in Telugu and 'Balekai' in Kannada. Let us check out the simple yet delicious stir fry using raw bananas.
    Check out few more interesting preparations with Raw Banana here.
    raw plantain stir fry

    Aratikaya Vepudu | Balekai Palya | Raw Banana(Plantain) Fry:
    Serves:3-4 persons
    Prep time:15 mins | Cooking time:15 mins | Total time:30 mins
    Cuisine: South Indian | Category: Stir fry - Side dish

    Ingredients:
    2 Raw Plantains(Raw Bananas)
    1 Onion,finely chopped
    2-3 Garlic pods,crushed
    8-10 Curry leaves
    1 tsp Urad dal
    1 tsp Chana dal
    1 tbsp Oil

    Method:
    • Steam the raw plantains for 10 mins or pressure cook for 2 whistles.Cool it and peel the skin and cut it into small pieces.
    • Heat oil and crackle mustard seeds and add chana dal and urad dal and fry for few mins.
    • Add curry leaves, chopped onions and crushed garlic and fry until the onions turn pink.
    • Add chopped raw banana pieces and fry for 8-10 mins until they become slightly crisp.
    • Now add Garlic chili powder and mix nicely and fry for 2 mins.As the garlic chili powder already has salt we don't need to add extra salt,check the taste and add salt if required.Add more garlic chili powder if you want it more spicy.
    Serve it hot with hot steamed rice,ghee and fryums or as a side dish with sambar rice or rasam rice.

    Notes:
    • You can also pound 3-4 green chillies with 5-6 garlic pods and 1/4 cup grated fresh coconut and add it at the end for a variation.
    • If you do not have Garlic chili powder,increase the amount of garlic pods to 4-5 and also add 3/4 tsp red chili powder and salt at the end.
    • You can follow the same process for vegetables like potatoes,Taro root(Arbi) and Yam(kandagadda). It tastes delicious.
    raw banana stir fry

    Kobbari Louz | Coconut Ladoo Recipe | Easy Diwali Sweets

    $
    0
    0
    coconut ladoo 
    Let me wish all my readers and friends who are celebrating 'Happy Eid' well in advance.

    Coconut Ladoo (Nariyal Ladoo) which is also known as Kobbari Louz(Louse) or 'Kobbari Undalu' in Andhra is a very simple sweet to prepare. My mom prepares this mixture as a filling for Coconut Holige and Kudumulu (Modak) and we used to eat few portion of poornam just like that but we never had prepared it as a sweet by itself. My MIL prepares this ladoo quite often to use up the fresh coconuts which she has at home always. 
    kobbari louz
    Back home, my mom always prepares this by grating the fresh coconut leaving the black portions which is bit time consuming but worth the effort. My MIL takes the easy route by grinding the coconut pieces in a mixer to a coarse mixture and proceed with the recipe. You can prepare it either ways, but I would ideally vote for the freshly grated coconut because it retains the moisture of the coconut in a better way and also enhances the taste.
    coconut ladoo
    On those lazy days you can go ahead and grind the coconut pieces to a coarse mixture and proceed with the recipe, it tastes delicious either ways but the grated coconut ladoos are more juicier and soft. I have used ground coconut pieces in this recipe. Also jaggery plays a major role while making these kind of sweets, use a good quality jaggery to prepare this sweet. It is a simple and straight forward recipe with minimal ingredients that you cannot go wrong in any way. This recipe is definitely a saviour if you have to use the fresh coconuts at home, try this out!!
    kobbari louz
    Also check out other Sweet varieties for Diwali in my blog here:


    Kobbari Louz | Coconut Ladoo | Nariyal Ladoo Recipe:
    Yields: 10-12 ladoos | Shelf life: upto a week
    Prep time:15 mins | Cooking time: 15 mins | Total time: 30 mins
    Cuisine: Indian | Category: Sweets

    Ingredients:
    1 1/2 cups grated fresh Coconut
    1 cup grated good quality Jaggery
    1 tsp Ghee
    1/2 tsp Cardamom powder

    Method:
    • In a thick bottomed pan/kadai mix grated coconut and jaggery and cook it on a low-medium flame until the jaggery melts and coats the coconut and form a thick dry and sticky lumpy mixture. It takes 10-12 minutes and keep stirring it occasionally.
    • Add ghee and cardamom powder to it and mix well and let the mixture cool completely and prepare round balls out of it.
      Arrange them in a single layer and store it in an air tight container.
    coconut ladoo
    Notes:
    1. If you find it difficult to grate the fresh coconut, you can even grind the fresh coconut pieces in whipper mode to a coarse mix by running it in whipper mode.
    2. You can even replace jaggery with sugar in the recipe and follow the same process.
    3. The addition of cardamom powder makes it more flavourful, so do not miss it.

      nariyal ladoo 

    Garlic Karasev | Garlic(Lahsun) Sev | Easy Diwali Snacks Recipes

    $
    0
    0
    garlic kara sev
    Garlic Kara sev is also known as 'Poondu Karasev' in Tamil , 'Lahsun Sev' in Marathi and 'Velluli Karapusa' in Telugu. I have earlier posted a Kara Sev recipe earlier which is quite different in taste from the Garlic Sev. Our family loves the flavour of Garlic and we used it extensively in our cooking and this Garlic Kara Sev is no exception. We love this garlic flavoured spicy sev very much and always carry back few packs of it during our trips to Bangalore. 
    garlic sev
    If you have not tried garlic kara sev any time I highly recommend you to try this snack at least once, you will definitely love it and will also thank me for introducing you to this recipe. This is a very nice time pass snack to munch along with a cup of tea or coffee. When my mom visited us few months back I asked her to prepare this Garlic sev and I must say that it was so delicious and did not absorb much oil, it got over very quickly. Try this Garlic flavoured Kara sev during Diwali and share it with your loved ones and enjoy!! 
    lahsun sev
    Check out other Diwali savouries in my blog here:
    Also check out the wide collection of Diwali Sweets Recipes and Payasam/Kheer Varieties.

    garlic kara sev

    Garlic Kara Sev Recipe:
    Shelf life:15-20 days
    Prep time: 10 mins | Cooking time: 30 mins | Total time: 40 mins
    Cuisine: Indian | Category: Snacks/Savouries

    Ingredients:
    2 1/2 cups Bengal Gram flour (Besan)
    2 tsp hot melted Ghee
    2 tsp Red chili powder
    Oil, for deep frying

    to grind:
    5-6 small Garlic pods
    Salt to taste (1.5 tsp roughly)

    Method:
    • Remove the skin of garlic pods and grind it to a smooth paste with enough salt. Add some water if required while grinding. Strain it through a thin mesh strainer, press the paste with a spoon to get most of the juice and flavour from it. Throw the pulp and reserve the strained water.
    • Sieve besan and rice flour together.
    • Make a well in between and then add strained garlic mixture, red chilli powder and hot melted ghee and mix it nicely until the mixture is mixed nicely. Divide the flour into 2-3 portions.
    • Meanwhile heat oil in a deep heavy bottomed kadai for deep frying.
    • Sprinkle enough water to each portion separately and make the dough just before frying. The dough should neither be very smooth nor very thick. It should be soft and smooth, the mixture will be slightly sticky.
    • Use a 5 holed round disc(disc no:4 in the above pic ) of your murukku maker.
    • Fill one portion of the mixed soft dough in the murukku maker and squeeze directly in hot oil in circular motion. Do not make it very thick while squeezing, try to spread in a thin layer.
    • Fry them over medium-high flame until they turn golden brown in color and the bubbles subsides in the oil and then turn to the other side and fry again until you get golden in color.
    • Remove from oil using a perforated ladle and drain on a colander or kitchen napkin. Repeat the process of sprinkling water and kneading the dough and pressing into hot oil and frying with the remaining portions.
    • Once it is cooled down to room temperature you can store it in dry air-tight container. You can store it like the swirls or slightly crumble them while storing.
    Serve it as a snack with tea/coffee.

    garlic kara sev
    Notes:
    1. Instead of red chili powder you can soak 8-10 red chillies in water for 10-15 mins and grind it along with garlic to a fine paste.
    2. You can even use 1 tsp pepper corns along with garlic pods while grinding and reduce the red chili powder to 1 tsp if you are using peppercorns.
    3. Use medium sized garlic pods, if you are using large garlic pods reduce them to 3-4 pods.
    4. They stay good for 15-20 days in an air tight container.

      spicy garlic sev

    Karwa Chauth Recipes 2013

    $
    0
    0
    Karwa Chauth is a festival which is celebrated in most of North India and  is being celebrated on 22nd October this year. This Festival falls on the 4th day post the Full moon day and hence the term Chauth- while "Karwa" represents an Earthen Pot.
    On this day, married women observe fast during the day and break the fast only in the evening after seeing the moon. It is mainly done for the well being of the husbands. While this festival is not common in south, my MIL observes the fast on Karwa Chauth as she had spent most of her time in Delhi and hence got used to this custom.
    I am posting a collection of recipes, which might help you in planning an elaborate dinner on the occasion of Karwa Chauth.The collection below offers a good spread of recipes and in case you don't eat onion and garlic on that day, you can avoid those recipes and follow the menu accordingly.

    Sweets:
    Beverages:

    Appetizers/Snacks/Chaats:

    Accompaniments:
    Soups/Salads:

    Light Tiffins | Mini Meals:

    Main Course(Rice/Roti/Paratha):

    Side Dishes(Curry/Gravy/Dal):

    Desserts:

    Viewing all 520 articles
    Browse latest View live